Blog

  • Birthday Facts: 60+ Verified Stats, Month Data & History

    Birthday Facts: 60+ Verified Stats, Month Data & History

    Header: abstract visualization of birthday data and calendar patterns

    A birthday is the yearly anniversary of a person’s birth, marked with cake, candles, gifts, and songs. Here are the birthday facts worth knowing first: just 23 people give a 50.7% chance of a shared birthday, and September 16 is the most common US birthday. Sources and dates appear throughout.

    What Are Birthday Facts? Definition, Scope, and How We Verify Them

    Birthday facts cover a narrower, more testable territory than most birthday-themed pages suggest. This guide sticks to statistics, month symbols, celebrity birthdays, history, and probability math — and leaves out anything that can’t be traced to a named source.

    The one-sentence definition of a birthday (and why dates, not hours, matter)

    A birthday is the anniversary of a person’s birth — or, figuratively, the birth of an institution — as Wikipedia defines it. The distinction that matters for everything below is between a birth day and a birth date. The birth day comes around every year: January 15 is January 15. The birth date is the complete timestamp, like January 15, 2001. Paste that timestamp into a birthday calculator and you get both back at once: the day of the week you were born, your zodiac sign and birthstone, and how many days remain until the next anniversary.

    That calendar-based reckoning — not an hour-by-hour count — is exactly what makes the birthday paradox work. Two people match if they share a month and day, no matter what year they were born.

    What counts as a birthday fact — and what we leave out

    This guide sticks to five verifiable categories: statistical distributions and rankings; birth month symbols (zodiac sign, birthstone, birth flowers); celebrity birthdays and age calculation; history and cultural practice; and probability math.

    Deliberately excluded: any claim that a birth month determines personality, destiny, or guaranteed health outcomes. Birth month associations do surface occasionally as weak, dated correlations in research, and those show up in Chapter 7 with their sample years attached — never as predictions about a specific person.

    One reader trap worth flagging early: sharing a birthday with someone does not mean sharing a birth year. Working out age always takes the birth year plus today’s date.

    How we source and date every fact in this guide

    Every data point below carries its source and, where relevant, its year. Statements fall into two buckets: historical analyses (such as the 2006 New York Times birth-date table) and current facts (such as Google’s 2026 anniversary count).

    When a study is more than a few years old, treat it as a reference value, not a snapshot of the present. That rule applies to the 2011 longevity research and the 2014 athletic-development reporting cited later — both still useful, neither a current-year finding.

    Birthday Statistics: The Most Common Birthday and Why the Calendar Isn’t Flat

    If you only remember one number from this section, make it this: September 16 is the most common birthday in the United States. Everything else here explains why the calendar year is lopsided instead of evenly spread — and which dates sit down at the low end.

    What is the most common birthday in the United States?

    Researchers at Harvard University analyzed US birth records and found that September 16 is the most common birthday in the United States — with September 9 right behind at No. 2 — as reported by The New York Times in 2006.

    That dataset is still the most widely cited baseline for US birth-date distribution, which is why the year stays attached here. It’s a historical analysis, not a live count — if you need current-year figures, check the latest official natality statistics.

    September is also the peak birth month overall in the US, not just a single standout date. The busiest stretch of the year runs through late summer and early fall.

    One more headline number, as a preview: According to Wikipedia’s “Birthday problem” entry, 23 people are enough for a 50.7% chance that two of them share a birthday, and 70 people push that probability to 99.9%. The full derivation is in Chapter 5.

    Why birth dates cluster: seasonality, holidays, and scheduled births

    US birth dates aren’t evenly spread, and the causes are mostly mechanical rather than mystical.

    Conception seasonality is the first driver. A peak in conceptions nine months earlier shows up as a peak in births — part of why the September window carries so much volume.

    Scheduling is the second. Planned inductions and C-sections tend to avoid weekends and major holidays, which pushes births down on dates like December 25 and January 1 and concentrates them on nearby weekdays. Hospital staffing and operating-room calendars reinforce the same pattern.

    So when someone asks why their birthday feels like it keeps colliding with other people’s, the answer is usually that it sits inside one of these high-volume weekday clusters, not on a holiday.

    The rarest birthdays: February 29 and December 25

    February 29 is the rarest birthday on the calendar because it only exists in leap years. As Wikipedia notes, it’s the one date that doesn’t occur annually — every other birth day comes back each year regardless of the calendar cycle.

    Roughly speaking, that date appears about once every 1,461 days, which is why people born on it accumulate “real” birthdays at about a quarter of everyone else’s rate. Chapter 7 covers how that affects legal age and ID renewals in the US.

    December 25 sits at the opposite end for a different reason. It’s a real, annual date, but births on it get pushed down by the same holiday-avoidance scheduling that lifts weekday counts elsewhere. The practical upshot: fewer people share Christmas as a birthday than the calendar’s symmetry would suggest.
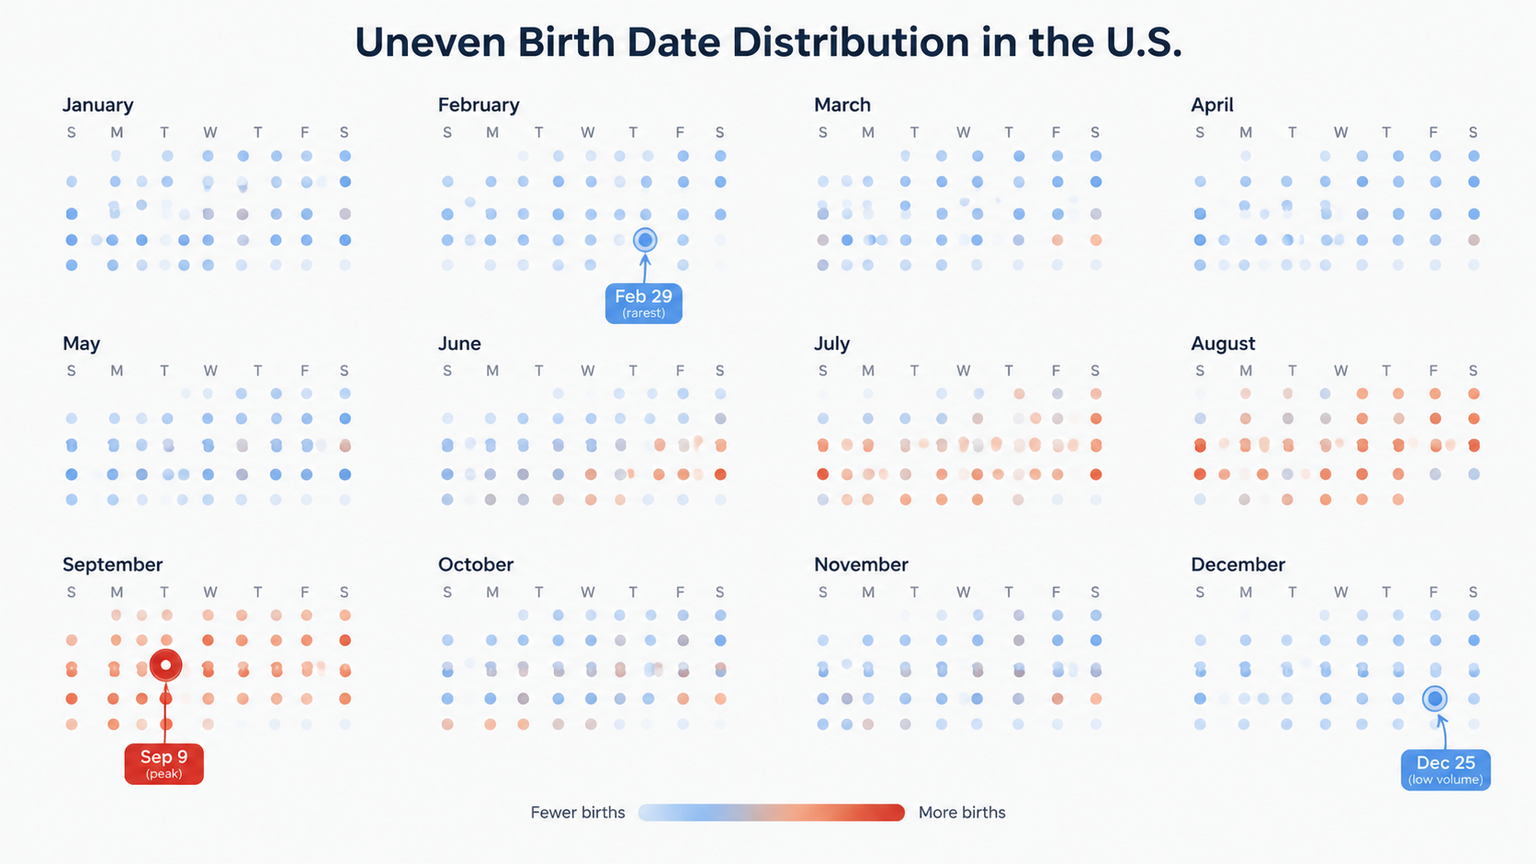
    US birth date distribution showing peak (Sep 16) and low-volume dates

    Birth Month Facts: Zodiac Signs, Birthstones, and Birth Flowers for All 12 Months

    Most sites split zodiac signs, birthstones, and birth flowers across three separate pages. The table below puts all three side by side so one lookup answers the whole thing.

    The 12-month table: zodiac sign, birthstone, and birth flowers side by side

    The zodiac ranges below follow the conventional Western sun-sign boundaries used by the Random Birthday Generator. Birthstones follow traditional month associations.

    Month Zodiac sign (conventional range) Birthstone Birth flower(s)
    January Capricorn (Dec 22–Jan 19), Aquarius (Jan 20–Feb 18) Garnet Carnation, snowdrop
    February Aquarius (Jan 20–Feb 18), Pisces (Feb 19–Mar 20) Amethyst Violet, primrose
    March Pisces (Feb 19–Mar 20), Aries (Mar 21–Apr 19) Aquamarine Daffodil, jonquil
    April Aries (Mar 21–Apr 19), Taurus (Apr 20–May 20) Diamond Daisy, sweet pea
    May Taurus (Apr 20–May 20), Gemini (May 21–Jun 20) Emerald Lily of the valley, hawthorn
    June Gemini (May 21–Jun 20), Cancer (Jun 21–Jul 22) Pearl, alexandrite Rose, honeysuckle
    July Cancer (Jun 21–Jul 22), Leo (Jul 23–Aug 22) Ruby Larkspur, water lily
    August Leo (Jul 23–Aug 22), Virgo (Aug 23–Sep 22) Peridot, spinel Gladiolus, poppy
    September Virgo (Aug 23–Sep 22), Libra (Sep 23–Oct 22) Sapphire Aster, morning glory
    October Libra (Sep 23–Oct 22), Scorpio (Oct 23–Nov 21) Opal, tourmaline Marigold, cosmos
    November Scorpio (Oct 23–Nov 21), Sagittarius (Nov 22–Dec 21) Topaz, citrine Chrysanthemum, peony
    December Sagittarius (Nov 22–Dec 21), Capricorn (Dec 22–Jan 19) Turquoise, zircon Narcissus, holly

    Two boundary details matter because people commonly get them wrong. Libra covers September 23 through October 22, and Scorpio begins October 23 — the switch does not happen at mid-month. Likewise, Virgo runs from August 23 through September 22, and Leo covers July 23 through August 22.

    People born within a day or two of a boundary are often called “on the cusp” — a label the generator notes is conventional, not scientific.

    October birthday facts: opal, tourmaline, marigold, and the Libra-to-Scorpio cusp

    October is one of the symbol-richest months of the year, carrying two birthstones, two birth flowers, and a zodiac split.

    October babies have two birthstones — opal and tourmaline — according to Happiest Baby. Opal is known for its color-shifting quality, while tourmaline comes in multiple shades: black tourmaline is associated with confidence and protection, pink tourmaline with love and compassion, and green tourmaline with strength and stamina.

    The month’s two birth flowers are marigold and cosmos. Marigolds, also called calendula, show up frequently in healing lotions, and cosmos is the second traditional bloom for October.

    Zodiac placement splits cleanly: birthdays through October 22 fall under Libra, and October 23 onward falls under Scorpio. Since the current date is early October 2026, anyone born this month sits in the Libra-to-Scorpio transition window and inherits both the dual gems and the dual flowers.

    September birthday facts: the most common birth month’s symbols

    September’s birthstone is sapphire, traditionally linked with wisdom, sincerity, and faithfulness. The classic sapphire is deep blue, though the gem appears in several colors.

    September also carries two birth flowers — aster and morning glory. Asters have daisy-like blooms often tied to love and wisdom, while morning glories are known for colorful, trumpet-shaped flowers.

    The September zodiac split runs Virgo through September 22 and Libra from September 23 onward. Add in September 16’s status as the most common US birthday, and the month pairs unusually high birth volume with a full set of symbols.

    Do birth months predict personality or health?

    Birth month and personality are not connected in any way this guide treats as established. Zodiac descriptions are traditionally assigned traits, and the generator itself labels its zodiac ranges as conventional rather than scientific.

    The health and performance research that does exist is correlational and date-stamped. Two examples appear in Chapter 7 — a 2011 longevity study and 2014 reporting on athletic development — and both come with specific samples, years, and caveats.

    The honest summary: birth month is a real, useful label for symbols and statistics. It is a weak, heavily qualified variable for anything about the actual person.

    Celebrity Birthdays: How Age Is Calculated and Why ‘Famous Birthdays’ Became a Data Business

    Celebrity birthday pages look simple, but they contain one recurring arithmetic trap. Reading them correctly takes about ten seconds of subtraction.

    How to calculate a celebrity’s age in 2026

    The rule: read the birth year first, then compare today’s date against the birthday. If the birthday has already passed this year, age equals current year minus birth year. If it hasn’t arrived yet, subtract one more.

    Keanu Reeves was born on September 2, 1964. As of September 2, 2026, he turns 62; before that date in 2026, he was 61. That parenthetical format — age shown as current-until-birthday — is the standard convention on celebrity birthday pages, and it’s why the same page can show two different numbers a week apart. To skip the subtraction, an online age calculator applies the same rule automatically: enter a birth date and it reads out the exact age as of today.

    The same logic applies across the board. Andrea Bocelli, Joan Jett, and Tom Felton all share a September 22 birthday, and Bored Panda’s 2026 list records their ages as 68, 68, and 39 respectively — numbers that only hold from that date forward until the next birthday.
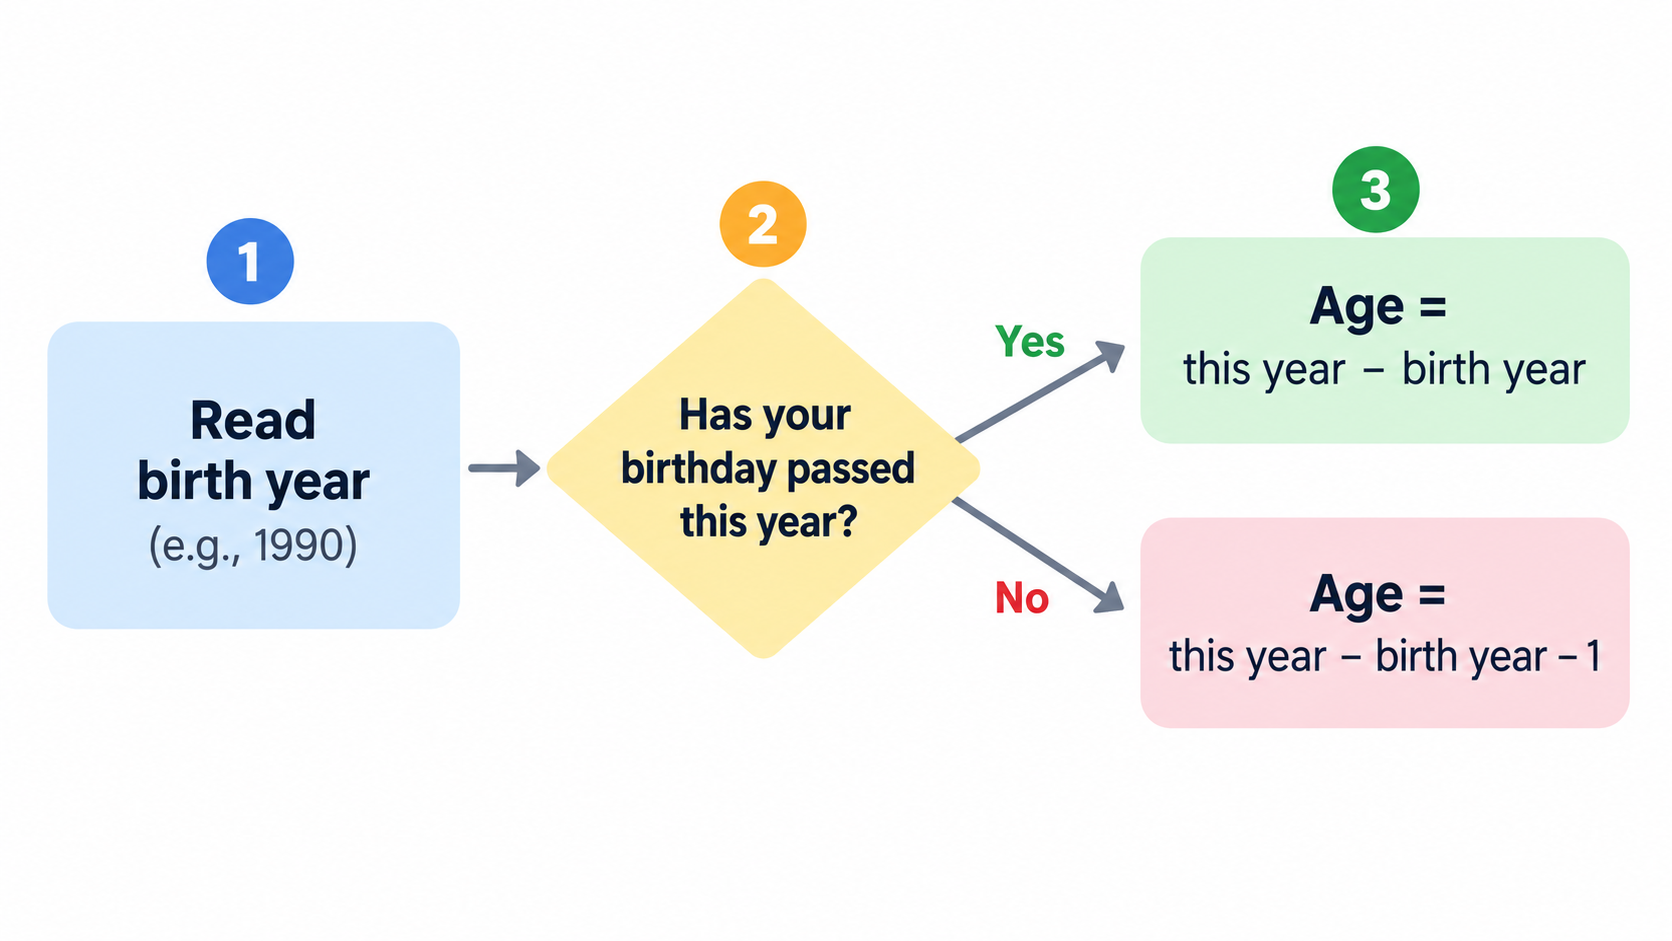
    Simple 3-step age calculation decision flow

    Inside the Famous Birthdays catalog: scale and influence

    Famous Birthdays is an American website based in Santa Monica, California, dedicated to cataloging famous people’s birthdays alongside other biographical facts.

    Its history has two distinct phases. The original site was created by Edward Morykwas, a Michigan schoolteacher, in 1996, and it offered e-cards. The current format launched on November 7, 2012, under Evan Britton, who has described the site as “Wikipedia for Generation Z.”

    The scale figures are the part worth keeping dated: as of January 2018, it held over 150,000 biographies, and as of June 2024, it drew 20 million unique visitors each month.

    Its cultural weight is a separate matter. Journalist Taylor Lorenz, writing in 2019, described a Famous Birthdays page as a “status symbol” or “badge of honor” for internet personalities, noting the site’s teenage and Generation Z audience. The site’s growth tracked a shift from traditional celebrities toward internet personalities, after Britton noticed visitors searching for people he did not recognize.

    How to read a celebrity birthday list critically

    Celebrity birthday roundups are frequently AI-assisted or user-submitted. The Bored Panda list cited above carries an explicit “AI-assisted post” label and credits Wikimedia Commons for its images — a transparency practice worth checking for.

    For casual sharing, that’s fine. For citation, the reliable move is to trace the birth date back to a primary or well-documented secondary source rather than repeating the aggregator.

    Age deserves a second caution. Any list that hard-codes an age without a reference date will drift out of accuracy within twelve months. Treat every stated age as valid only for the date it was published.

    The Birthday Paradox: The Math That Makes Birthday Facts Feel Impossible

    This is the part of birthday math that reliably surprises people, and it’s genuinely counterintuitive — not a trick.

    The birthday paradox in numbers: 23 people, 253 pairs, 50.7%

    According to Wikipedia’s “Birthday problem” entry, in a group of 23 randomly chosen people, the probability that at least two share a birthday is 50.7%. At 70 people, it reaches 99.9%. At 366, a repeat is guaranteed.

    Why it feels wrong: your intuition is answering a different question. People mentally calculate the chance that someone shares their birthday, which stays low. The actual problem compares every possible pair.

    With 23 people, there are 23 × 22 ÷ 2 = 253 pairs to consider. That’s the whole trick: 253 comparisons at roughly a 1-in-365 match rate each produces a coin-flip outcome.

    Wikipedia’s probability table lays out the curve: 5 people give 2.7%, 10 give 11.7%, 23 give 50.7%, 30 give 70.6%, 50 give 97.0%, and 70 give 99.9%. The problem is generally attributed to Harold Davenport around 1927, though the first published version came from Richard von Mises in 1939.
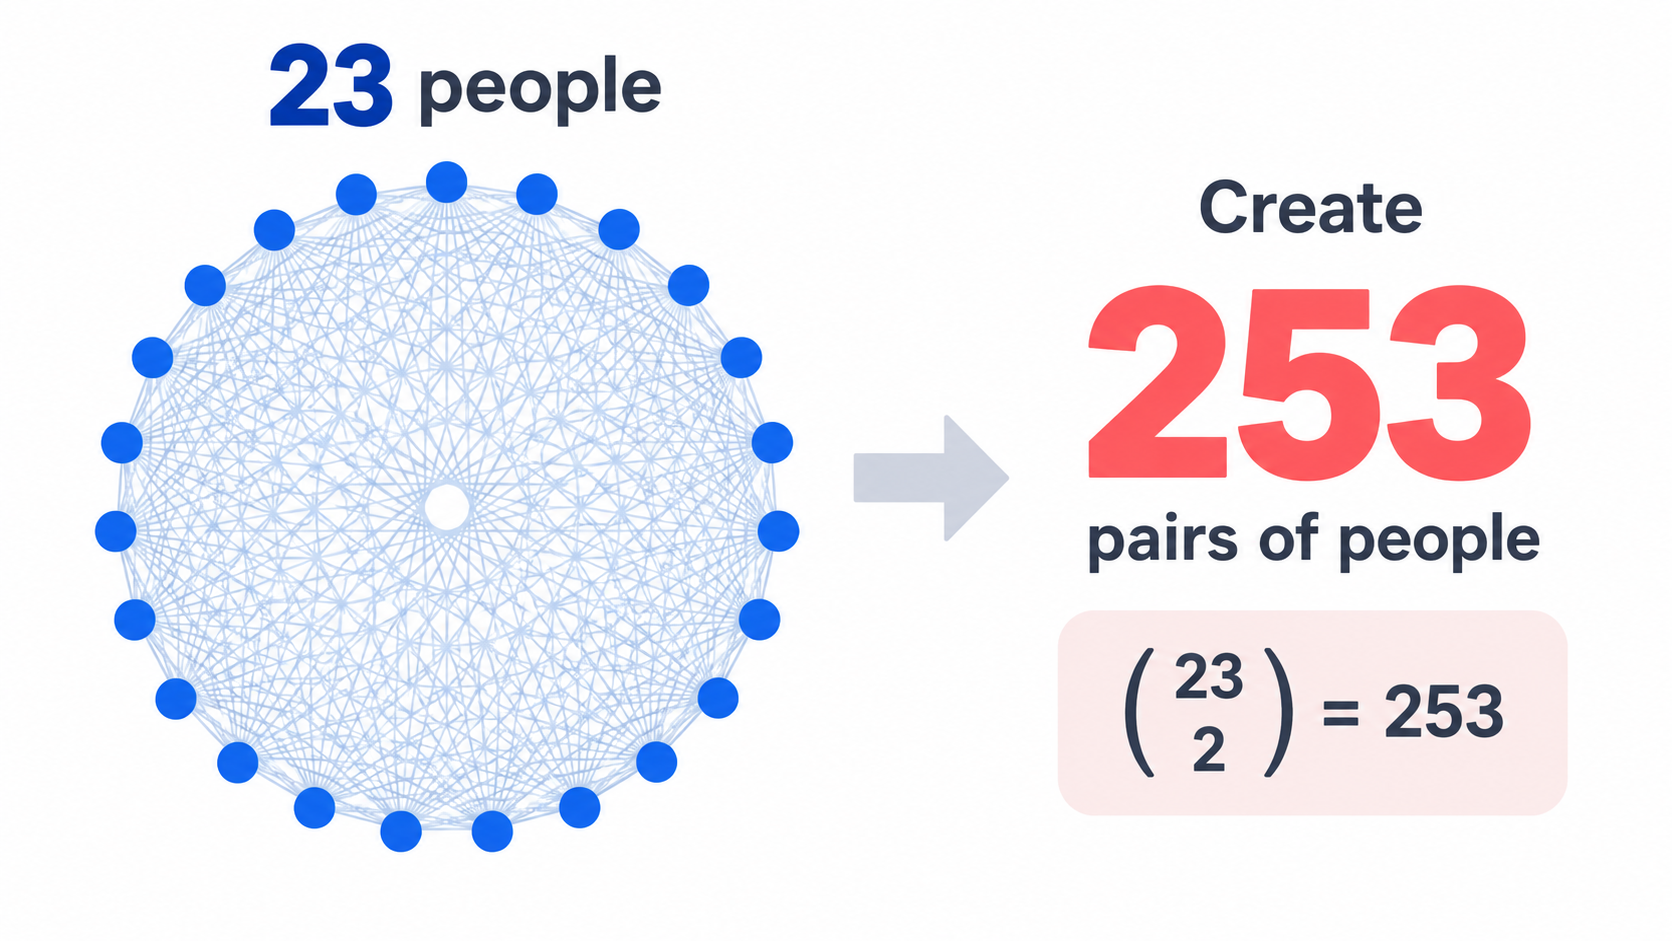
    Birthday paradox: 23 people creating 253 pairs to reach 50.7% probability

    Real-world proof: shared birthdays among the Apollo astronauts

    The most frequently cited real-world example comes from the lunar astronauts. Among 24 Apollo astronauts, there are 276 comparable pairings, and 3 of those turn out to be shared birthdays — as illustrated in the birthday-attack comparison chart in Wikipedia’s birthday problem article.

    That’s a small sample behaving exactly as the math predicts, and it makes a clean classroom demonstration: the group is small enough to list by name and large enough that the match isn’t a fluke.

    Why tech cares: birthday attacks, hash collisions, and test data

    The same structure that produces party surprises also breaks cryptographic assumptions. The birthday attack uses this probabilistic model to cut down the complexity of finding a collision for a hash function, and the same math estimates collision risk for a given population size.

    The practical rule: the expected number of N-bit hashes generated before a collision is not 2^N but roughly 2^(N/2). Wikipedia’s comparison table shows the collision thresholds across hash sizes, with the birthday problem placed alongside a SHA-256 example using 16 variants each of benign and harmful contracts — 1 collision appeared out of 256 pairings.

    The birthday problem has non-security uses too. It has been applied under the name capture-recapture statistics to estimate fish populations in lakes, and it’s a standard tool for modeling coincidences and for stress-testing data pipelines where duplicate keys are assumed to be rare.

    Birthday History and Culture: Cake, Candles, Wishes, and Coming-of-Age Milestones

    Modern birthday customs blend ancient ritual, medieval naming practice, and industrial-era economics.

    Where birthday cake and candles come from

    One origin thread traces the candle-topped cake to ancient Greece, where round cakes topped with lit candles were offered to Artemis, with the round shape referencing the moon. A second thread runs through 18th-century Germany and the Kinderfeste tradition, where a cake with candles marked a child’s birthday.

    The most repeated explanation — that the smoke carries the wish to the gods — is an inherited piece of custom rather than a documented historical fact, and it should be described that way.

    The mechanics of the modern wish are better documented. As Wikipedia notes, a birthday cake may be decorated with the person’s name and age, or studded with as many lit candles as the person’s age. The celebrant makes a silent wish and tries to blow out every candle in one breath; if they succeed, superstition holds the wish will be granted. In many cultures the wish has to stay secret or it won’t come true.

    The shift from aristocratic custom to mass practice came with economics. Falling sugar prices after the Industrial Revolution and the spread of commercial baking made cake affordable well beyond the nobility.

    Coming-of-age birthdays: Sweet 16, quinceañera, bar/bat mitzvah

    Different cultures mark the same biological milestone with different birthdays and different ceremonies.

    In Canada and the United States, families often mark a girl’s 16th birthday with a “sweet sixteen” celebration — something popular culture has reinforced heavily. In some Hispanic countries and in Brazil, the quinceañera — or festa de quinze anos — traditionally marks a girl’s 15th birthday.

    Jewish boys have a bar mitzvah on their 13th birthday. Jewish girls have a bat mitzvah on their 12th birthday, or sometimes on their 13th in Reform and Conservative Judaism. As Wikipedia explains, this marks the transition where they become obligated in commandments from which they were previously exempted and are counted as part of the community.

    Japan’s Coming of Age Day celebrates everyone who has turned 18. The Philippines holds a debut for young women at 18 and young men at 21. Korea marks both Baek-il, the 100th-day feast, and Doljanchi, the child’s first birthday.

    How different countries mark the same day

    The core legal concept is shared even where customs diverge. In most legal systems, a person becomes a legal adult on the birthday when they reach the age of majority — usually somewhere between 12 and 21 — and specific ages unlock specific rights: leaving full-time education, military enlistment, marriage with or without parental consent, voting, running for office, buying alcohol or tobacco, buying lottery tickets, or getting a driver’s license.

    Some places complicate the counting itself. In China, traditional birthdays were reckoned using the lunisolar calendar, which can vary from the Gregorian calendar by as much as a month in either direction; celebrating the lunisolar birthday remains common in Taiwan while growing less common on the mainland. South Korea used multiple age systems until June 2023, when all Korean ages were set back at least one year and official ages became reckoned only by birthdays.

    One more wrinkle worth knowing: many cultures also observe a name day, or saint’s day — celebrated much like a birthday, but keyed to the saint sharing the person’s name rather than their birth date.

    US Birthday Facts: Peak Dates, Age Milestones, and Being Born on February 29

    This section concentrates the US-specific data readers most often need to cite, with each figure’s year attached.

    US birth distribution: peak months and the quietest dates

    The headline US figure is still September 16 as the most common birthday, based on a Harvard University analysis of US birth records reported by The New York Times in 2006. September is the busiest birth month overall.

    The quietest stretch of the calendar runs through weekends and major holidays, where scheduled deliveries are deliberately steered away. December 25 and January 1 are the standard examples. February 29 is the rarest date overall because it only exists in leap years.

    Cross-referencing with symbol data adds a practical detail: a September 16 birthday falls under Virgo (Virgo runs through September 22), carries sapphire as a birthstone, and picks up aster and morning glory as birth flowers.

    Age milestones in the US: what actually changes at 18 and 21

    Two ages carry the most cultural weight in the US. Eighteen is generally when voting rights and legal adulthood arrive in most states; 21 is when the drinking age applies nationwide.

    Beyond those two, the picture fragments. Renting a car, signing a contract, buying a firearm, and other rights vary by state — and whether a right activates on the birthday itself or on a different administrative date depends on the jurisdiction and the specific law.

    The safe way to phrase any of these: reaching 18 or 21 marks the general threshold, but the exact effective date and scope should be checked against the relevant state’s rules, not assumed.

    February 29 births create a set of small but real administrative questions. Because the date doesn’t occur in non-leap years, US practice commonly treats February 29 babies as reaching a given age on March 1 or February 28 of non-leap years for legal and identification purposes.

    The generator tool’s software convention offers a useful contrast: it advances February 29 ages on March 1 in non-leap years, and explicitly labels that as a software convention rather than a legal age rule. That distinction is worth keeping — agencies and systems don’t all handle it the same way, so a leap-day birthday is one case where checking the specific rule ahead of time saves trouble.

    The celebratory math is simpler. A February 29 baby accumulates roughly one quarter as many “actual” birthdays as peers of the same age, which is why many choose February 28 or March 1 for parties in common years.

    One more US data point worth carrying with its year: a 2011 study in the Journal of Aging Research found that people born from September to November were more likely to reach age 100 than those born in other months. The study compared American centenarians with their siblings and spouses, and it’s a historical analysis rather than a current-year finding.

    A second dated finding: research reported by The Guardian in 2014 indicated that autumn-born children showed stronger athletic performance, with the leading explanation being the “relative age effect” — being older and bigger than classmates within the same school cohort. Both findings are correlational, and neither predicts an individual outcome.

    Time-Sensitive Birthday Facts for 2026: Google’s Birthday and Today’s Celebrity Lineup

    This section holds the numbers that change from year to year. Last updated: October 2026.

    When is Google’s birthday, and how old is it in 2026?

    Google’s birthday has a genuine ambiguity built into it. The company was incorporated on September 4, 1998, but it officially celebrates its birthday on September 27 each year — and ClickOnCare’s 2026 milestone summary notes that tradition has been tied to September 27, with the celebration reported as running since 2002.

    In 2026, Google marks its 28th birthday. The 1996 predecessor project, “Backrub,” was built by Larry Page and Sergey Brin at Stanford; the domain google.com was registered in 1997, and the company was officially founded in 1998.

    That gap between incorporation date and celebration date is the interesting part. A business can pick a birthday; a person can’t.

    Today’s celebrity birthdays: how to keep this section current

    Daily celebrity birthday lists exist at scale. Bored Panda maintains a running Celebrity Birthdays hub with daily posts, and the September 22, 2026 edition lists ten figures: Andrea Bocelli, Joan Jett, Tom Felton, Tatiana Maslany, Billie Piper, Bonnie Hunt, Nick Cave, Teyonah Parris, Mireille Enos, and Jessie Murph.

    The ages in that list — 68, 68, 39, 41, 44, 65, 69, 39, 51, and 22 — were correct as of September 22, 2026 and change on each person’s next birthday. Apply the Chapter 4 formula instead of copying the number.

    This is the section readers should re-check rather than trust from memory. Any age, anniversary count, or daily lineup listed here carries an implicit expiration date.

    Global birthday traditions: cake, candles, and coming-of-age ceremonies

    How to Use These Birthday Facts: Party Icebreakers, Classroom Math, and Content Ideas

    The data above works better as an activity than as a fact list. Here are three settings where it shines, plus one tool that removes the manual labor.

    Party and classroom activities using birthday statistics

    The strongest opener is the 50.7% figure from Wikipedia’s birthday problem entry. At a gathering of 23 or more, announce the number, then have guests pair up and compare birthdays. The result validates the paradox live, and the explanation — 253 pairs, not 22 comparisons — is the payoff.

    For a classroom, run the same activity, then move to the Apollo astronaut case: 24 astronauts, 276 pairings, 3 shared birthdays. Students can check the predicted range against a real, nameable group, which turns an abstract probability lesson into a data-checking exercise.

    The extension for advanced groups is the birthday attack. Same math, different stakes: a collision that’s a party trick in one context is a security vulnerability in another.

    Generating sample birthday data for tests, games, and content

    Manual birthday generation doesn’t scale. The Random Birthday Generator produces fictional dates in batches of up to 1,000, with three generation modes: age range, custom date range, or month-and-day only (no birth year).

    Each result can include the date, calculated age, weekday, Western zodiac sign, and birthstone. Exports come as CSV or JSON, and there’s a no-duplicates option plus an explicit February 29 toggle. Everything runs in the browser — the tool states that generation, exports, and card creation happen on the user’s device, with no account required.

    The intended uses are character profiles, tabletop games, form and calendar testing, and classroom sampling. The tool’s own documentation is clear that results are fictional sample data and should never be used as identity information, for verification, or in official records.

    One implementation detail worth knowing if you’re building on top of it: the tool labels its zodiac ranges as approximate Western sun-sign dates intended for entertainment, and its birthstones as traditional month associations.

    Content and quiz ideas built on birth month symbols

    The 12-month table in Chapter 3 is designed to be reused directly. Three recurring formats work well:

    • Month symbol posts. One month per post, combining its zodiac range, birthstone, and birth flowers. Chapter 3 covers September and October as worked examples.
    • Same-day challenges. Pair a shared birthday (like September 22, 2026) with the ages and the paradox math to produce a “who else shares your day” post.
    • Quiz questions. Turn the probability table into a five-question quiz: how many people for 50.7%? How many for 99.9%? How many pairings exist among 23 people?

    Any content built this way should carry its source and year, exactly as this guide does.

    Conclusion

    Birthday facts are a set of verifiable data points: a 50.7% shared-birthday chance at just 23 people, September 16 as the most common US birthday, and a full 12-month table of zodiac signs, birthstones, and birth flowers. Use this guide selectively — cite Chapters 2 and 7 for US statistics with their years attached, run the Chapter 9 activities for parties and classrooms, and export CSV or JSON from the generator when you need sample data in bulk. Any number that changes over time should be re-checked against the last-updated date noted in each section.

    FAQ

    What is the most common birthday in the United States?

    September 16, according to a Harvard University analysis of US birth records reported by The New York Times in 2006. September 9 is a close second in the same dataset. September as a whole is the peak birth month, while weekends and major holidays see noticeably lower birth rates because scheduled deliveries avoid them. That figure is a historical dataset — check current official natality statistics for year-by-year data.

    How many people need to be in a room for a 50% chance of a shared birthday?

    Twenty-three people produce a 50.7% probability. The reason: the comparison covers every pair, not just one person against the rest — 23 people create 253 pairs. At 70 people the probability reaches 99.9%, and at 366 a repeat is guaranteed. Among 24 Apollo astronauts, 3 shared birthdays appeared across 276 pairings.

    Which birthstones and birth flowers belong to October babies?

    October carries two birthstones, opal and tourmaline, and two birth flowers, marigold and cosmos. Opal is known for its shifting color, and tourmaline appears in black, pink, and green varieties. On the zodiac side, Libra runs through October 22 and Scorpio begins October 23, so an October birthday falls on one side of that split.

    Why do we make a wish and blow out candles on a birthday cake?

    One origin thread traces the practice to ancient Greece, where round cakes with lit candles were offered to Artemis — the round shape referencing the moon. A second thread runs through the 18th-century German Kinderfeste tradition of a candle-topped cake. The popular explanation that smoke carries the wish to the gods is inherited custom rather than documented history.

    When is Google’s birthday, and how old is Google in 2026?

    Google was incorporated on September 4, 1998, but officially celebrates its birthday on September 27, a tradition reported as running since 2002. In 2026, Google marks its 28th birthday. The split between incorporation date and celebration date is common for companies, and contrasts with a person’s single legal birth date.
  • Compress BMP Files: 3 Proven Ways to Shrink Them Fast

    Compress BMP Files: 3 Proven Ways to Shrink Them Fast

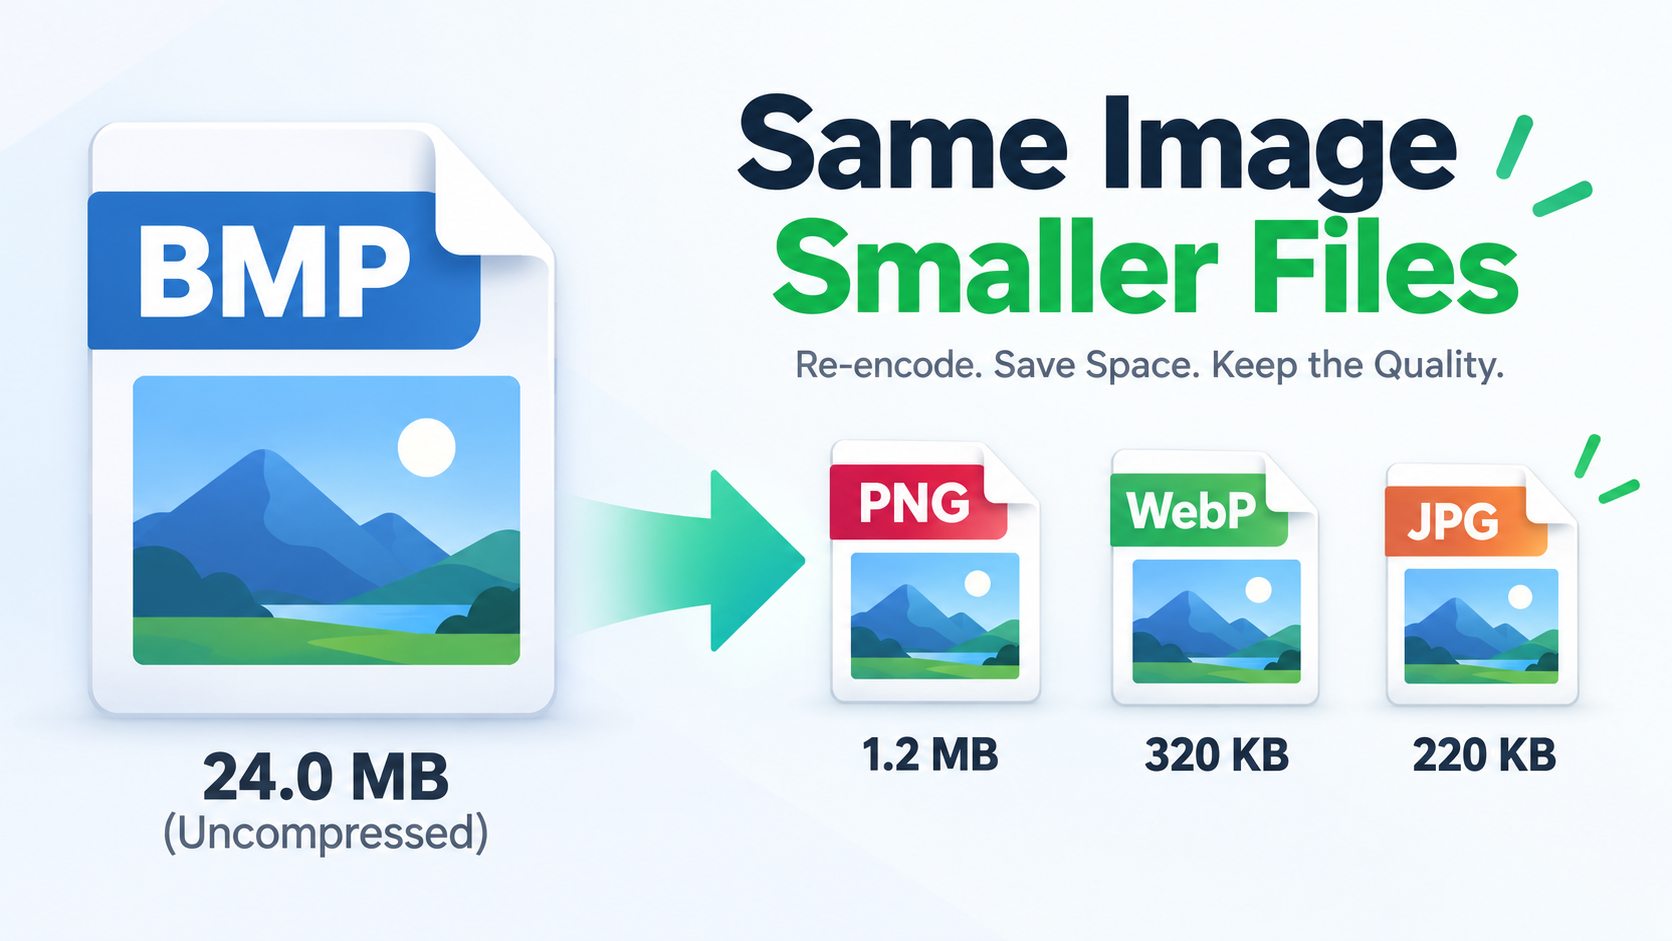
    Header: A large BMP file becoming smaller PNG, WebP, and JPG files

    BMP stores every pixel uncompressed, so you can’t compress BMP much while keeping the .bmp extension. The practical fix is to re-encode as PNG or WebP for lossless savings, or JPG for photos — usually cutting file size by more than half.

    How to Compress a BMP File: The Three Paths That Actually Work

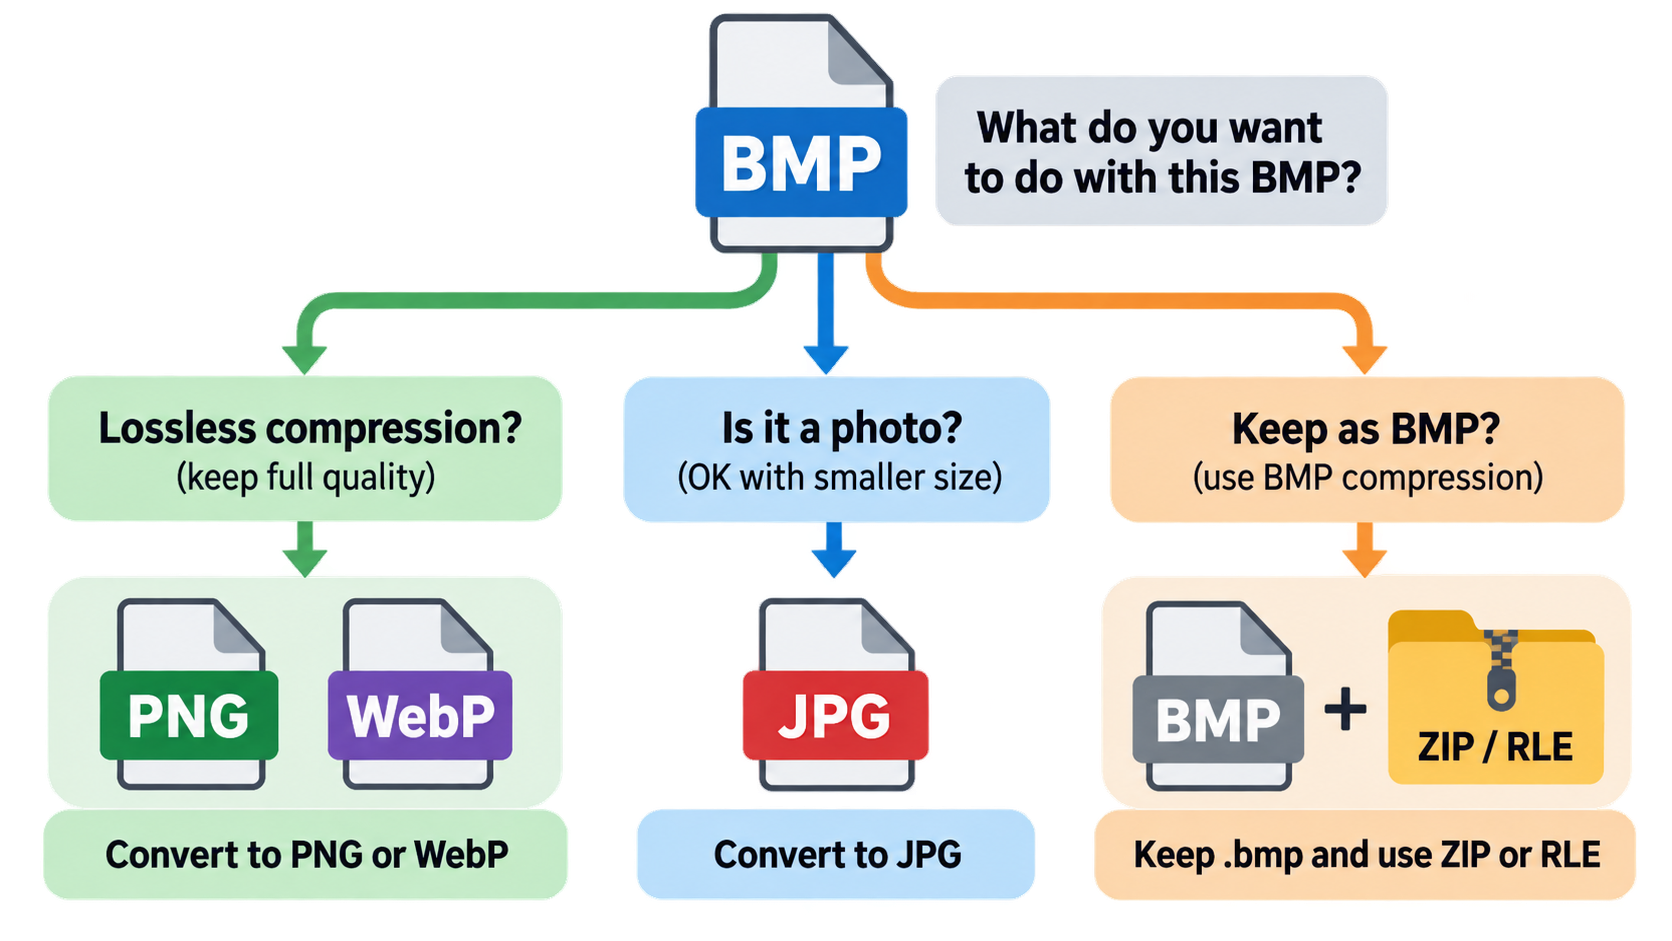
    Before you open a tool, know that “compress BMP” isn’t a single operation. There are three real paths, and only one of them keeps the .bmp extension. Pick the wrong one, and you can spend an hour dragging sliders only to end up with a file that’s barely smaller.

    Path A — re-encode to PNG or WebP. This is lossless re-encoding. Every pixel you get back matches the one that went in, but the file is usually 60–80% smaller. Why? The encoder removes redundancy BMP never bothered to remove. It’s the best fit for screenshots, line art, logos, and CAD or GIS exports.

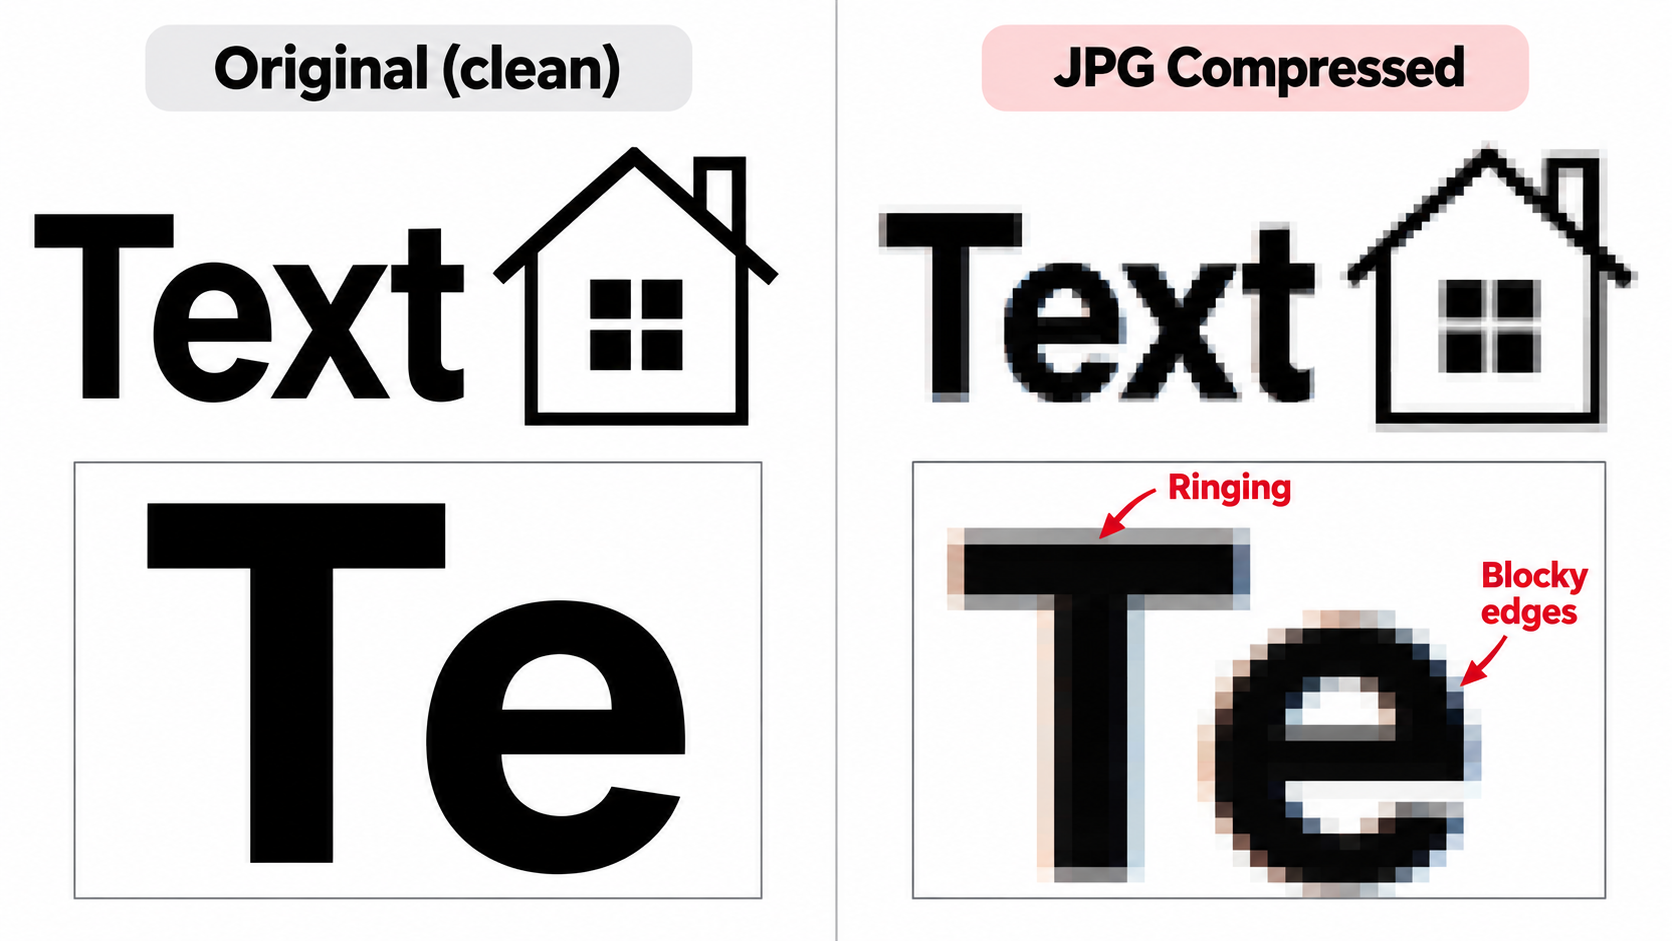
    Path B — re-encode to JPG. This is lossy, and it gives you the smallest file for photographs. It also adds visible ringing and blocking around text and hard edges, which is why it’s a poor choice for anything that looks like a diagram.

    Path C — keep the .bmp extension. ZIP or Deflate archiving, RLE encoding, or reducing bit depth and DPI. These are real, working options, but the savings are modest compared with a format change.

    The one-line decision shortcut: photograph → JPG or WebP; screenshot, line art, or scan → PNG; web page asset → WebP; must stay .bmp → ZIP or RLE.

    Three-path BMP compression decision flow

    Path A: Re-encode to PNG or WebP (Lossless)

    PNG is the default lossless target. It applies Deflate compression to the raw pixel data, and according to CoolUtils, that cuts BMP file size by 60–80% with no quality difference. WebP offers a lossless mode that generally goes smaller still, and it is supported by every current major browser.

    Because nothing is discarded, this path is safe for images where accuracy matters: screenshots of application UIs, scanned pages that need to stay legible, monochrome technical drawings, and exported maps. You can verify the result by opening both files side by side at 100% zoom — they should be indistinguishable.

    Path B: Re-encode to JPG (Smallest, Photos Only)

    JPG wins on raw byte count for photographs, where smooth gradients and fine noise tolerate lossy compression well. The trade-off is real but localized. Compression artifacts appear first around sharp transitions, which is precisely where text, table borders, and thin vector-like lines live.

    Use JPG for camera output and continuous-tone imagery. Do not use it for screenshots of documents, terminal windows, or CAD drawings — the text becomes fuzzy at exactly the zoom level people use to read it.

    Path C: Keep the .bmp Extension (Limited but Possible)

    Some pipelines cannot accept PNG. Legacy Windows software, industrial control panels, and older medical imaging systems expect raw bitmap data, and swapping the extension breaks the workflow. In that case your options are general-purpose lossless archiving, BMP’s own RLE encoding for indexed images, or reducing the bit depth or pixel dimensions. Each works; none gets you close to what PNG would deliver. The next section covers each in detail.

    Why BMP Files Are So Large: The Windows Bitmap and Its Uncompressed Pixels

    BMP is one of the oldest image formats on the IBM PC. According to Wikipedia, the format was first released by Microsoft in December 1987, and the modern file structure most applications write today arrived with Windows 3.0 in 1990. Its history is visible in the header sizes: the 12-byte BITMAPCOREHEADER was the original, the 40-byte BITMAPINFOHEADER came with Windows 3.0 in 1990, the 108-byte BITMAPV4HEADER arrived with Windows 95 and NT 4.0, and the 124-byte BITMAPV5HEADER came with Windows 98 and Windows 2000.

    The reason for the size problem sits in the pixel format, not the header. BMP defaults to BI_RGB, meaning every pixel is stored literally on disk. There is no entropy-coding step, no dictionary, no prediction — nothing that looks at the image as a whole and removes repetition. The bytes on disk are essentially a dump of the frame buffer.

    This reframes the entire task: “compressing” a BMP is really a re-encoding decision. It is not a quality slider you drag until the number gets small enough.

    The Pixel Array, Row Padding, and the Size Formula

    For an uncompressed bitmap, the pixel array is written as successive scan lines, each rounded up to a multiple of 4 bytes — the padding is called the stride, and the pad bytes are not necessarily zero. Total pixel data lands at roughly width × height × bytes-per-pixel, plus padding overhead. Color tables, when present for indexed images, add a small fixed amount.

    That formula is also the diagnostic. If a file is unexpectedly huge, either the pixel dimensions are large, the bit depth is 24 or 32, or both. There is nothing hidden to blame.

    Bit Depth and DPI: Why a 300 DPI Scan Hits 25 MB

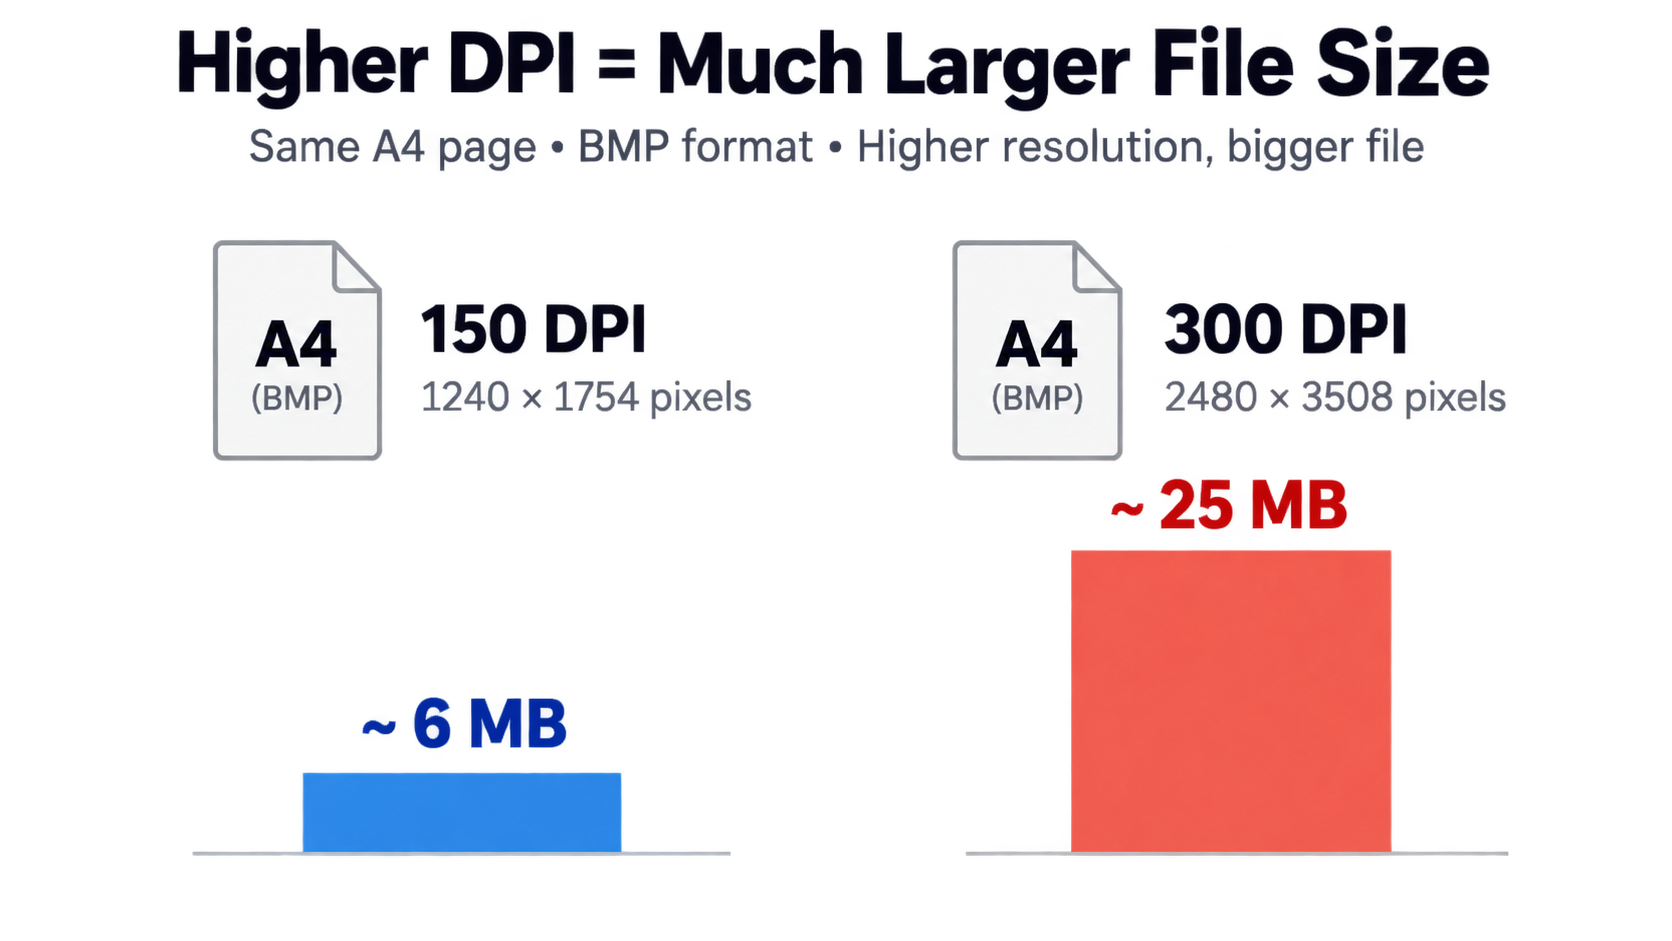
    Size scales with both bit depth and resolution, and print-oriented scans push both up at once. CoolUtils puts a single A4 page rendered at 150 DPI (1240 × 1754 pixels, 24-bit color) at roughly 6 MB as a BMP. The same page at 300 DPI reaches about 25 MB.

    A 300 DPI A4 page is 2480 × 3508 pixels — four times the pixel count of the 150 DPI version — and at 24 bits per pixel that multiplication lands directly on the file size. This is why scanned documents and PDF-to-BMP exports produce files that resist email attachment limits.

    A4 BMP size at 150 DPI vs 300 DPI

    Compressing a BMP Without Changing the Format

    This is the question most tool pages skip: sometimes the extension simply cannot change. Legacy Windows applications such as Paint, older medical imaging software, and industrial control panels expect raw bitmap data rather than a compressed image, and a PNG renamed to .bmp will not load. If you are in that situation, four options remain.

    Option 1 — general-purpose lossless archiving. Wikipedia notes that because uncompressed BMP files hold a great deal of redundant data, they can often be reduced substantially by general-purpose lossless compression such as ZIP or RAR. Nothing about the image changes; you simply wrap it in a container that removes the repetition. The downside is that the recipient must decompress before opening.

    Option 2 — BMP’s own RLE encoding. BI_RLE4 and BI_RLE8 are run-length encoding modes defined in the format itself. They are limited to 4-bit and 8-bit indexed-color images, which excludes most contemporary content.

    Option 3 — reduce bit depth. Dropping 24-bit true color to an 8-bit indexed palette cuts pixel data by roughly two-thirds. It only works cleanly when the image genuinely uses few distinct colors — screenshots of text, monochrome line art, simple diagrams.

    Option 4 — crop or downsample. Fewer pixels is the only guaranteed byte reduction, but it changes the image dimensions rather than compressing it.

    Set expectations honestly: staying inside .bmp caps your achievable savings well below what PNG or WebP would give you on the same file.

    ZIP and Deflate: Lossless Shrinking Without Touching a Pixel

    ZIP is the safest option because it is fully reversible and requires no format knowledge. The compression ratio depends on how repetitive the pixel data is — a flat white scanned page compresses dramatically better than a photograph, which has high per-pixel entropy. For archival storage of BMPs you cannot convert, ZIP or RAR is the default answer.

    RLE Encoding: Only for Indexed 4- and 8-Bit BMPs

    Run-length encoding replaces sequences of identical pixel values with a count and a value. It works well on flat regions and poorly on noise. In practice, RLE is a legacy capability rather than a routine choice, and most modern encoders do not offer it as an output option at all.

    Lower Bit Depth, Crop, or Downsample

    If the BMP only exists to feed a display or a print at a known size, reducing bit depth or DPI is legitimate. Check whether the image is truly 24-bit color or merely a 24-bit container holding a handful of colors — the difference determines whether an 8-bit palette is lossless in practice. Crop first: removing empty margins costs nothing and reduces the pixel count before any other step.

    PNG vs JPG vs WebP vs PDF: Which Format Shrinks a BMP the Most?

    The best target format depends on what the image contains and where it is going, not on which format has the best reputation.

    Decision Table: Pick the Format by Image Type

    Image type Best target Why
    Screenshot (UI, dialog, terminal) PNG Lossless, keeps text and 1-pixel borders sharp
    Scanned document page PNG, or PDF for archiving Legible text, no artifact buildup
    Line art, logo, icon PNG or lossless WebP Flat colors compress extremely well
    CAD or GIS export PNG Preserves thin lines without ringing
    Photograph JPG or lossy WebP Lossy compression is efficient on continuous tone
    Web page asset WebP (AVIF as a next-gen option) Smaller transfer size, broad browser support

    PNG is the default lossless target and the one with the clearest published numbers: 60–80% smaller than the source BMP with no quality difference, per CoolUtils. WebP usually beats PNG at the same visual quality for web delivery, and AVIF can go smaller still, though support is less universal.

    Tie the choice to the delivery target. For web pages, smaller images support faster Largest Contentful Paint and less layout shift in Core Web Vitals. For email, the constraint is an attachment limit. For print archiving, it is fidelity.

    Why JPG Ruins Text and Line Art

    JPG compresses by discarding high-frequency detail, and text edges are almost pure high-frequency detail. The result is ringing — faint halos around letters — and blocking, where the image breaks into visible 8×8 tiles. On a photograph nobody notices. On a screenshot of a spreadsheet, it makes numbers hard to read.

    Sharp text vs JPG-artifacted text close-up

    WebP, AVIF, and PDF for Specific Delivery Targets

    WebP compresses further than PNG or JPG for the same visual quality at high resolutions, which is why it has become the default recommendation for modern websites. AVIF is a next-generation format offering strong compression with high quality; it is gaining adoption but is worth verifying on your target platform.

    PDF behaves differently from the image formats. It is a container, not a compression codec, and the converter applies Flate or JPEG compression inside the PDF — which CoolUtils says can shrink a file dramatically compared with the raw BMP. That makes PDF a strong choice when the destination is a document to be emailed, printed, or archived rather than an image to be edited. For a sense of magnitude, ResizerPicture demonstrates an 8 MB source photo becoming a 450 KB JPG and then a 220 KB WebP — vendor self-reported figures, useful as an order-of-magnitude reference rather than a promise.

    How to Compress a BMP Online in 3 Steps (No Install)

    Browser-based converters handle the format change without any software. The process is short enough that the harder decisions are the format and quality settings you pick, not the click sequence.

    Step-by-Step: From .bmp Upload to Smaller Download

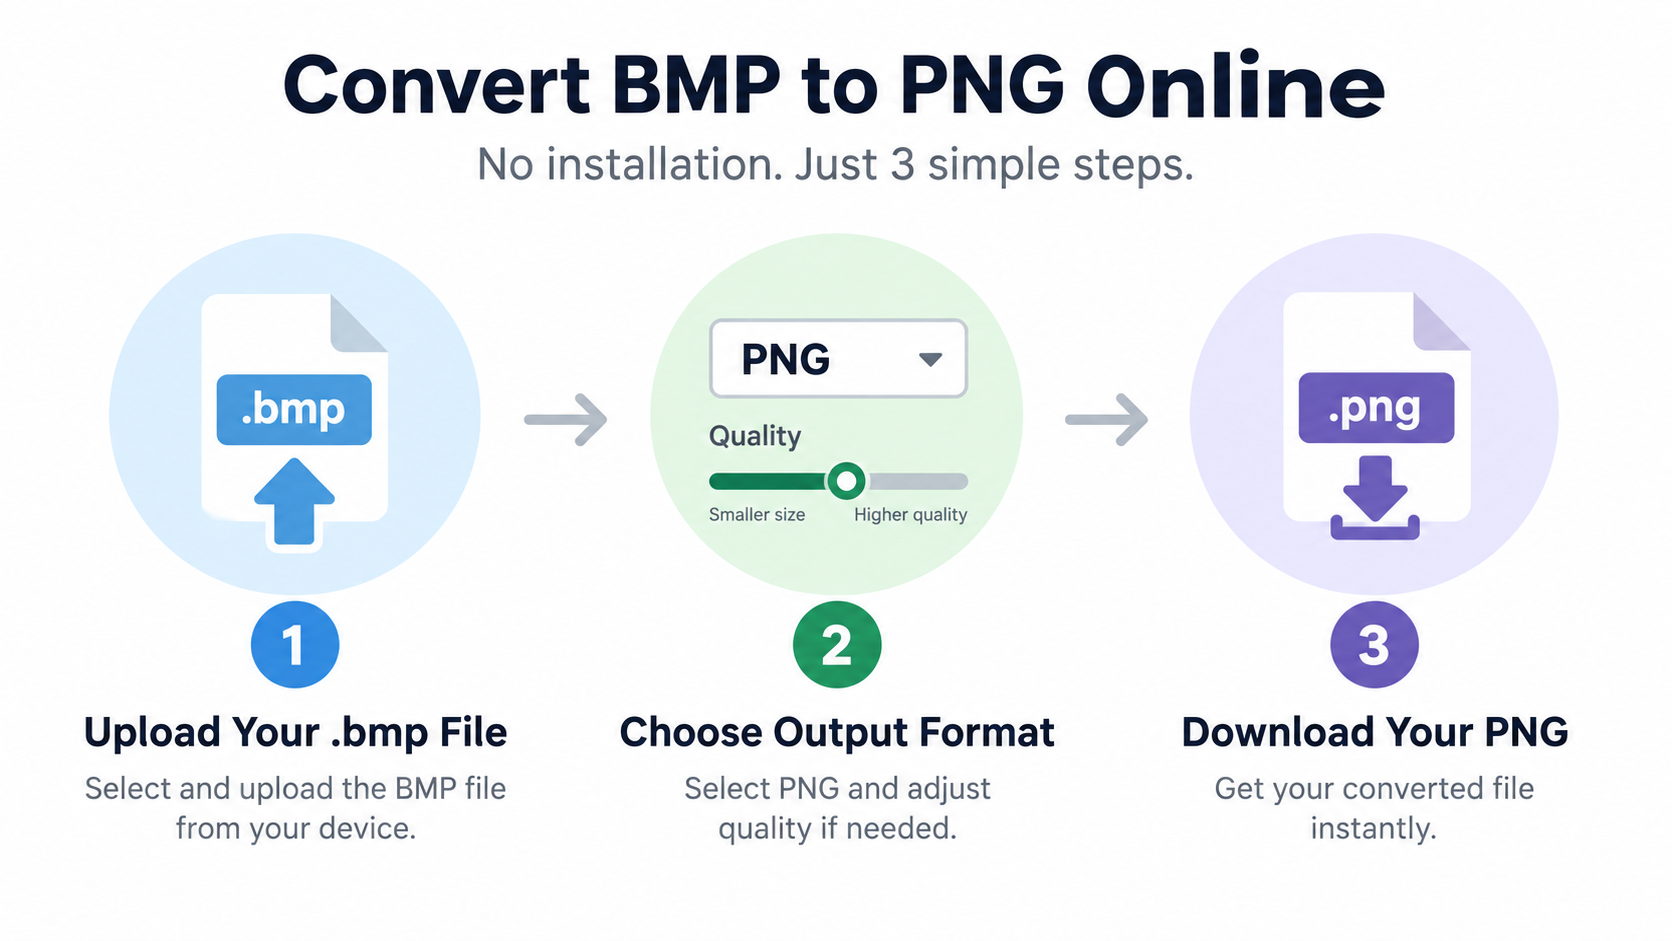
    Step 1: Upload the .bmp. Drop the file into a browser-based BMP compressor. Some tools also accept a URL or a cloud storage import.

    Step 2: Choose the output format and quality. Pick PNG for screenshots and line art, JPG or WebP for photographs, or PDF if the goal is a shareable document. If the tool exposes a quality slider, start high and step down.

    Step 3: Download the result. Single files download directly. Tools that handle multiple files typically package everything into one ZIP.

    Three-step online BMP compression flow

    Check the free-tier limits before you upload a folder. Aspose’s BMP Resizer allows a maximum of 5 files and 5 MB total per operation on the free tier, while CoolUtils accepts BMP files up to 50 MB. The gap between those two numbers decides which tool is usable for a given job.

    The online-versus-desktop trade-off is straightforward: online means no install and immediate use, desktop means higher or unlimited size ceilings, batch power, and full control over encoder settings. For a one-off screenshot, online wins. For a folder of 300 scans, it does not.

    How to Tell Whether a Tool Uploads Your File

    Look for two specific signals. First, whether the tool states that processing happens locally in your browser. Second, whether it publishes a retention window. Aspose states that documents are stored in secure storage for 24 hours and then deleted; CoolUtils states that both the source and result are deleted automatically after conversion, and in any case within 24 hours.

    A tool that says nothing about either is not automatically unsafe, but you have no basis for trusting it with confidential material. For CAD exports, medical scans, or anything under an NDA, use an offline desktop tool or a local script instead.

    One more check worth running: verify the tool actually re-encodes rather than merely resizing dimensions. A resizer can shrink the byte count by discarding pixels, which is a different operation with a different result.

    Batch-Compressing Dozens or Hundreds of BMP Files

    Single-file web converters do not scale. Uploading one file at a time is tolerable for three images and untenable for a folder of 200 scans or a nightly CAD export.

    Browser-based batch converters occupy a middle ground. BulkImagePro accepts up to 50 files per run, processes them locally in the browser, and packages the output as a single ZIP that downloads automatically. That ceiling is generous for a design team and irrelevant for a production archive.

    Choose by volume: under 20 files, use an online bulk image converter; 20–500 files, use a desktop batch tool; recurring or scheduled jobs, use a script or a watch folder.

    Desktop Batch Converters and ZIP Output

    Desktop tools remove the file-count ceiling and typically preserve folder structure, which matters when you are converting a directory tree rather than a flat list. reaConverter converts hundreds of BMP images at once, works entirely offline so nothing is uploaded, integrates with the Windows right-click menu, and supports Watch Folders for automated runs. Because there is no upload, the privacy question disappears entirely.

    Scripted Pipelines and Watch-Folder Automation

    For repeatable, version-controlled pipelines, command-line conversion is the most reliable option. reaConverter exposes all of its features from the Windows command line, and CoolUtils documents a command-line form for batch BMP-to-PDF work, with a /ProcessRecursively switch to include subfolders. Wrap the command in a batch file and schedule it.

    Watch Folder mode is the natural end state for recurring jobs: set the rules once, and every new BMP that lands in a directory is converted and filed automatically. That removes the manual step from the workflow entirely.

    Compression vs. Resizing: Hitting a Target File Size Without Losing Quality

    The distinction matters more than it sounds, because many tools labeled “compress BMP” only resize. Aspose’s BMP Resizer is explicit that it resizes — increasing or decreasing image dimensions — and does not perform byte-level compression. If a tool only scales pixels, it will never shrink a BMP at fixed dimensions, regardless of its label.

    Compression changes bytes. Resizing changes pixels. When a portal demands a file under 500 KB, you can work backward: choose the format first, then adjust the quality setting or the color depth, and only resize if you still miss the target. Tools that accept an explicit target size do this search for you; a compress BMP to 100 KB tool fixes the ceiling and adjusts quality automatically, and News Appite’s 500 KB compressor lets you enter any target in KB and automatically finds the highest quality that fits, reducing dimensions only when necessary.

    Does Compressing a BMP Reduce Image Quality?

    It depends entirely on the target format, not on the act of compressing. PNG, lossless WebP, and ZIP archival produce output that is pixel-identical to the original BMP. JPG and lossy WebP discard detail, and the artifacts appear first around text and hard edges. Judge lossy output at 100% zoom over a region containing text, not from a thumbnail.

    Stripping EXIF Metadata: Smaller and Safer

    Image files routinely carry EXIF metadata such as GPS location, camera model, and timestamps — CoolUtils notes that BMP uploads can carry this information. Removing it is a modest size win and a meaningful privacy win, particularly for photos taken on phones and shared publicly. Several browser-based tool suites include a dedicated EXIF remover alongside their conversion utilities.

    Conclusion

    You cannot meaningfully compress BMP in place. The format stores raw pixels by design, so the real savings come from re-encoding to PNG, WebP, or JPG, with ZIP or RLE as the only options when the .bmp extension must stay. Pick the target format by image type — PNG for screenshots and line art, JPG for photos, WebP for web pages, PDF for documents you need to archive. Run one file through a converter, compare the before-and-after size and the visual result at full zoom, then scale up to a batch tool or a scripted pipeline for the rest of the folder.

    FAQ

    Can I compress a BMP file without changing it to another format?

    Yes, but only modestly — the BMP specification offers no efficient compression of its own. Your options are ZIP, RAR, or Deflate archiving, RLE encoding for 4- or 8-bit indexed images, or dropping from 24-bit to 8-bit color. Expect far smaller savings than converting to PNG or WebP.

    Does compressing a BMP reduce image quality?

    It depends on the target format, not on the act of compressing. PNG, lossless WebP, and ZIP are lossless — pixels remain identical to the original BMP. JPG and lossy WebP discard detail, and artifacts show up first around text and hard edges. Always check lossy output at 100% zoom.

    How much smaller is a PNG or WebP than the original BMP?

    PNG typically cuts BMP file size by 60–80% with no quality difference, according to CoolUtils. WebP generally goes smaller still than PNG for the same image and quality level, especially at high resolutions. Multi-megabyte BMPs from 300 DPI scans can drop by well over 80% when re-encoded.

    Why is my BMP file so large in the first place?

    BMP stores every pixel literally as width × height × bytes-per-pixel, with row padding, and applies no compression. File size therefore scales directly with resolution and bit depth. A single A4 page is roughly 6 MB at 150 DPI and about 25 MB at 300 DPI as an uncompressed BMP.

    Can I batch-compress hundreds of BMP files at once?

    Yes. Browser-based batch converters handle about 50 files per run and deliver a ZIP download. Desktop batch tools and command-line scripts scale to thousands of files. For recurring jobs, a Watch Folder or scheduled script converts new BMPs automatically as they arrive, with no manual step.

    Is it safe to compress BMP files with a free online tool?

    Check two things: whether the file is processed locally in the browser, and what the retention policy says. Reputable tools state either that files never leave your device or a clear auto-delete window such as 24 hours. For confidential scans, CAD exports, or anything under an NDA, use an offline desktop tool or a scripted local pipeline instead.

  • Lua Beautifier: Format Lua Code Free in Your Browser

    Lua Beautifier: Format Lua Code Free in Your Browser

    Header: Browser-based Lua beautifier turning messy code into clean, readable format

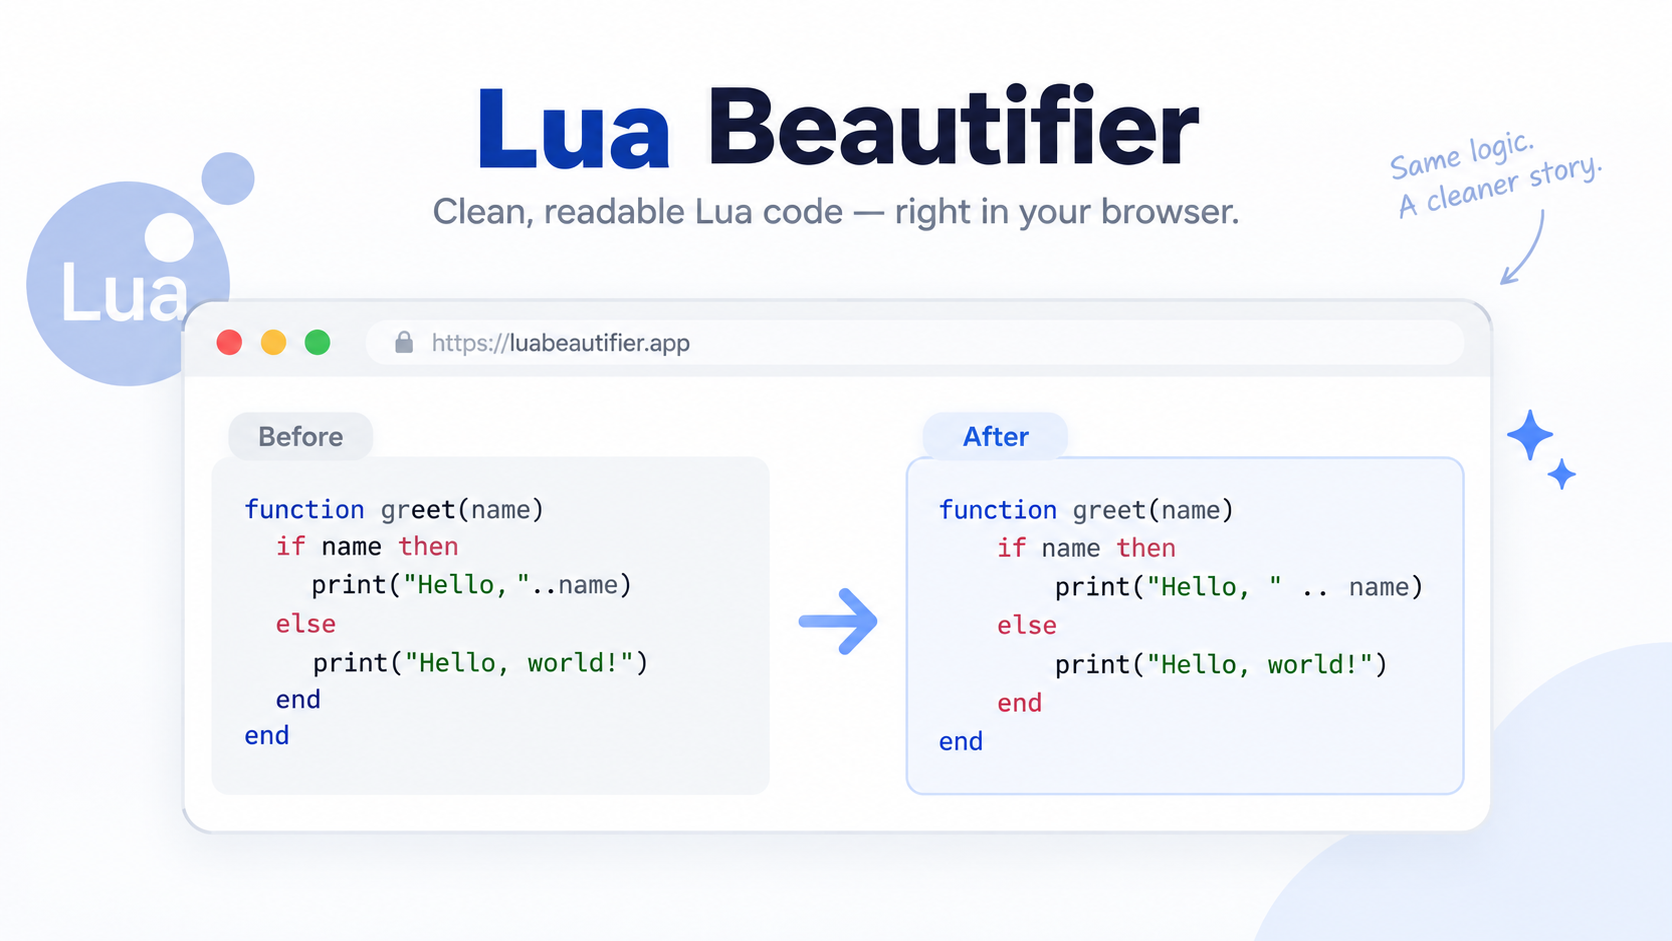
    A Lua beautifier — also called a Lua formatter or pretty-printer — rewrites Lua source into clean, consistent indentation and spacing without changing how the code runs. In 2026, most are free browser tools that format pasted Lua 5.5, LuaJIT, or Luau code locally, while editors can auto-format Lua on save.

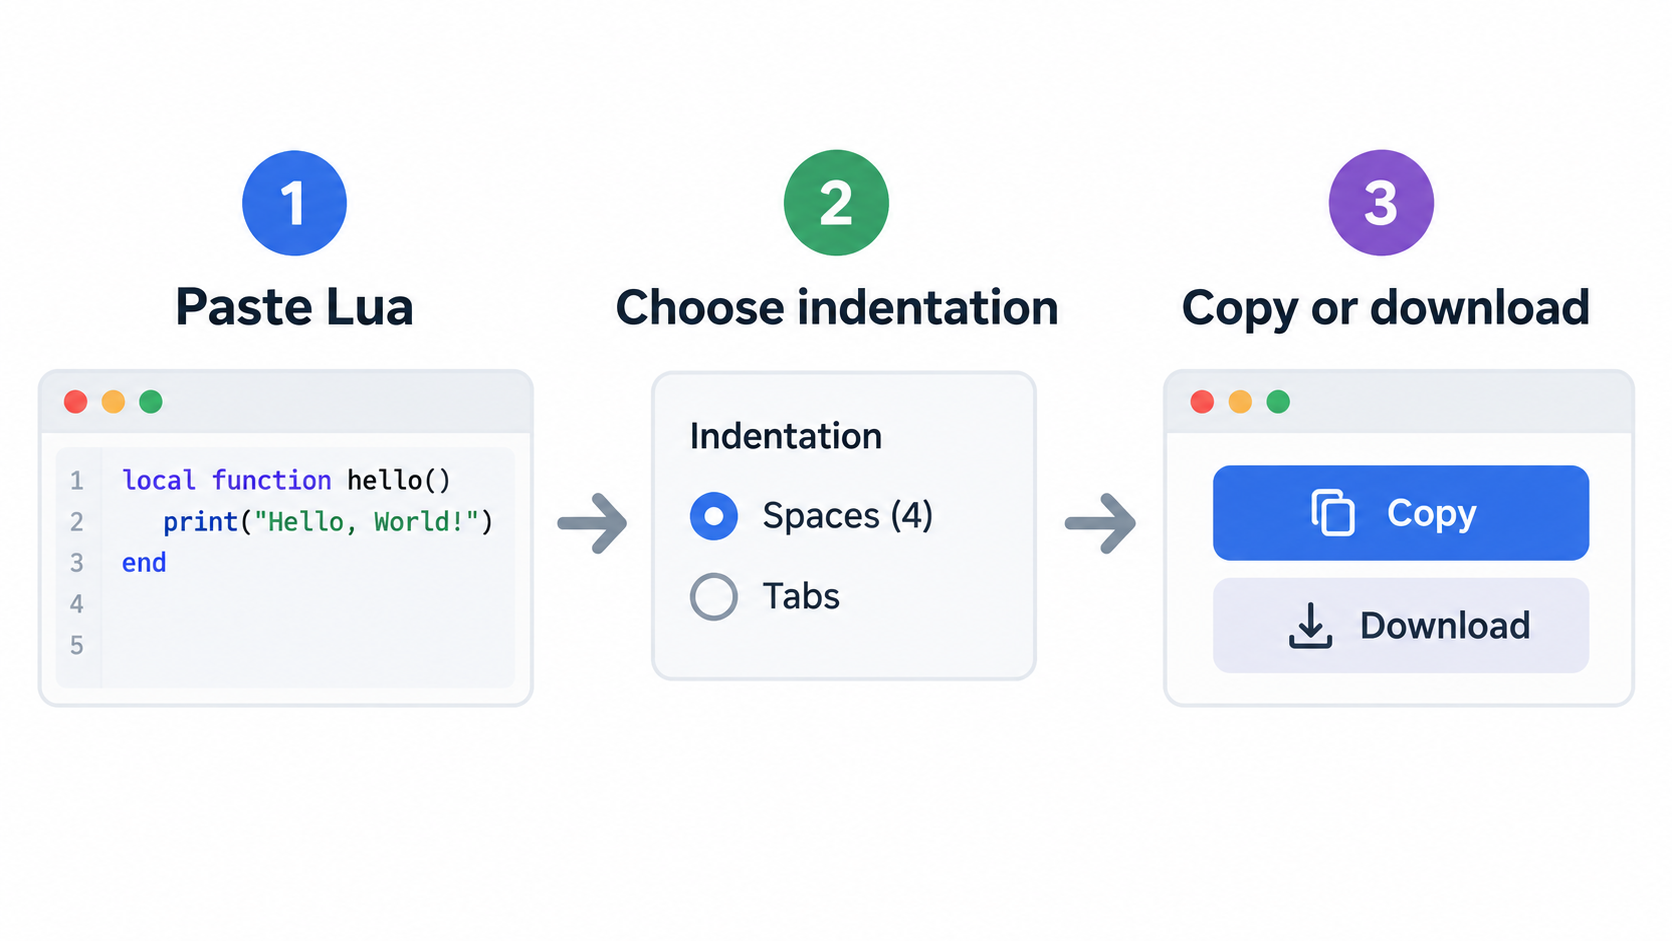
    How to Beautify Lua Code in 3 Steps

    The browser workflow is short: paste, configure, take the result back.

    Step 1 — paste. Drop raw Lua into the online Lua beautifier. No account, no install, no download. The code stays in the tab you pasted it into.

    Step 2 — configure. Choose your indentation before you format: 2 spaces, 4 spaces, or tabs. Two spaces is the common default in Lua and Luau codebases, so stick with it unless a project’s existing style says otherwise.

    Step 3 — copy or download. Run the format, then copy the output straight back into your editor or download a .lua file. That’s it.

    Three-step browser workflow: paste, configure, copy or download

    Does the Lua beautifier upload my code?

    It depends on the tool, and the privacy-first pattern is worth looking for explicitly. Browser formatters that process locally state no upload and no account required, and they cap in-browser preview length rather than server-side file size — Phoenix Code’s HTML formatter (updated September 28, 2026) puts that ceiling at 2,000,000 characters and runs the formatting client-side, which is the same pattern a Lua tool can follow. Before you paste proprietary code, look for a local-processing statement instead of trusting a generic “secure” badge.

    What you get back: copy, download, or paste straight into your editor

    The output is plain text, so it goes into whatever you already have open. Copy it into the file you were editing, or download a .lua file and drop it beside the project. When the input is production code, diff the result against the source first and confirm that only whitespace moved.

    A full Lua parser fits in a web page because Lua itself is small. According to Lua.org, the Lua 5.5.1 tarball — source code plus documentation — is 390K compressed and 1.5M uncompressed, around 32,000 lines of C. That’s a reasonable payload for a client-side tool.

    What a Lua Beautifier Changes — and What It Leaves Alone

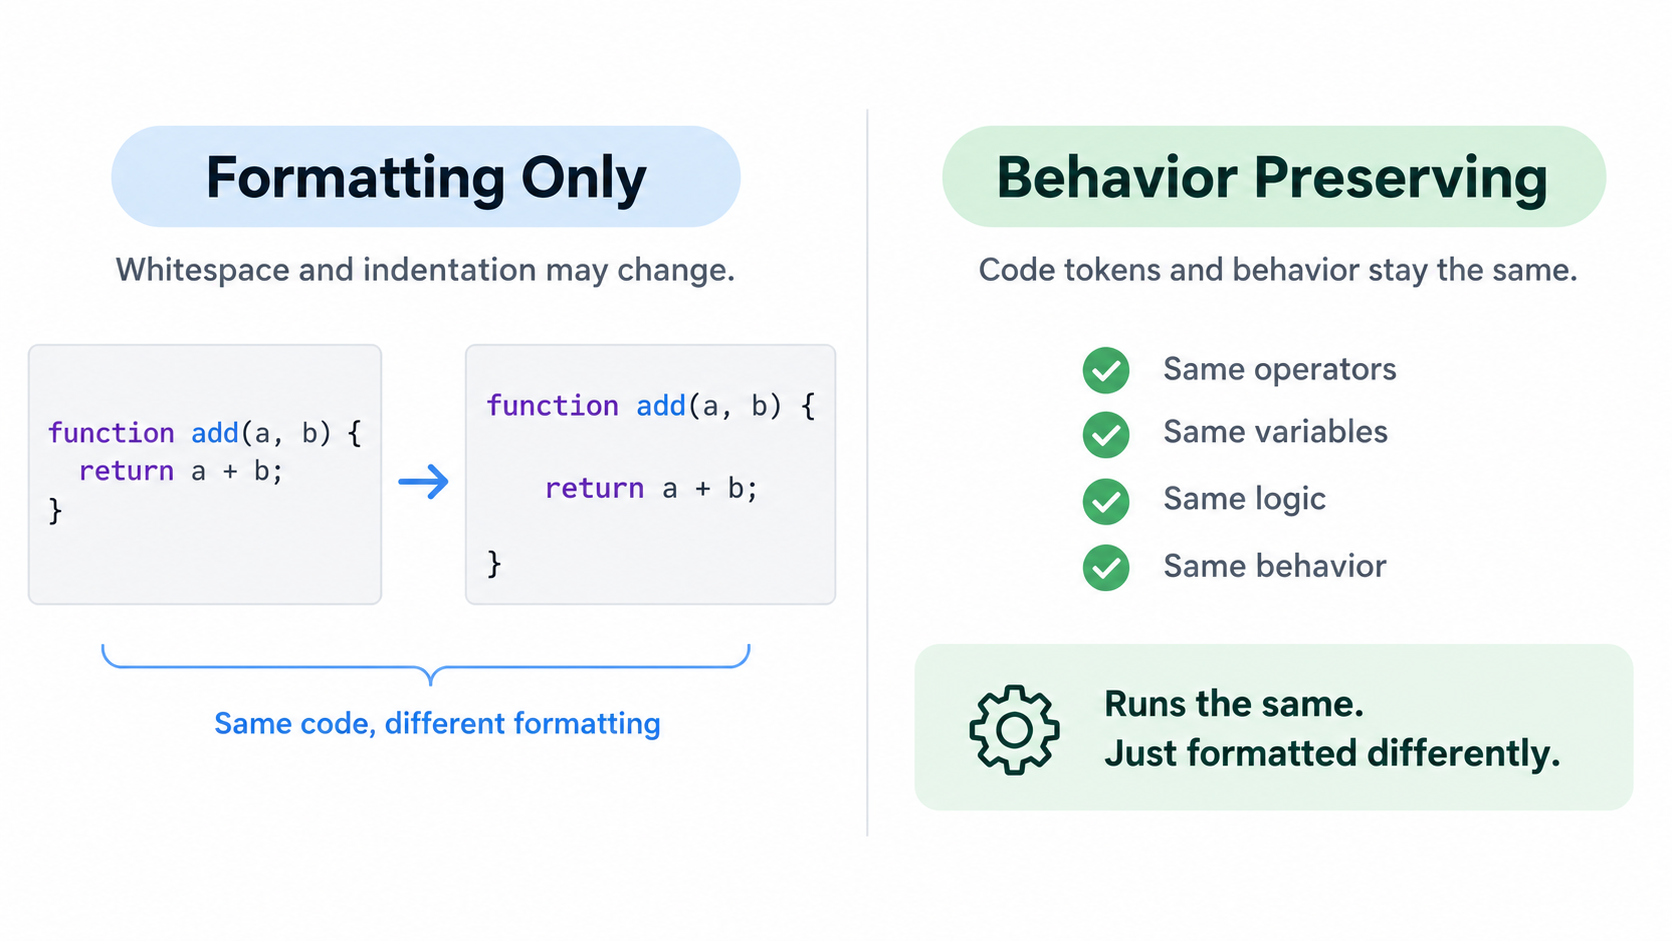
    A beautifier normalizes indentation, spacing around operators, blank lines, and line breaks. It does not rename, reorder, evaluate, or delete code.

    Clear split between whitespace changes and code behavior left untouched

    That behavior-preserving property is structural, not a promise: the token stream is untouched and only the whitespace between tokens moves. A file that formats cleanly should produce byte-identical output when it runs.

    It also won’t find syntax errors or logic bugs. That’s a validator’s or a linter’s job, and the strongest formatter-shaped tools draw that line explicitly. Phoenix Code states the distinction in one sentence — a formatter changes whitespace, a validator checks conformance, and a browser parser may infer missing elements and repair a document tree. The same split applies to Lua.

    Long bracket strings ([[ ... ]]) and long comments (--[[ ... ]]) have to be preserved byte-for-byte, for the same reason formatters protect raw-content regions in HTML: the text inside is literal, and re-indenting it changes rendered output.

    Is a Lua beautifier the same as a Lua formatter, minifier, or validator?

    A beautifier and a formatter are the same job under two names — rewriting whitespace for readability. “Beautifier” usually implies re-expanding something minified or unreadable, but the implementation is identical.

    A minifier does the opposite: it strips whitespace to shrink the file. A validator neither reflows nor shrinks; it reports whether code conforms to a syntax or rule set, and it leaves your layout alone.

    Beautifier vs. linter vs. AI code generator

    A linter reports suspicious or incorrect code without changing layout. An AI code generator is a different category again: it writes new Lua from a description rather than rearranging Lua you already have. Zenifiq’s Lua generator page makes the limitation plain — generated code still has to be verified, because the tool cannot test against your host and won’t keep pace with API changes.

    So the division of labor is: the beautifier reflows, the linter inspects, the generator authors.

    Which Lua Do You Have: Lua 5.5, LuaJIT, or Roblox Luau?

    Lua.org describes Lua as “a powerful, efficient, lightweight, embeddable scripting language” that supports procedural, object-oriented, functional, data-driven, and data-description styles. That breadth is exactly why one canonical layout can’t fit every Lua file — and why the answer to “which beautifier” depends on which grammar you pasted.

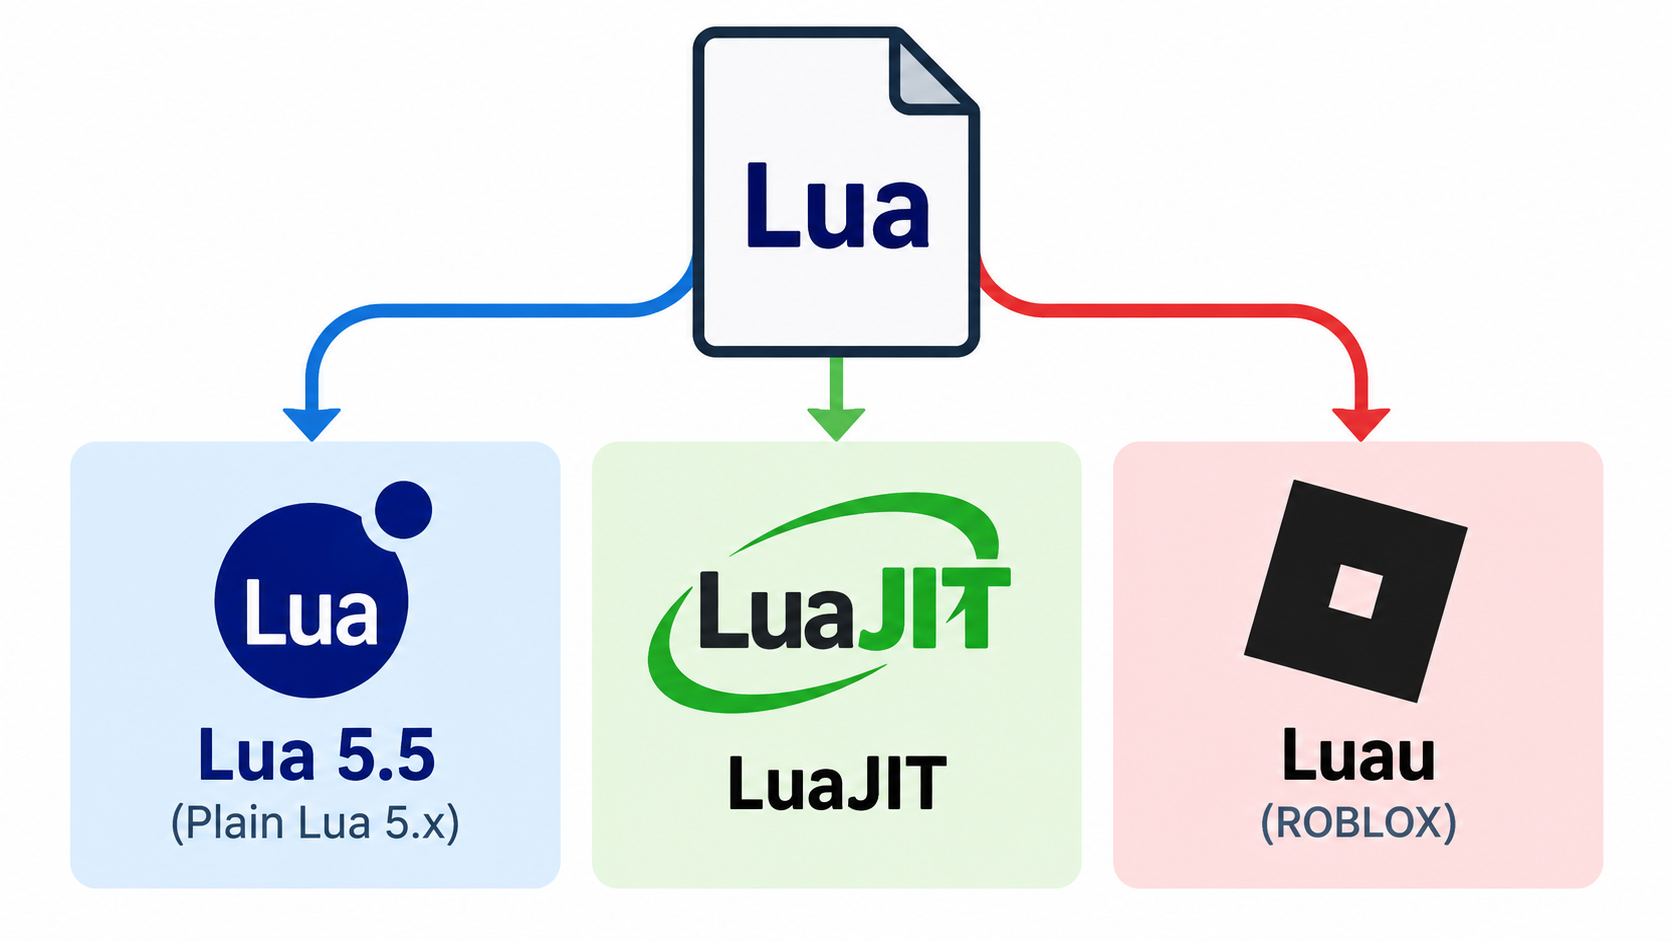
    Plain Lua 5.x — the current line is 5.5.x — is the baseline grammar most beautifiers target first. LuaJIT is the runtime behind Neovim’s init.lua and LÖVE2D, and its accepted syntax is a superset-with-caveats of standard Lua. Roblox Luau adds type annotations, continue, and changed standard-library behavior, so a formatter tuned only for plain Lua can mangle or reject Luau type syntax outright.

    Three Lua dialects: plain Lua 5.x, LuaJIT, and Roblox Luau

    Lua has existed since 1993 and was profiled at HOPL III in 2007, so no single frozen grammar covers every file a reader will paste into a box.

    What host is your Lua embedded in? Roblox, Neovim, LÖVE2D, Redis, or standalone

    Lua is almost always embedded, and the host API — not the syntax — decides what a script can do. Roblox runs Luau. Neovim uses Lua for configuration. LÖVE2D drives games with it. Redis exposes redis.call with KEYS and ARGV as the only way in. Formatting expectations differ per host: the type annotations a Roblox team expects carry no meaning inside a Redis script.

    Real embedded Lua can be long and unusual. On the darktable forum, a user wrapped image tagging in a Lua script that scores every photo against a fixed vocabulary of roughly 1,000 labels — the 365 scene categories of Places365 plus the 601 object classes of OpenImages V7 — then rewrote it to run purely in Lua against imported .dtmodels files with no Python involved. Scripts at that scale are exactly where formatting stops being cosmetic.

    Roblox Luau: type annotations a plain Lua beautifier may not expect

    Luau is not Lua with a different name. It adds a type system and its own features, and some standard Lua behavior is absent. A formatter built for plain Lua may treat local x: number = 1 as a syntax error, or strip the annotation because it doesn’t recognize the construct.

    Check the tool’s stated dialect coverage before pasting Luau, and treat “supports Lua” as an unverified claim until you’ve tested a typed snippet. A dedicated Luau formatter handles the typed grammar natively, and a one-line annotation test tells you more than a feature list does.

    Who maintains Lua — and why the MIT license matters for browser tools

    Lua is designed, implemented, and maintained by a team at PUC-Rio, the Pontifical Catholic University of Rio de Janeiro in Brazil, and is now housed at LabLua within the university’s Department of Computer Science. It’s free open-source software under the MIT license and may be used for any purpose, including commercial purposes, at no cost.

    That licensing is what makes a client-side beautifier straightforward: a browser tool can ship a Lua parser without navigating a restrictive redistribution term.

    Lua Beautifier Settings That Actually Matter

    Most options are cosmetic. A few change how readable your code stays in version control.

    The clearest model for a Lua beautifier’s option set is a formatter UI that exposes indentation, wrapping, and preserve-newline controls directly rather than burying them in a config file.

    2 spaces, 4 spaces, or tabs: picking a Lua convention

    Two spaces is the common default in Lua and Luau codebases. Four spaces shows up in many C-adjacent and game-engine shops. Tabs render at whatever width a reader’s editor is set to, which makes diffs inconsistent across machines.

    Match the file you’re editing before you format a project file. Converting a whole file from 4 spaces to 2 is safe but produces a diff with no review value.

    Wrapping, alignment, and the preserve-newlines setting

    Set a max line width, or leave lines untouched. If you hand-grouped a table across multiple lines for a reason, enable the preserve-existing-newlines option — otherwise a formatter may collapse the grouping into one long line.

    Keep long bracket strings and long comments verbatim; reflowing inside [[ ]] can change rendered output. Trailing whitespace removal and a single final newline are cosmetic, safe, and worth turning on. When the input is production code, look at the preview or diff before you copy.

    Format Lua on Save: VS Code, Neovim, and CLI Without a Web Tool

    A browser tool handles a one-off paste. Once a project has a style worth keeping, wire formatting into the editor so it happens without a decision.

    VS Code: Lua language server plus format on save

    Install a Lua language server, enable format-on-save, and let the server handle indentation on every write. The formatter that runs is the same kind of formatter a browser tool ships — the difference is that it fires automatically instead of on paste.

    Neovim: vim.lsp.buf.format on BufWritePre (and the version trap)

    In Neovim, formatting is wired to BufWritePre, so every :w reformats the buffer:

    vim.api.nvim_create_autocmd('BufWritePre', {
      group = vim.api.nvim_create_augroup('my.format', {}),
      callback = function(ev)
        if #vim.lsp.get_clients({ bufnr = ev.buf, method = 'textDocument/formatting' }) > 0 then
          vim.lsp.buf.format({ bufnr = ev.buf, timeout_ms = 2000 })
        end
      end,
    })
    

    Check versions before writing that config. As of October 2026, per Terminal Skills’ Neovim skill (updated October 1, 2026), vim.pack requires Neovim 0.12, vim.lsp.config and vim.lsp.enable require 0.11, and nvim-lspconfig requires 0.11.3 or newer. The stable line referenced is 0.12.5.

    Migrating off the deprecated require('lspconfig').<server>.setup{} framework means replacing each call with vim.lsp.config (settings) plus vim.lsp.enable (activation), and moving on_attach logic into an LspAttach autocommand. Verify it headlessly:

    nvim --headless -c 'if v:errmsg != "" | cquit 1 | endif' -c qa
    

    Then confirm :checkhealth vim.lsp lists your servers under Enabled Configurations. Follow that documented migration path and the deprecation warning goes away, with the servers appearing there.

    CLI formatters for CI and pre-commit hooks

    For CI and pre-commit hooks, run a standalone Lua formatter — StyLua or LuaFormatter — against a file or a directory, so formatting is enforced before review. The same guidance applies: for editor-agnostic tasks like formatting in CI, call the formatter or linter directly instead of routing through an editor.

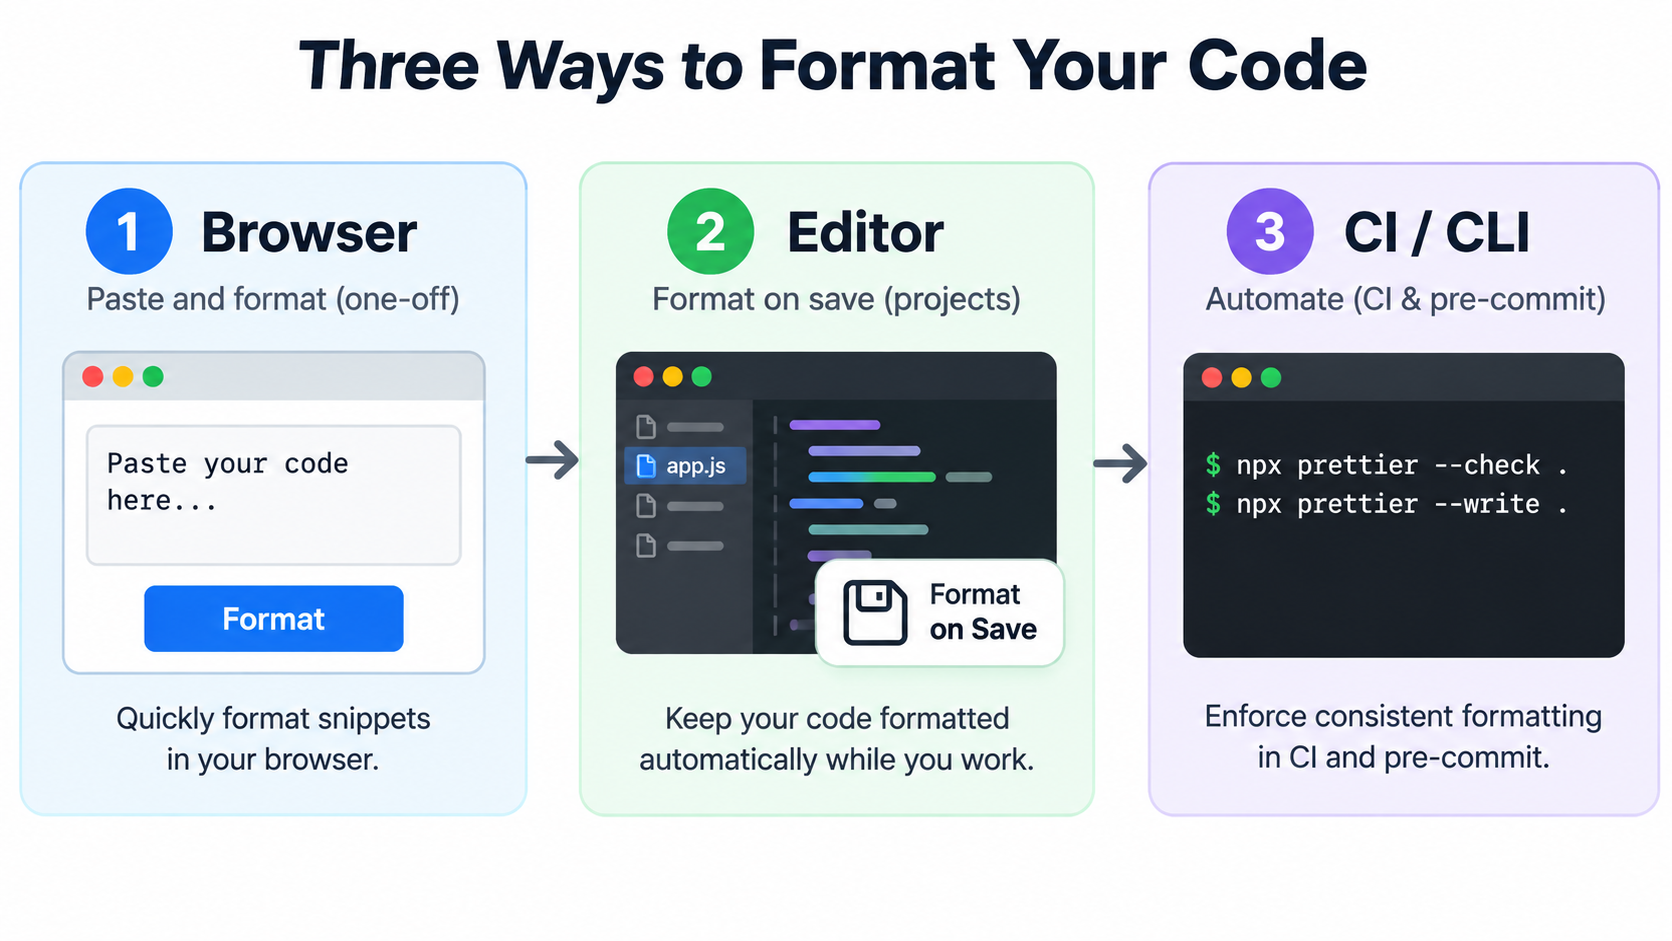
    Which route to pick: paste into a browser tool for a snippet you can’t install anything for, and move to format-on-save once a project has a style to keep.

    From one-off browser paste to editor format-on-save to CLI enforcement in CI

    Is Beautifying Lua Safe? nil Gaps, 1-Based Indexing, and Behavior

    Beautifying is safe when it’s purely whitespace-level, and the failure modes worth knowing about are the ones formatting never touches.

    Does beautifying Lua code change how it runs?

    No. Whitespace between tokens is not significant in Lua, so indentation and spacing changes are behavior-preserving by construction. Long strings and long comments must survive verbatim, or embedded text inside them would change — the same guarantee a formatter gives when it protects raw-content regions during transformation.

    Safe doesn’t mean correct, though. A beautifier never fixes nil gaps, indexing errors, or host API misuse.

    What no formatter can fix: nil gaps, 1-based indexing, host API misuse

    Three traps catch newcomers and generated code alike. A table’s length is undefined once the table contains nil gaps. Array indexing starts at 1, not 0. And the host API dictates what any script is allowed to do. Zenifiq’s Lua generator documentation names all three and points at the pattern where they meet: generated Lua that removes items from an array mid-loop.

    A formatter will happily preserve a nil gap inside a table, and #t will still return an unexpected length afterward. Indentation is not a correctness check.

    Formatting also can’t fix architectural problems inside embedded scripts. On the darktable forum, the script’s author warns that tagging hundreds of images at once can freeze the application’s UI — “it is in the end a Lua script” — and another user reports Argus taking about two minutes to prepare its model and Artemis about eight on Windows 11. No beautifier changes that.

    The practical verification is to re-run your tests after formatting, or diff the token stream rather than the text.

    Conclusion

    A Lua beautifier only rewrites whitespace — which is exactly why it’s safe, and exactly why it can’t fix the dialect, version, or semantic problems hiding in your Lua. It solves readability; it does not solve correctness.

    Paste one snippet into a browser Lua beautifier now and confirm which dialect you’re looking at — plain Lua 5.x, LuaJIT, or Roblox Luau. Then, once the style is settled, wire format-on-save into your editor so formatting stops being a manual step and becomes something that happens when the file is saved.

    FAQ

    Is a Lua beautifier the same thing as a Lua formatter or a Lua linter?

    A beautifier and a formatter are the same job under two names: rewriting whitespace for readability. A linter is different — it reports suspicious or incorrect code without changing layout. Most tools keep the two separate, and some offer beautify, minify, and validate as distinct actions.

    Does beautifying Lua code change how it runs?

    No. Whitespace between tokens is not significant in Lua, so indentation and spacing changes are behavior-preserving. Long strings and long comments must be preserved verbatim, or embedded text inside them would change. Safe doesn’t mean correct: a beautifier never fixes nil gaps, indexing errors, or host API misuse.

    Does an online Lua beautifier support Lua 5.4, Lua 5.5, LuaJIT, and Roblox Luau?

    Support varies by tool. Plain Lua 5.x is the usual baseline, and the current line is Lua 5.5.x. LuaJIT (Neovim, LÖVE2D) and Roblox Luau are separate grammars; Luau adds type annotations and changed standard-library behavior. Check the tool’s stated dialect coverage before pasting Luau, and treat “supports Lua” as an unverified claim until you test a typed snippet.

    Is my Lua code uploaded to a server when I use an online beautifier?

    It depends on the tool. The privacy-first pattern is client-side processing entirely inside the browser tab. Browser formatters that advertise local processing state no upload and no account required, and cap in-browser preview length instead of server-side size. For proprietary or NDA-covered scripts, use a local editor or CLI formatter rather than trusting a claim you can’t verify.

    Can I auto-format Lua on save in Neovim or VS Code without a web tool?

    Yes — wire the LSP formatter to a write event: BufWritePre plus vim.lsp.buf.format in Neovim, format-on-save in VS Code. Check versions first: Neovim 0.12 for vim.pack, 0.11 for vim.lsp.config/enable, and 0.11.3+ for nvim-lspconfig as of October 2026. Verify the config headlessly and with :checkhealth vim.lsp so a broken formatter never silently skips a file.

  • Bar to PSI: Quick Conversion Formula, Chart & Examples

    Bar to PSI: Quick Conversion Formula, Chart & Examples

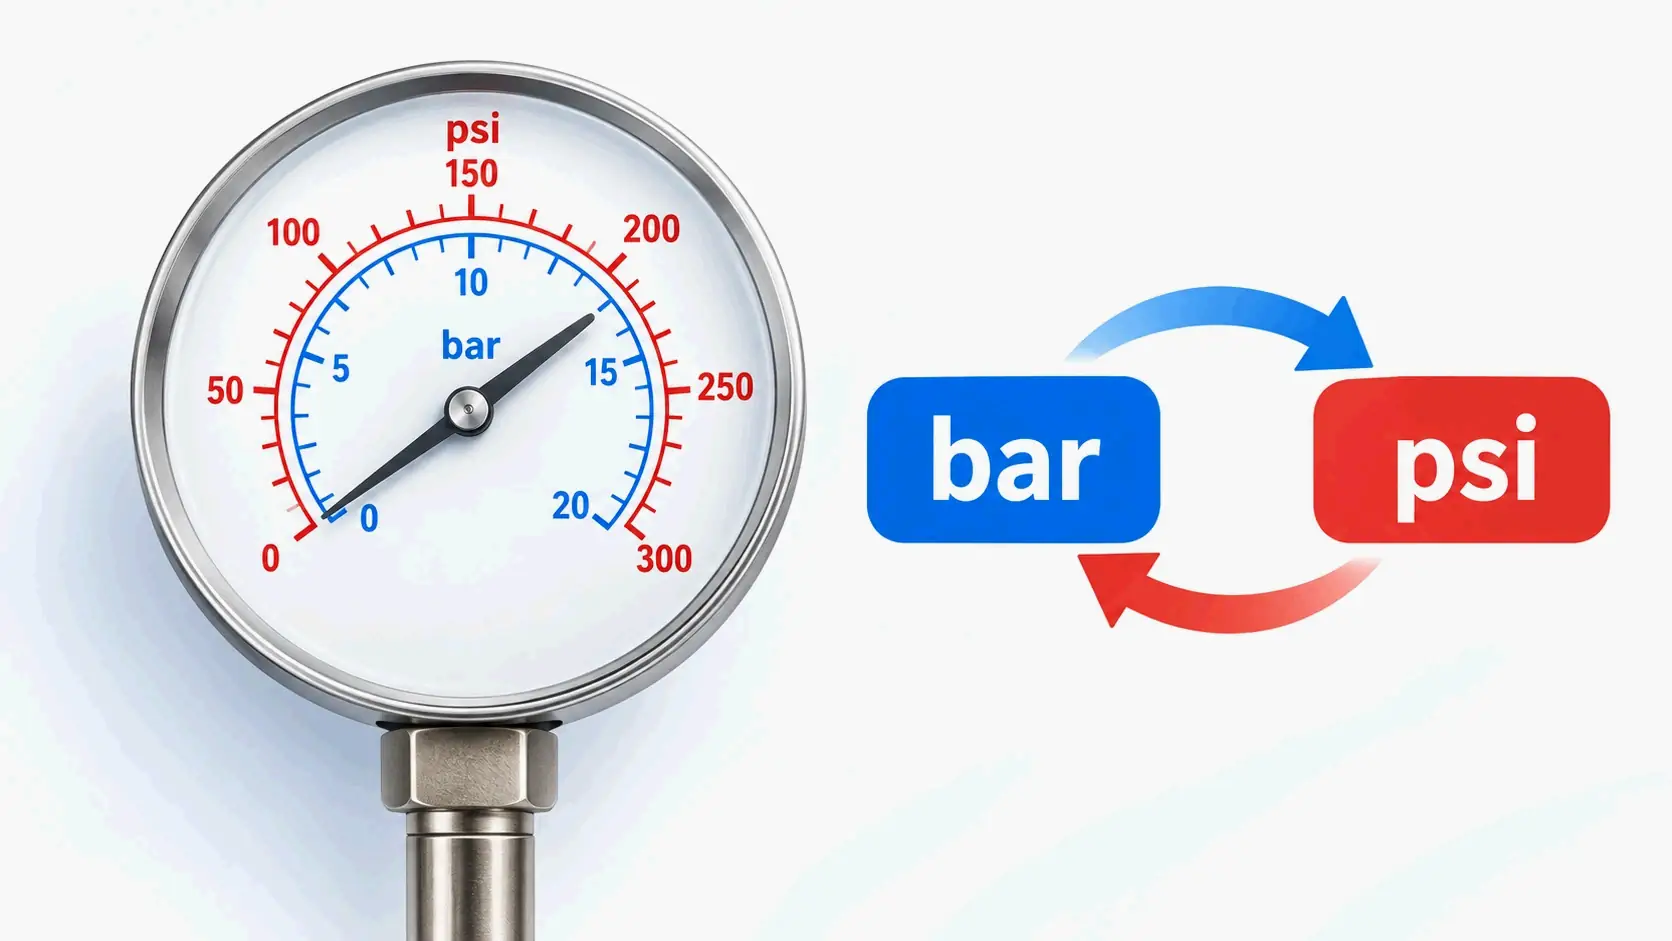
    Pressure gauge showing both bar and psi units to illustrate the conversion theme

    To convert bar to psi, multiply by 14.5038. That means 1 bar = 14.5038 psi, or about 14.5 psi for quick math. To go the other way, multiply psi by 0.0689476. One atmosphere is close but not identical: 1 atm = 1.01325 bar = 14.696 psi. For example, 2.5 bar is roughly 36.3 psi, and 10 bar is about 145 psi.

    How to Convert Bar to PSI: Step-by-Step Formula Using 14.5038

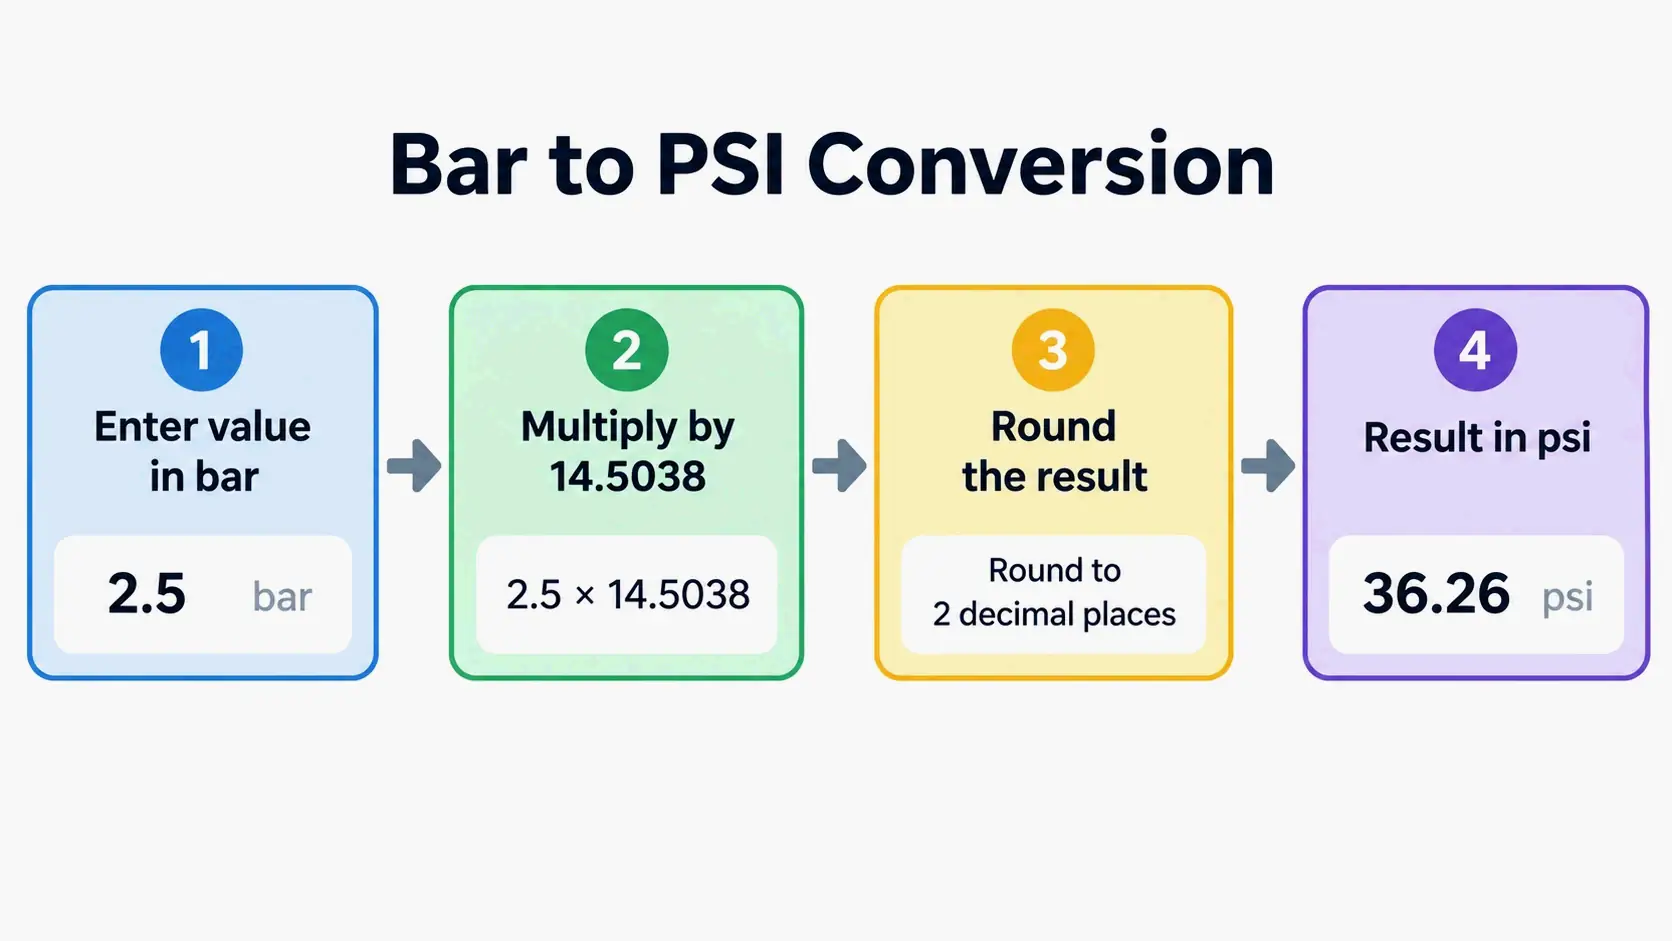
    The whole conversion comes down to one multiplier: psi = bar × 14.5038. As Tradukka shows, 1 bar equals 14.5038 psi. To reverse the calculation, multiply psi by 0.0689476, which is the same relationship turned around. You really only need to remember one direction.

    Follow these steps to convert any bar reading to psi:

    1. Identify the bar value. Look at the tire label, compressor manual, gauge, or product spec to find the pressure in bar.
    2. Choose your precision level. Use 14.5038 for exact engineering work or spreadsheets. Use 14.5 for quick field estimates.
    3. Multiply. bar × 14.5038 = psi for exact conversion, or bar × 14.5 for a fast approximation.
    4. Round only at the end. Keep full decimals during the calculation, then round the final psi value to a practical precision such as one decimal place.

    Simplified four-step flowchart for converting bar to psi

    Here’s a worked example. Convert 2.5 bar: 2.5 × 14.5038 = 36.2595 psi, which most people round to 36.3 psi. You can do the same in a calculator by typing 2.5 * 14.5038, or in a spreadsheet with =A2*14.5038 if cell A2 holds the bar value.

    The bar to psi formula

    The exact formula is psi = bar × 14.5038. That factor stays the same no matter what you’re measuring. For instance, 3 bar × 14.5038 = 43.5114 psi, and 5 bar × 14.5038 = 72.519 psi.

    Reverse conversion: PSI to bar formula

    To convert psi back to bar, use bar = psi × 0.0689476. For example, 30 psi × 0.0689476 = 2.068 bar. That’s the same as dividing by 14.5038, so 145 psi ÷ 14.5038 ≈ 10 bar.

    Mental math shortcut for bar to psi

    A quick mental shortcut: multiply bar by 14.5, then add a small correction of about 0.026% if you need more precision. For example, 10 bar × 14.5 = 145 psi, and the correction takes it to 145.038 psi. For everyday tire checks, 14.5 is usually close enough.

    Bar to PSI Conversion Chart: Common Values (1–100 Bar)

    The table below uses the standard 14.5038 factor, matching the conversion data published by Tradukka and Besto Calculator.

    Bar PSI (bar × 14.5038)
    1 14.5038
    2 29.0076
    3 43.5114
    5 72.519
    10 145.038
    50 725.19
    100 1,450.38

    These values cover common ranges, from low-pressure water systems up to industrial hydraulics. As a quick reference, 1 bar is close to 14.5 psi, 10 bar is close to 145 psi, and 100 bar is close to 1,450 psi.

    When should you use the exact 14.5038 instead of the rounded 14.5? Stick with 14.5 for tire inflation, home appliances, or rough comparisons where a fraction of a psi won’t affect safety or performance. Use 14.5038 for engineering calculations, calibration, certification, or anything where small pressure differences matter.

    PSI to bar quick reference table

    PSI Bar (psi × 0.0689476)
    10 0.689
    30 2.07
    50 3.45
    100 6.895
    145 10.0

    This reverse table comes in handy when a US tire gauge shows psi but the vehicle manual lists bar. For example, a common passenger tire at 30–35 psi is about 2.1–2.4 bar, which lines up with the range you see above.

    What Are Bar and PSI? Unit Definitions and the Pascal Bridge

    The bar is a metric pressure unit equal to exactly 100,000 pascals. It’s widely used in Europe and in industrial and scientific work. Besto Calculator points out that the bar isn’t an official SI unit, but it’s accepted in practice because it gives convenient numbers for tire pressure, hydraulic systems, air compressors, and gas systems. One bar is roughly equal to average atmospheric pressure at sea level, which is why it feels intuitive in many situations.

    PSI, or pounds per square inch, is the imperial/US unit of pressure. It measures force per unit area: PSI = Force (pounds) ÷ Area (square inches). Besto Calculator notes that psi is the standard for vehicles, tires, and mechanical systems in the United States. A typical passenger vehicle tire may need around 30–35 psi.

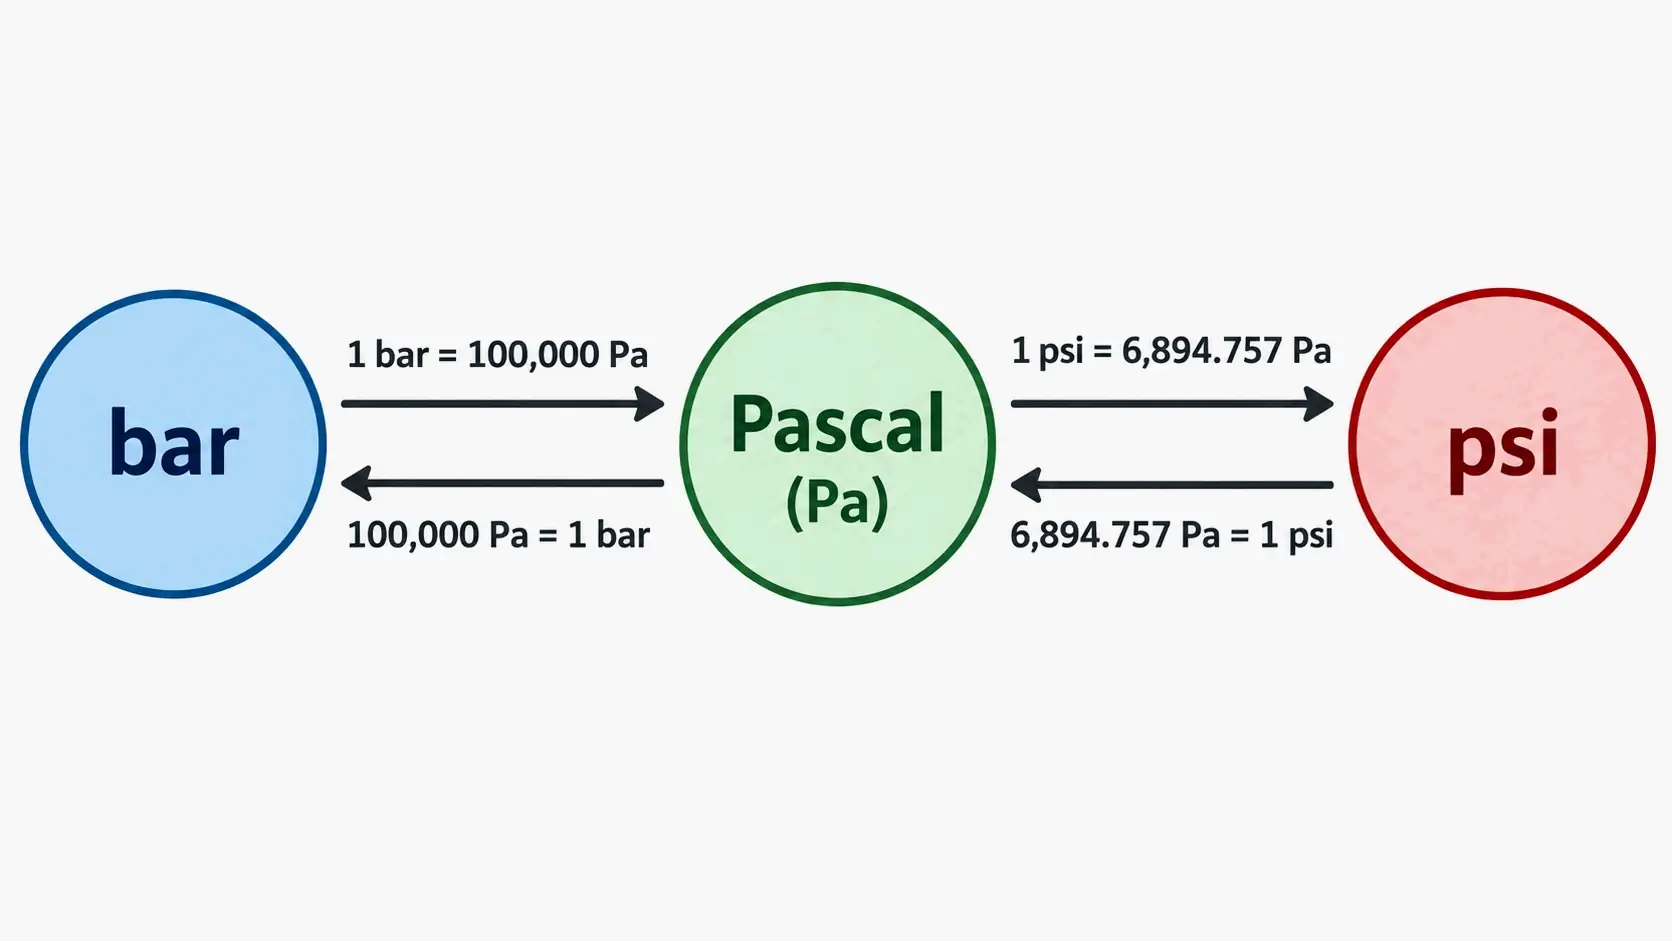
    The pascal (Pa) is the SI base unit for pressure, equal to one newton per square meter. It connects bar and psi because both can be expressed in pascals. According to Best Tool Online, 1 psi equals 6,894.757 pascals, or 6.895 kPa. Since 1 bar equals 100,000 Pa, the bridge is complete: 100,000 Pa is one bar, and 6,894.757 Pa is one psi.

    Diagram showing the conversion relationship between bar, psi, and pascal

    Gauge Pressure vs Absolute Pressure: Why It Matters for Bar to PSI Conversions

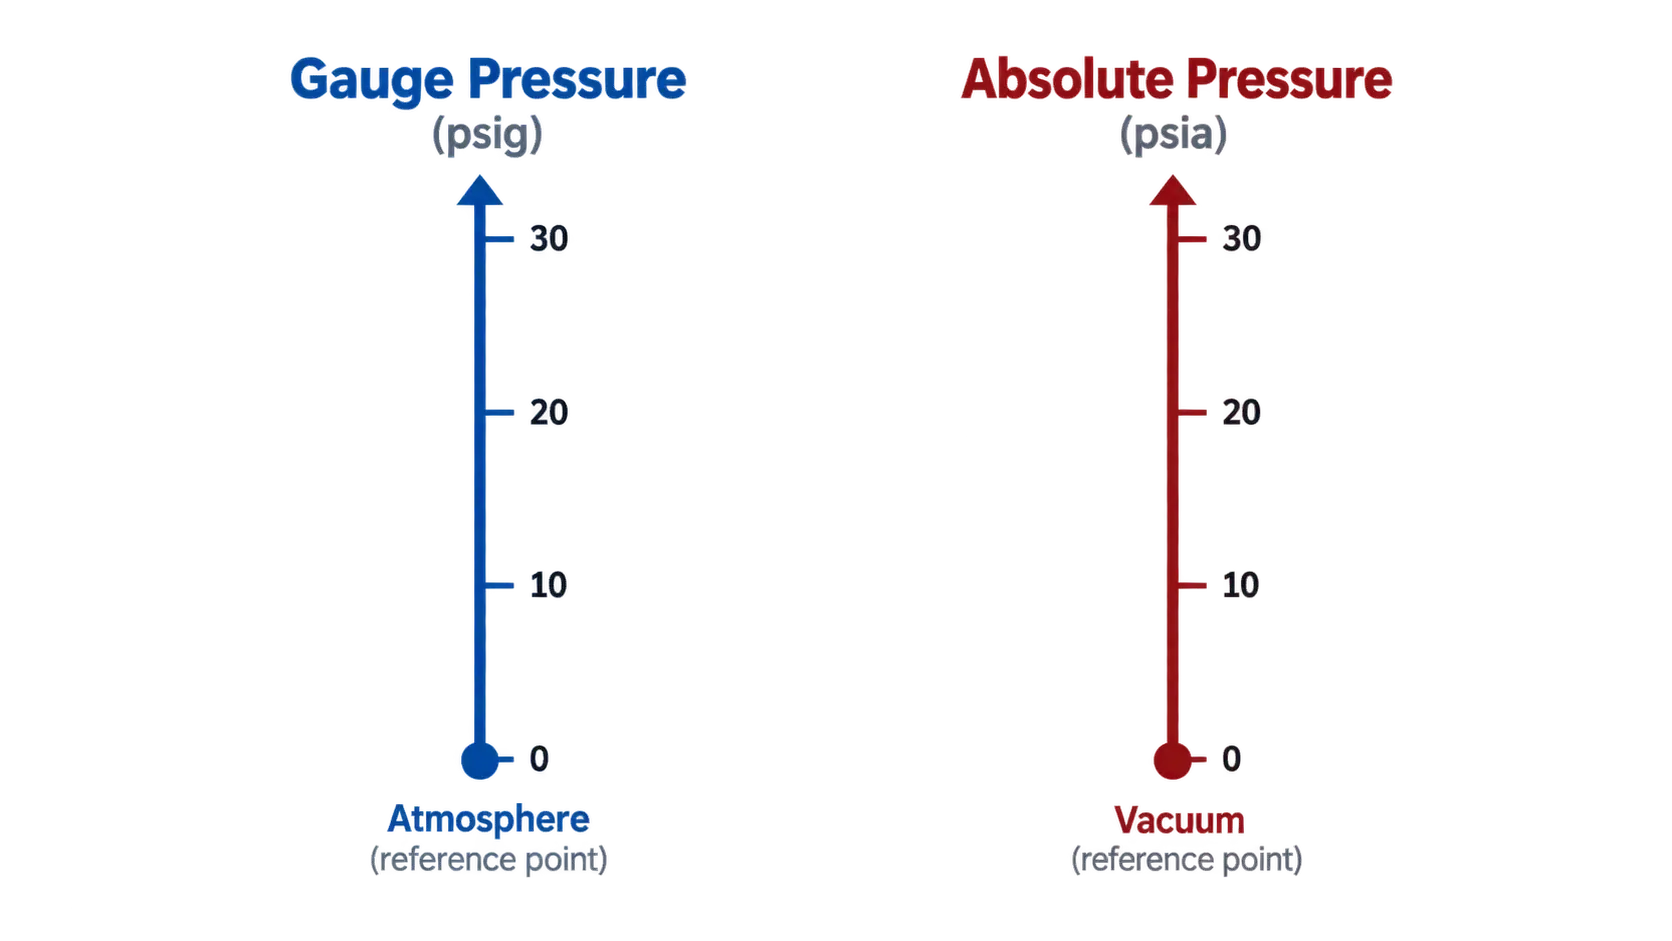
    Most everyday pressure readings are gauge pressure, written as psig or bar gauge. Gauge pressure measures pressure relative to the surrounding atmosphere, not from a perfect vacuum. Absolute pressure, written as psia or bar absolute, includes atmospheric pressure in the total.

    Tires, air compressors, and pressure cookers normally display gauge pressure. So a tire reading of 32 psi gauge isn’t 32 psi absolute; absolute pressure would be about 46.7 psi at sea level because standard atmospheric pressure is about 14.7 psi. The same logic applies to bar: a reading of 2.1 bar gauge is about 3.1 bar absolute at sea level.

    This distinction only changes your conversion when you’re comparing gauge and absolute readings. If you convert 2.1 bar gauge to psi using 14.5038, you get 30.5 psi gauge. But if you mistakenly compare that to an absolute psi specification, the numbers won’t line up because absolute includes the atmosphere.

    Pressure cooking gives a clear example. According to Wikipedia’s pressure cooker reference, a gauge pressure of 1.0 bar (15 psi) produces a cooking temperature of about 121 °C (250 °F). That 1.0 bar is gauge pressure, not absolute pressure; the absolute pressure inside the cooker is about 2 bar because standard atmospheric pressure is already about 1 bar.

    Diagram comparing gauge pressure and absolute pressure reference points

    Psig vs psia: Which one does your device show?

    Check the label or manual for abbreviations. psig and bar gauge mean gauge pressure; psia and bar absolute mean absolute pressure. Tire gauges, compressor regulators, and pressure cookers almost always use gauge units. Scientific instruments, weather reports, and some industrial sensors may report absolute pressure. If the unit isn’t labeled, see whether the reading returns to zero when open to air: gauge pressure reads zero, while absolute pressure reads about 14.7 psi or 1.013 bar at sea level.

    Real-World Bar to PSI Conversions by Use Case

    Different applications use different reference points, but the same 14.5038 multiplier applies once you know whether the reading is gauge or absolute.

    Use case Bar PSI Notes
    Passenger car tire 2.1–2.4 bar 30–35 psi Gauge pressure
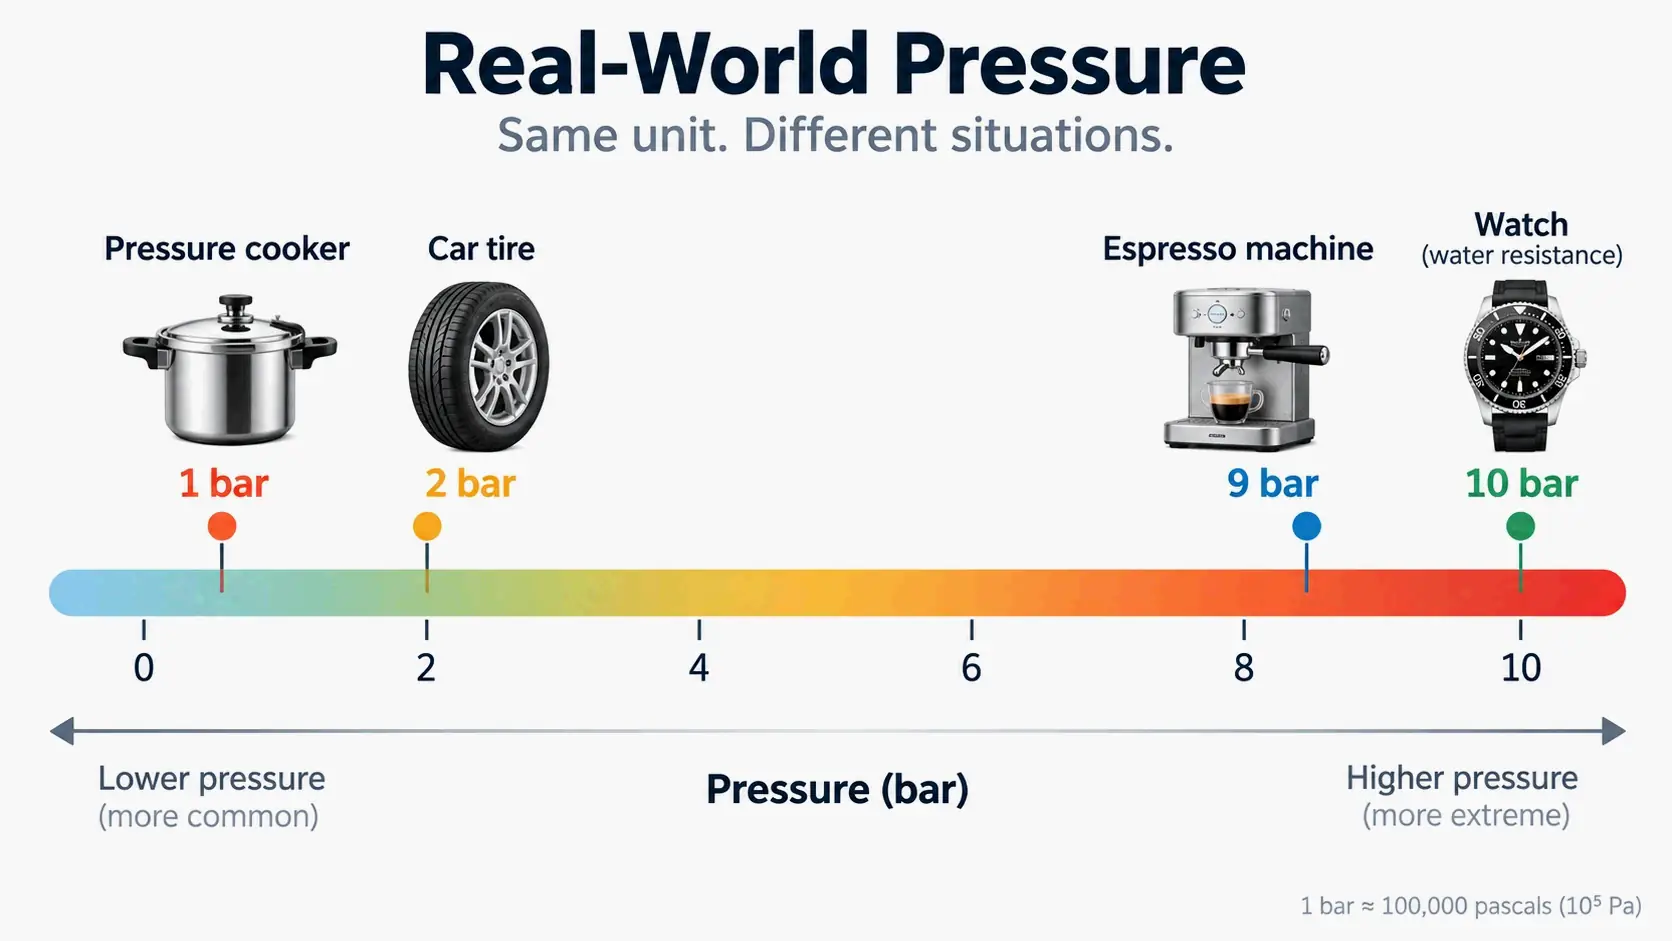
    Espresso machine 9 bar 130.5 psi Brew pressure, usually gauge
    Watch water resistance 10 bar 145 psi Equivalent to 100 m depth rating
    Pressure cooker 1.0 bar gauge 15 psi About 121 °C cooking temperature
    Air compressor varies varies US models usually in psi; European models often in bar

    Automotive and bike tire pressure

    According to Besto Calculator, a typical passenger vehicle tire needs around 30–35 psi, which is about 2.1–2.4 bar. Many European vehicles show tire pressure recommendations in bar, while American vehicles often use psi. For example, a 2.2 bar tire spec equals 2.2 × 14.5038 = 31.91 psi, close to 32 psi. Always check the vehicle’s door sticker or owner’s manual—not the tire sidewall—for the correct pressure.

    Espresso, water resistance, and home appliances

    Espresso machines commonly brew at 9 bar. Multiply by 14.5038 and you get 9 × 14.5038 = 130.53 psi, usually cited as about 130.5 psi. That’s one of the higher everyday pressures, though still below many hydraulic systems.

    For watch water resistance, the Hamilton Khaki Field Murph 38mm specification lists a water resistance of 10 bar (100 m) / 145 psi (328 ft). That 145 psi figure is the direct conversion of 10 bar using 14.5038, which confirms that watch ratings expressed in bar can be read as a pressure equivalent in psi.

    Pressure cookers work at lower gauge pressures. According to Wikipedia, a gauge pressure of 1.0 bar (15 psi) corresponds to a cooking temperature of about 121 °C (250 °F). Home espresso machines and pressure cookers both show why gauge pressure matters: the pressure value you see is above ambient pressure, not the total absolute pressure.

    Air compressors show a regional split. Besto Calculator notes that European equipment often uses bar, while US models typically display psi. Before setting a compressor, check which unit the regulator shows and convert as needed to avoid over-pressurization.

    Pressure scale showing common real-world application values

    Bar vs atm vs kPa: Complete Pressure Unit Conversion Matrix

    Pressure units overlap, and the standard atmosphere is a common source of confusion. According to Wikipedia’s atmospheric pressure reference, the standard atmosphere (atm) is defined as 101.325 kPa, which equals 1,013.25 hPa, 14.696 psi, and 1.01325 bar. The same values appear in the pressure unit guide from Best Tool Online.

    The table below covers the most common pressure units.

    Unit Equivalent
    1 bar 100,000 Pa = 100 kPa = 14.5038 psi = 0.986923 atm
    1 psi 6,894.757 Pa = 6.895 kPa = 0.0689476 bar = 0.068046 atm
    1 atm 101.325 kPa = 1.01325 bar = 14.696 psi
    1 kPa 0.01 bar = 0.145038 psi = 0.00986923 atm
    1 MPa 10 bar = 145.038 psi = 9.86923 atm

    For automotive work, psi and bar are the most practical units. For scientific and meteorological use, kPa and hPa often appear. MPa is common in high-pressure engineering and material specifications because 1 MPa equals exactly 10 bar.

    Why bar and atm are not exactly the same

    The bar was defined as a convenient multiple of the pascal, while the standard atmosphere is defined from the average sea-level pressure on Earth. According to Best Tool Online, 1 atm equals 1.01325 bar, so the difference is about 1.3%. In psi terms, that’s 14.5038 psi for 1 bar versus 14.696 psi for 1 atm. For most practical conversions, this difference is small, but it matters in calibration, weather data, and scientific work where a 1.3% gap can affect results.

    Conclusion

    Converting bar to psi comes down to one multiplier: 14.5038. But using the right pressure type and real-world context matters more than the math itself. Gauge pressure and absolute pressure describe different things, and mixing them up can lead to incorrect settings. Save the formula, keep the conversion chart nearby, and always confirm whether your device reads gauge or absolute pressure before applying a conversion. With that check in place, bar to psi conversion becomes a fast, reliable step rather than a source of error.

    FAQ

    Is 1 bar the same as 1 atmosphere (atm)?

    No. One atm equals 1.01325 bar and 14.696 psi, while 1 bar equals 14.5038 psi. The difference is about 1.3%, small for everyday use but relevant in scientific or calibration work.

    What is 2.5 bar in psi?

    Multiply 2.5 by 14.5038 to get 36.2595 psi. For practical use like tire inflation or equipment settings, that’s typically rounded to 36.3 psi.

    How do I convert psi back to bar?

    Divide the psi value by 14.5038, or multiply by 0.0689476. For example, 30 psi × 0.0689476 = 2.068 bar, which matches a common passenger car tire pressure range.

    What does 10 bar water resistance mean in psi?

    Ten bar equals about 145 psi and corresponds to a water resistance rating of approximately 100 meters. This rating appears in watch and diving equipment specifications, such as the Hamilton Khaki Field Murph 38mm.

    Does car tire pressure use bar or psi?

    US vehicles typically display tire pressure in psi, while European vehicles often use bar. A common passenger tire range is 30–35 psi, or about 2.1–2.4 bar. Always check the vehicle’s door sticker for the recommended value.

  • UPC vs EAN-13: Which Barcode Do US Sellers Actually Need?

    UPC vs EAN-13: Which Barcode Do US Sellers Actually Need?

    Header: one GS1 number printed in two regional lengths

    UPC vs EAN-13 really comes down to one digit. UPC-A is the 12-digit retail barcode for the US and Canada; EAN-13 is the 13-digit code used almost everywhere else. Both encode GS1 GTINs from the same system — a UPC-A is an EAN-13 with a leading zero. For US retail, license a GTIN from GS1 US and print UPC-A. Sunrise 2027 does not ban it.

    UPC vs EAN-13: The 3 Differences That Actually Matter

    For a US seller, this is a short answer. If your product gets scanned at a US or Canadian checkout, you print a UPC-A. UPC-A carries 12 digits and serves the US and Canada. EAN-13 carries 13 digits and serves almost everywhere else, as BoxHero describes the split.

    Neither format is technically better than the other. Both are GTINs drawn from the same global numbering system administered by GS1 — two regional lengths of one identifier family, not competing standards. That single fact removes most of the anxiety around this decision.

    It also helps to separate the number from the picture of the number. The bars are only a carrier. The licensed number is the product’s identity, and the symbol is simply how a scanner reads it. Vxceed puts it plainly: the GTIN, UPC, and EAN are the same idea at different lengths, all licensed from one standards body, while the barcode isn’t a number at all — it’s a picture of one.

    Why there are 12-digit and 13-digit versions of the same number

    The US grocery industry built the 12-digit UPC first, and the rest of the world standardized on a 13-digit version shortly after. Retail Scan & Stock describes the UPC-A as introduced in North American supermarkets in 1974, with the European Article Number developed shortly after to include a country code prefix. Because the 13-digit form needed room for that prefix, US numbers effectively became the same numbers with a zero in front.

    UPC vs EAN-13 at a glance (comparison table)

    Attribute UPC-A EAN-13
    Digit count 12 13
    GTIN equivalent GTIN-12 GTIN-13
    Primary region US and Canada Everywhere else
    Issuing body GS1 / GS1 US GS1 / GS1 US (regional member organizations)
    Scans at US checkout Yes Yes
    Typical package level Retail unit Retail unit

    Barcode vs GTIN vs SKU: three different things

    A GTIN is the global identity of a product configuration. A barcode is the machine-readable symbol that carries it. A SKU is a private, merchant-defined code that sits alongside the GTIN inside your own systems — it never replaces it. SKUs are internal and unregulated; GTINs are globally unique and licensed.

    Three-part concept diagram: GTIN, barcode, and SKU as different roles

    Which Barcode Should You Print? A Decision Tree for US Sellers

    Here’s the one-line rule: if you’re selling physical consumer goods in the US, print UPC-A from a GS1 US-licensed GTIN. Most readers won’t need an exception to that.

    The table below maps five real situations to a format.

    Your situation What to print Why
    US marketplace only (Amazon, Walmart Marketplace) UPC-A from a GS1 US GTIN The marketplace validates the number against the GS1 registry
    US retail shelf or big-box UPC-A from a GS1 US GTIN Retailers require a licensed GTIN and a unit-level symbol
    US seller exporting abroad The same GTIN, printed as EAN-13 The number does not change — only the printed length does
    Book or audiobook EAN-13 Bookland barcode from an ISBN Books use the ISBN, not a GS1 GTIN
    Internal inventory only Code 128 or your own store codes No GS1 license needed, because the code never leaves your building

    A single GS1 GTIN covers both markets. The same number prints as UPC-A domestically and as an EAN-13 with a leading zero abroad, so nobody needs to buy two numbers for one product.

    Internal-only labels never need a GS1 license, because they never leave your four walls. BoxHero states the rule directly: a GS1 barcode is required only when the product is sold through a retailer or marketplace that scans it at checkout or verifies it in a catalog.

    Three questions settle almost every case: where the item will be scanned, who verifies the number, and whether the code must resolve in a global registry.

    Simple decision flow for US sellers: US retail, export, or internal only

    US retail shelf vs US marketplace: same barcode, different validation

    The symbol is identical in both channels — a UPC-A at unit level. What differs is who checks it. A retail shelf buyer may accept your packaging spec after a vendor onboarding review, while a marketplace validates your GTIN programmatically against the GS1 database before your listing goes live.

    Selling internationally from the US: do you need an EAN-13 too?

    No. You need a 13-digit number the moment you print for a market that expects EAN-13, but you don’t need a second identifier. Add the leading zero to the same GTIN and render it as EAN-13. That’s a formatting step, not a licensing step.

    If your product is a book: ISBN / Bookland EAN instead of a UPC

    Books are the one common exception. According to ISBN Services, the 13-digit ISBN is converted into an EAN-13 barcode commonly printed on the back cover, often called the Bookland EAN barcode. The ISBN itself comes from the national agency — Bowker in the United States — so you don’t license a GS1 GTIN for the book edition. For the printing side, our guide to generating an ISBN barcode walks through the Bookland EAN requirements step by step. Non-book items bundled with a book, such as a tote, toy, or media accessory, still need their own GS1 GTIN.

    UPC vs EAN-13 Digit by Digit: Prefix, Item Reference and Check Digit

    Once you know what each position controls, you know which digits are yours and which ones you must not touch.

    What each digit position means in a UPC-A and an EAN-13

    Wikipedia’s UPC entry describes the UPC-A structure as SLLLLLLMRRRRRRE, where S, M, and E are guard patterns and the L and R sections carry the 12 digits. The first digit is a number system digit, and the last is an error-detecting check digit. In practice, the first section holds a GS1 company prefix assigned by the local GS1 organization, the middle holds the product reference, and the final digit validates the whole thing.

    EAN-13 follows the same logic with one extra position at the front. Vxceed summarizes every GTIN as three parts: a GS1 company prefix, an item reference assigned by the manufacturer, and a mathematical check digit at the end that verifies scanning integrity.

    Format Position 1 Company prefix Item reference Final digit
    UPC-A (12 digits) Number system digit Assigned by GS1 member organization Assigned by the brand Check digit
    EAN-13 (13 digits) Issuing-region prefix Assigned by GS1 member organization Assigned by the brand Check digit

    One caution about the EAN-13 prefix: it’s an issuing-region indicator, not a country of manufacture. It identifies which GS1 member organization issued the number. A product manufactured in China and sold by a US brand still carries a US prefix, because the US brand’s GS1 member organization issued that GTIN.

    How does the check digit work in a 12- vs 13-digit number?

    The check digit is the final modulo-10 computed digit used for error detection. For a UPC-A, you sum the digits in odd positions, multiply by 3, add the digits in even positions, take the remainder modulo 10, and subtract from 10. Wikipedia walks through the example 03600029145x, where the odd-position sum is 14, multiplied by 3 gives 42, plus the even-position digits gives 58, and 58 mod 10 = 8, so the check digit is 10 − 8 = 2.

    For an EAN-13, the developer walkthrough on DEV Community uses the same weighted logic with a different weight order: take the first 12 digits of 400638133393, multiply odd positions by 1 and even positions by 3, sum to 89, and reach the next multiple of ten — 90 — so the check digit is 1, giving the complete number 4006381333931.

    The error-detection math is worth knowing, because it explains why the check digit isn’t a formality. Wikipedia reports that UPC-A detects 100% of single-digit errors and roughly 89% of transposition errors — a transposition escapes detection only when the difference between two adjacent digits is 5, which works out to about 11.111% of transpositions being undetectable.

    GTIN-8, -12, -13 and -14: unit, inner pack, case and store-issued codes

    The GTIN family covers more than the two retail lengths. Retail Scan & Stock lays out the hierarchy: GTIN-8 for very small retail packages such as gum or cosmetics, GTIN-12 encoded in UPC-A for US and Canadian units, GTIN-13 encoded in EAN-13 globally, and GTIN-14 encoded in ITF-14 or GS1-128 symbols on outer shipping cartons and master cases.

    Two further categories sit outside that hierarchy. Variable-measure and restricted-circulation codes are store-assigned numbers for items weighed or priced at the point of sale — Wikipedia notes that number system 2 is reserved for local use for items sold by variable weight, where the store assigns an item number and the remaining digits carry weight or price. These aren’t GTINs at all, and they’re scoped to the store that issued them. Separately, JAN is Japan’s implementation of the EAN system — a regional name for the same 13-digit structure, not a different standard.

    Is a UPC-A Just an EAN-13 With a Leading Zero?

    Yes — mathematically. A 12-digit UPC-A is identical to the 13-digit EAN-13 formed by prefixing a zero. Retail Scan & Stock gives the worked example: UPC 012345678905 is represented in global 13-digit databases as 0012345678905. The same equivalence is corroborated by BoxHero and Vxceed, both of which describe the leading-zero relationship in the same terms.

    One GTIN shown as a 12-digit UPC-A and a 13-digit EAN-13 with leading zero

    The practical consequences are simple. You don’t buy a new number to sell the same item internationally, and you don’t need to convert anything on the package artwork beyond choosing which length to render.

    Conversion is a formatting operation, not an identity change. A genuinely new product, size, flavor, or multi-pack still needs its own GTIN — reusing one number across variants is a separate mistake that has nothing to do with the UPC-versus-EAN-13 question.

    Do US checkout scanners actually read EAN-13 barcodes?

    Yes. Modern US point-of-sale systems are built to read 13-digit EAN-13, since a US UPC-A is the leading-zero form of the same number. Retail Scan & Stock notes that since the 2005 GS1 Sunrise initiative, virtually all modern retail scanners and smartphone camera decoders read both UPC-A and EAN-13 formats. A US product should still print UPC-A, because that’s what US packaging standards, retailers, and marketplace listings expect.

    UPC-E and EAN-8: the compressed formats people confuse with UPC-A and EAN-13

    These are separate small-package symbologies, not shortened versions you generate by trimming digits. BoxHero describes UPC-E and EAN-8 as compressed forms for items like a stick of gum or a small cosmetic tube. If you’re weighing the small-package forms, this EAN-13 vs EAN-8 comparison covers the shorter format in detail. Wikipedia adds that UPC-E suppresses the number system digit, trailing zeros in the manufacturer code, and leading zeros in the product code, and can only correspond to UPC-A number systems 0 or 1.

    How to Get a UPC or EAN-13 in the US: GS1 Licensing and Costs

    GS1 US is the authoritative issuer in the United States. You license numbers — you don’t buy a barcode image from a generator.

    There are two routes. A single GS1 US GTIN covers one product. A GS1 Company Prefix covers a catalog, and the prefix is what lets you assign numbers yourself per item and per packaging level.

    On reported pricing, BoxHero states that a single GS1 US GTIN costs a one-time $30 with no annual renewal fee, and that a GS1 Company Prefix carries an initial fee based on how many numbers you need plus an annual renewal fee, with published first-year figures starting at a few hundred dollars. Retail Scan & Stock reports the same $30 individual GTIN figure and notes that other GS1 member organizations apply regional fee structures. Treat these as published figures to verify at source — check gs1us.org before you budget.

    Assign a distinct GTIN to every sellable variant and to each packaging level: each, inner pack, and case. Reusing one number across variants is the most common expensive mistake, because it corrupts stock records, orders, and sales history at the same time — and the damage tends to surface late.

    Single GTIN vs a GS1 Company Prefix: how to choose

    Choose a single GTIN if you’re listing a handful of products and don’t expect to change packaging levels soon. Choose a company prefix the moment you have a catalog, multiple sizes, or case-level labeling to manage, because the prefix is what lets you assign the next number yourself instead of starting a new purchase each time. BoxHero notes that once you license the number, the GS1 US Data Hub generates the barcode image as a PNG or EPS file at one fixed size.

    Are third-party reseller barcodes safe to use?

    Cheap reseller codes are real numbers, but they carry a hidden mismatch. According to BoxHero, these codes come from GS1 company prefixes bought before 2002 that remain legally transferable under a court settlement, and for some purposes they scan fine. The problem is ownership: a code registered to the reseller’s original company name can fail a marketplace check even though the bars scan correctly at a register.

    Free barcode generators and validators render symbols and check digits accurately — Yotpo’s generator, for example, handles the specific digit rules and check digit calculation for UPC-A and EAN-13 — but none of them grant you a licensed number. Marketplaces check the registry, not the image.

    US Barcode Launch Checklist: From GS1 License to Printed Symbol

    This sequence runs from licensing to a scanned proof. Each step names the failure point it prevents.

    1. License the GTIN from GS1 US. Failure point: buying a reseller code whose registry owner does not match your brand.
    2. Assign a number per variant and per packaging level. Failure point: two flavors or two sizes sharing one code, which corrupts stock records and listings.
    3. Create artwork with the correct symbology for the number. Failure point: applying an EAN-13 symbol to a 12-digit payload, or the reverse.
    4. Meet size and quiet-zone rules. Failure point: a barcode placed outside the quiet zone, which produces a symbol that will not scan.
    5. Scan-test a printed proof with a real scanner. Failure point: discovering a rendering problem after the full print run.
    6. Store the number as text. Failure point: database or spreadsheet handling that silently alters the identifier.
    7. Verify the number against marketplace metadata. Failure point: a catalog mismatch that reads as an invalid GTIN during listing review.
    8. Keep the human-readable digits complete. Failure point: truncated digits printed under the bars, which breaks manual key entry when a scanner fails.

    The print specifications your printer needs

    Treat these as the spec you hand your printer, not trivia. Wikipedia gives the nominal x-dimension for UPC-A as 0.33 mm (0.013 in) and the nominal symbol height as 25.9 mm (1.02 in), with guard pattern bars extended downward by five times the x-dimension. A complete UPC-A is 95 modules wide: 84 modules for the 12 digits plus 11 modules for the start, middle, and end guard patterns. A quiet zone at least 9 times the x-dimension wide must be present on each side. UPC-A can be reduced or magnified anywhere from 80% to 200%.

    For developers and ops: storing, normalising and validating barcode data

    Spreadsheet and database handling is where clean identifiers go wrong. Retail Scan & Stock identifies three specific failure modes: leading zeros dropped because a spreadsheet reads 012345678905 as the number 12345678905; long digit strings displayed in scientific notation; and a 15-digit numeric precision limit that converts digits past the 15th position to zeroes. Microsoft Support documentation confirms the 15-significant-digit limit, and the recommended fix is to format the column as Text before entering or importing identifiers.

    The DEV Community validator walkthrough makes the same point from the engineering side: keep barcode values as strings, never pass them through Number(), and validate the check digit before rendering anything. That author also draws a boundary worth keeping: a passing check digit means the number satisfies the mathematical rule — it does not mean the number was licensed correctly, that the product exists, or that a marketplace will accept it.

    Why Amazon, Walmart and Target Reject Some Seller Barcodes

    Marketplaces verify the GTIN against the GS1 registry and expect the brand and company on record to match the listing. A real but mismatched number fails that check and is treated as an invalid GTIN.

    The rejection mechanism is catalog mismatch — not a broken barcode, and not a UPC versus EAN-13 format problem. This distinction matters, because sellers often respond to a rejection by reprinting the symbol, which fixes nothing.

    How marketplace GTIN validation actually works

    BoxHero describes the process: Amazon checks the barcode you enter against the GS1 database and expects the brand and company on record to match your listing, and Amazon’s barcode policy states that it verifies UPCs through the GS1 database and treats codes that do not match GS1’s information as invalid. A reseller code registered to the reseller’s original company name can fail that check, so even when the code scans, a listing may be rejected for an invalid GTIN. The practical safeguard is to license codes directly from GS1 US for anything going to Amazon, Walmart, or Target, and to keep the GS1 certificate on hand — these marketplaces can ask you to prove the code is registered to your company.

    ASIN is not a GTIN (and a case code is not a unit code)

    Two further mismatches cause avoidable rejections. An ASIN is Amazon’s own catalog identifier and does not replace a GTIN anywhere else, as Vxceed notes in its list of external identifiers a SKU maps to online. And a GTIN-14 case code will not scan as a retail unit — Retail Scan & Stock warns against scanning a master carton symbol as an individual piece count on the sales floor.

    Sunrise 2027 and 2D Barcodes: What Changes for Your UPC-A

    Sunrise 2027 is a GS1 target for retail point-of-sale systems to read 2D codes — QR, GS1 DataMatrix, GS1 Digital Link — alongside the 1D barcodes they read today. It is a target, not a government mandate.

    Sunrise 2027 in one paragraph: target, not mandate

    In BoxHero’s rendering, GS1 states that “by the end of 2027, retail point-of-sale systems should be able to read and process 2D barcodes in addition to the 1D barcodes they read today.” Three things keep this in proportion: the UPC is not being banned, there is no fine for skipping it, and the pressure comes from large retailers rather than regulators. A 1D barcode holds one piece of information — the GTIN — while a 2D code holds several thousand characters, including batch number, expiration date, serial number, and a web link tied to the product. Adoption is already underway: GS1 reports the transition is being tested in 48 countries representing 88% of the world’s GDP, per a 2024 GS1 statement cited by BoxHero.

    The practical action now is small. Keep printing the UPC-A, leave label real estate for a future 2D carrier, and make sure your GTIN data is clean enough to power one. GS1 suggests printing both the 1D and 2D barcode on the same package during the switch.

    1D barcode and 2D code coexisting on the same product label

    From the first 1974 scan to 2D in 2027

    The 1D retail barcode has been in continuous use since the first UPC scan. Wikipedia records that the first UPC-marked item scanned at retail checkout was a 10-pack of Wrigley’s Juicy Fruit chewing gum, purchased at the Marsh supermarket in Troy, Ohio, at 8:01 a.m. on 26 June 1974, ringing up 67 cents on an NCR cash register.

    That longevity was deliberate. Murray Eden, a consultant on the team that created the UPC barcode and chairman of a committee of scientists at MIT, helped, in his 1970s-era phrasing, “select a symbol that would endure the inevitable rush of technology that lay ahead.” He also chose the font and introduced the human-readable digits below the bars as a fail-safe in case a reader malfunctioned. GS1 now frames Sunrise 2027 as coexistence rather than replacement — which is exactly consistent with a symbol chosen for endurance more than fifty years ago. The history of QR codes tells the same story from the other direction: a 2D carrier invented for Toyota factory floors that now shares labels with the 1D symbol it was never meant to replace.

    Conclusion

    UPC vs EAN-13 is not a choice between competing standards — it is one GS1 number printed in two regional lengths, and US sellers print the 12-digit UPC-A. License a GTIN from GS1 US (verify current pricing at gs1us.org before budgeting), assign a separate number to every variant and packaging level, generate the symbol to spec, scan-test a physical proof, and store the number as text. Reserve label space for a 2D carrier, but do not reprint anything for Sunrise 2027 — it is a target, not a mandate.

    FAQ

    Can I convert a 12-digit UPC to an EAN-13, or do I need to buy a new number?

    No purchase is required. Add a leading zero to the 12 digits and the result is the valid EAN-13 for the same item — for example, 012345678905 becomes 0012345678905. The conversion changes formatting only, never identity. You still need a new GTIN for a genuinely new product, size, flavor, or multi-pack.

    Do US checkout scanners actually read EAN-13 barcodes?

    Yes. Modern US point-of-sale systems are built to read 13-digit EAN-13, since a US UPC-A is the leading-zero form of the same number — Retail Scan & Stock notes that virtually all modern retail scanners read both formats. A US product should still print UPC-A, because that is what US retailers and marketplace listings expect.

    Can I just make up my own barcode number for my product?

    No. The number must come from a GS1-issued prefix so it resolves uniquely in the global registry. A self-invented number may render and even scan locally, but marketplaces and retailers that validate against GS1 will reject it. Internal-only labels for your own warehouse can use your own codes, because they never need to resolve globally.

    Is a UPC the same thing as a GTIN?

    A GTIN is the umbrella identifier family, and UPC-A (GTIN-12) and EAN-13 (GTIN-13) are two of its lengths. GTIN-8 covers small packages and GTIN-14 covers cases and pallets, so “GTIN” is the safe general term. Most US retail listings that ask for a “UPC” will accept any valid GTIN.

    Why does my barcode turn into scientific notation in Excel?

    Spreadsheets treat long digit strings as numbers, strip the leading zero, and switch to scientific notation past 15 digits. Retail Scan & Stock notes that Excel numeric precision is limited to 15 significant digits, so digits past the 15th position can become zeroes. Store barcode values as text and validate the check digit before exporting to artwork — and always keep the leading zero on a 13- or 14-digit GTIN.

    Will my UPC stop working in 2027 because of Sunrise 2027?

    No. Sunrise 2027 is a GS1 target for retail POS to read 2D barcodes alongside 1D, not a ban or a deadline for brands. There is no fine for non-compliance and UPC-A and EAN-13 remain scannable. The practical move is to keep printing your UPC and reserve label space for a future 2D carrier.

    Do books need a UPC, or is the ISBN barcode enough?

    Books carry a 13-digit ISBN encoded as an EAN-13 Bookland barcode, not a UPC-A, according to ISBN Services. ISBNs come from Bowker in the US, so you do not license a GS1 GTIN for the book itself. Non-book items bundled with a book — a tote, a toy, a media accessory — still need their own GS1 GTIN.

    Do I need a separate UPC for each size, color, or multi-pack?

    Yes. Every sellable variation that a retailer scans or stocks separately needs its own distinct GTIN. Different packaging levels also differ: each unit, inner pack, and case carry their own GTIN, with GTIN-14 and ITF-14 on cases. Reusing one number across variants is a leading cause of listing rejections and inventory errors.

  • How to Compress a MOV File Without Losing Quality

    How to Compress a MOV File Without Losing Quality

    Large MOV compressed to a smaller MP4 while keeping quality

    The fastest way to compress a MOV file without losing quality is to re-encode it with a modern codec: convert ProRes or high-bitrate MOV to H.264 for compatibility, or H.265 for smaller files, lower the bitrate, and export as MP4. Expect 50–90% reductions with little visible quality loss — but verify a 15-second sample first.

    Why Your MOV File Is So Big: It’s a Container, Not a Codec

    MOV is a container format, not a video format. The same .mov extension can hold H.264, H.265, Apple ProRes, DNxHD, Motion JPEG, or uncompressed audio, and the file size depends entirely on what’s inside. Two files with the same duration and the same filename can differ by a factor of twenty.

    MOV container holding different codecs like H.264, H.265, ProRes

    ProRes is the single most common reason a MOV is huge. ProRes looks excellent and edits smoothly, but it eats storage fast: a short 4K ProRes clip can hit several gigabytes within minutes, while the same footage encoded as H.264 takes up a fraction of that space. Screen recordings balloon the same way when the capture tool defaults to a high bitrate. That’s why a two-minute clip can take longer to upload than it took to record.

    File size ≈ bitrate × duration, which makes bitrate the biggest single lever you control. According to WowTechHub, re-encoding high-bitrate or ProRes MOV to H.264 or H.265 typically cuts size by 50% to 90% — a 4 GB 1080p MOV recorded at 60 Mbps becomes roughly a 600 MB file at 10 Mbps, with very little visible loss. The same lever drives compressing any video without losing quality; MOV is just the container where it shows up most.

    Encoder choice compounds that gain. WonderFox illustrates it with a 100-minute 4K source: the same footage lands at roughly 30 GB in MPEG-4, about 10 GB in H.264, and around 5 GB in H.265 or VP9 — a 3x to 6x overall reduction. The point isn’t to make every file tiny. As Ava Taylor of WowTechHub puts it, “Compression is not about making every file tiny. It is about making the file small enough for its purpose while keeping viewers from noticing the tradeoff.”

    Check What’s Inside Your MOV in 30 Seconds

    Before you change a single setting, identify what the file actually contains. Open it in QuickTime Player and use the movie inspector to read the codec, resolution, and data rate. Or inspect the file with a utility such as MediaInfo or ffprobe and look at three numbers: video codec, bitrate, and resolution.

    Those three values decide everything downstream. A 50 Mbps H.264 source has enormous headroom; a 5 Mbps H.264 source has almost none. Note the audio codec at the same time — uncompressed audio inside a MOV is rare, but it inflates a file noticeably when present.

    The Formula That Predicts Your Result: Bitrate × Duration

    Size math is simple enough to do in your head. Multiply the bitrate by the duration, and you get the approximate file size — a 60 Mbps clip runs about 7.5 MB per second, or roughly 450 MB per minute, before audio.

    Use that to set expectations before encoding. If the input bitrate is 60 Mbps and your target is 8 Mbps, you’re asking for a 7.5x reduction, which a modern codec handles comfortably. If the input is already 6 Mbps, the same target demands visible sacrifices. Resolution and frame rate feed into this too: higher resolutions and frame rates like 60 fps, 90 fps, or 120 fps require proportionally more data to stay sharp. That’s why a 4K60 clip is so much heavier than a 1080p30 clip of the same length.

    How to Compress a MOV File: The 3-Step Method

    The practical workflow comes down to three decisions — codec, quality target, and output container — plus one optional set of geometry levers if you still need more space.

    Three-step workflow: choose codec, set CRF, export container

    Step 1: H.264 or H.265 — Which Codec Should Your MOV Become?

    H.264 (AVC) is the compatibility default: it plays almost everywhere, on nearly every device made in the past decade. H.265 (HEVC) delivers smaller files at the same visual quality, which matters most for 4K and long clips, but it encodes far more slowly and older hardware may fail to play it.

    Choose H.264 when the file’s destination is unknown or broad. Choose H.265 when you control playback and size is the priority. Either way, remember that ProRes is a source codec, not a delivery codec — it belongs in your editing pipeline, not in an email.

    Step 2: CRF 22 as Your Default (and When to Go Lower)

    Use Constant Quality (CRF) rather than guessing a bitrate. According to Uploadex, CRF 22 is the everyday “looks the same to me” setting: high-bitrate sources can drop by roughly 80% with no visible loss, while H.265 pushes the savings further. HandBrake’s own scale treats 18 as visually lossless at a large file size, 20–22 as visually lossless to most viewers, 23 as showing slight loss on a side-by-side, and 24–28 as noticeably compressed.

    Recommended ranges: H.264 → CRF 18–23; H.265 → CRF 22–28. The first-pass sanity command in FFmpeg looks like this:

    ffmpeg -i input.mov -c:v libx264 -crf 22 -preset slow -c:a aac -b:a 128k output.mp4
    

    -preset slow trades encoding time for better compression efficiency. For H.265, swap in libx265 and CRF 24.

    Step 3: Export as MP4, or Keep the MOV Wrapper?

    Converting MOV to MP4 is the most common path because MP4 balances size, compatibility, and sharing. Keeping the MOV wrapper makes sense when the file is heading back into an editing pipeline that expects ProRes-class handling.

    Audio deserves its own decision. AAC at 128 kbps is enough for voice and screen recordings; 192–256 kbps is safer for music-heavy content. Over-compressing audio makes otherwise good video feel cheap. And since audio is a small share of total size, there’s little to gain from cutting it below 128 kbps.

    If the file is still too large after codec and CRF are set, then reach for geometry: downscale resolution, then reduce frame rate from 60 to 30 fps. Change codec and CRF first, geometry last.

    Source Type × Target Use: The MOV Compression Decision Table

    Most guides mix ProRes sources and already-compressed H.264 sources into the same advice, but their headroom is completely different — one can shrink by 80%, the other barely moves. This table separates them.

    High-bitrate source has large compression headroom; already-compressed source has little

    Source bitrate (MOV contents) After CRF 22 H.264 After CRF 22 H.265 Visible quality loss
    4K ProRes master → delivery copy ~80% smaller Smaller still None
    50 Mbps (raw camera H.264) ~6 Mbps ~4 Mbps None visible
    20 Mbps (high-quality export) ~4 Mbps ~3 Mbps None visible
    10 Mbps (typical online video) ~3 Mbps ~2 Mbps None visible
    5 Mbps (already compressed) ~3 Mbps ~2 Mbps Slight at busy scenes

    Source: Uploadex, which frames the rule plainly — you can drop a high-bitrate source by 80% without visible loss, but you cannot drop an already-compressed file by another 80%, because there is no quality left to throw away.

    Match the output to its destination rather than to a single universal setting. WowTechHub offers typical bands by use case:

    Use case Resolution Codec Typical bitrate
    Email preview 720p H.264 2–5 Mbps
    Website video 1080p H.264 or H.265 5–10 Mbps
    4K sharing copy 4K H.265 20–35 Mbps
    Archive master Original ProRes or high bitrate Keep original

    Resolution downscaling (4K to 1080p) is one of the few remaining levers once CRF is fixed, but only apply it when the destination platform never displays 4K. For screen recordings, confirm small text is still legible before committing.

    Keep the original as a master. The compressed file is a delivery copy, not a replacement. That single habit prevents the re-compression death spiral where a file is squeezed again and again until artifacts dominate.

    Reading the Table: Same MOV, Five Very Different Outcomes

    Batch results show how much this matters at scale. One marketing team holding 200 product clips went from 800 GB to about 120 GB by re-encoding delivery copies while masters stayed on a backup drive, according to WowTechHub. A creator’s review folder of ten 3 GB 4K MOV files dropped from 30 GB to roughly 5 GB — about 83% — the same way.

    Frame-rate reduction is an optional last row in this table: 60 → 30 fps where the platform does not need 60 fps.

    Screen-Recording MOV Files Compress Differently

    QuickTime and OBS screen recordings are among the most common .mov sources, and the generic “just drop the resolution” advice backfires on them. Static UI and slideshow-style frames compress extremely well, so raise CRF to 26–30 before touching resolution at all.

    Keep resolution when the recording contains small text, code, or UI labels. Downscaling destroys readability in a way that CRF never does — a slightly softer gradient is forgivable, an unreadable menu bar is not. Validate with a 15-second sample at full size before committing to a 40-minute render.

    Frame-rate reduction is usually safe here, since most recordings do not need 60 fps. A Microsoft Tech Community thread from September 2026 captures the classic version of this problem: a user named Rhysin had QuickTime screen recordings over 1 GB plus other movies stored on a Windows 10 PC, and needed both smaller files and something small enough to email.

    How to Compress a MOV File on Mac: QuickTime, iMovie, and Finder

    Mac users have three built-in options, and all three are convenient but limited in the same way: they give you presets, not parameters.

    QuickTime’s Export As Options (and Their Limits)

    QuickTime Player is both the main source of .mov files and a limited export tool. File → Export As offers 1080p, 720p, and 480p options plus a “Smaller File Size (HEVC)” choice, but it gives no CRF control and no reliable size estimate before you commit. QuickTime’s Share → Email path does show an estimated output size along with frame rate and codec details, which makes it useful for rough email targets, though still not precise.

    When you need CRF 22, a specific megabyte count, or batch processing, QuickTime is the wrong tool.

    iMovie Share → File / Email: Resolution Presets Explained

    iMovie is free and built in, and exports smaller files through Share → File or Share → Email with resolution and quality presets. The File route displays an estimated output size in the corner of the export dialog, which is enough for a rough cut. It is not built for precise size targets, and it offers no codec choice beyond what the presets imply.

    Finder’s Encode Selected Video File Only Works on MOV

    Finder’s right-click “Encode Selected Video File” is MOV-only and preset-limited — it will not help with MP4 or MKV files, so do not expect it to be a general-purpose compressor. Within that boundary it is fast and simple, letting you pick a resolution, convert to Apple ProRes, or extract audio only.

    Note also where the file is headed. Editing pipelines often want MOV or ProRes, so exporting the delivery MP4 and keeping the MOV master is the correct split, not a compromise.

    How to Compress a MOV File on Windows with HandBrake

    HandBrake is the free, cross-platform default for MOV compression, and it is what most of the practical advice in this guide assumes.

    HandBrake Settings for a MOV File: Fast 1080p30 + Constant Quality RF 20–23

    Load the .mov into HandBrake, pick the Fast 1080p30 preset, then switch to the Video tab and set Constant Quality to RF 20–23 — RF 22 is the standard “preserve quality” choice. Set the container to MP4, choose an output location, and start the encode. A 4 GB 1080p source typically lands around 1.5–2 GB at CRF 22, though encoding speed depends heavily on your CPU.

    Use the queue to batch-process dozens of clips instead of repeating the settings dialog. That is the workflow the 200-clip marketing case implies, and it is the difference between a one-off fix and a repeatable process. For whole libraries of mixed media, bulk resizing photos and videos with a privacy-first tool follows the same batch logic.

    VLC’s Media → Convert/Save route works but cannot preview the output size before encoding, which makes it a fallback rather than a planning tool. For exact sizes and scripted batches, move up to FFmpeg; for clips already inside a timeline, Premiere Pro or DaVinci Resolve let you preview an estimated output size while you adjust encoder, bitrate, and resolution.

    A Mac Screen Recording MOV on a Windows PC: What Changes

    Cross-platform work exposes a gap most guides skip. A QuickTime screen recording made on a Mac plays on Windows only if the right codec is present, and installing playback patches treats the symptom. The cleaner fix is to transcode the file once to H.264 MP4 in HandBrake, which produces a file that plays natively and is already compressed to a sensible size.

    Windows users also encounter the “saved movie” case — a .mov downloaded or exported from another app, with no QuickTime ecosystem around it at all. The same HandBrake workflow applies.

    Online MOV Compressors: What the Free Tiers Actually Allow

    Browser-based compressors are convenient, but their limits change frequently and competing sources contradict each other. Verify on the official page before relying on any number below.

    The Dated Tool Comparison Table (Upload Cap, Watermark, Output, Privacy)

    Tool Free upload cap Watermark on free Notes Paid tier
    ScreenApp 2 GB No Encrypted in transit and at rest; no account required $19/month annual
    FreeConvert 1 GB Not stated Supports target size, quality, resolution, max bitrate $12.99/month
    Clideo 500 MB Yes No output format choice Not stated
    VEED 1 GB Yes — Not stated
    Adobe Express 1 GB Not stated 480p–4K output with a live size-estimate slider Free plan available
    FileReducer Guest 50 MB / Free 100 MB / Pro 1 GB / Business 2 GB No Files deleted after 1 hour / 24 hours / 30 days by tier Pro and Business
    Ezgif ~35 MB No Clip testing only —
    Clipchamp Conflicting: 20 GB vs 500 MB Not stated Sources disagree — check the official page —

    Caps and prices for ScreenApp, FreeConvert, Clideo, and VEED were checked by ScreenApp on 2026-09-12 and 2026-09-15. FileReducer’s tier structure and retention policy come from FileReducer (2026). Adobe Express supports files up to 1 GB with resolutions from 480p to 4K and updates an estimated output size as you move the compression slider — its example figures, such as turning a 1 GB drone video into a 90 MB MP4 or a 1 GB travel vlog into 180 MB, are vendor claims rather than independent tests.

    Two caveats worth stating plainly. First, unsupported audio codecs and HDR can make browser-based paths fail even when the file is under the size cap. Second, some third-party sites point two different product names at the same Clideo URL, so treat naming as unreliable.

    Why On-Device Compression Beats Uploading a 1 GB MOV

    Local browser compression avoids uploading your footage at all. SqueezeVid processes MOV up to 2 GB on your device and outputs an H.264 MP4, with a separate 10 GB browser beta at original resolution and a 10 GB server-side channel when uploading is acceptable. It uses FFmpeg in the browser, and it warns that memory-only browsers cap outputs at 512 MiB.

    The same source offers the most honest expectation-setting in this category: savings depend on the source video, duration, resolution, and bitrate, and already-compressed files may barely shrink.

    How to Compress a MOV File to a Target Size (and Why Email Usually Fails)

    Platform limits define the goal, so start there rather than at a quality setting. According to Uploadex, Gmail caps outbound attachments at 25 MB and Outlook at 20 MB.

    The Target-Size Formula (With a Worked Example)

    Target bitrate ≈ (target MB × 8 ÷ duration in seconds) − audio bitrate.

    For a 95 MB target on a 5-minute (300-second) video: 95 × 8 ÷ 300 ≈ 2,530 kbps total. Subtract 128 kbps for audio, and you have roughly 2,400 kbps for video. The same arithmetic works for a 500 MB web-upload cap or a 100 MB WhatsApp limit — each one produces a completely different bitrate budget.

    Two-Pass FFmpeg: Hitting an Exact Megabyte Count

    CRF cannot target a byte count, so exact sizes require two-pass encoding. The first pass writes statistics to a log; the second pass uses them with the calculated bitrate:

    ffmpeg -y -i input.mov -c:v libx264 -b:v 2400k -pass 1 -an -f null /dev/null
    ffmpeg -i input.mov -c:v libx264 -b:v 2400k -pass 2 -c:a aac -b:a 128k output.mp4
    

    Set expectations before you start encoding. If the file is only slightly over the limit, cut audio to 96–128 kbps and raise CRF by one or two points. If it is 40x over the limit, stop encoding and share a link instead — no quality-preserving compression turns a 4 GB MOV into an email attachment. As Surya Prakash of Uploadex notes: “If you’re compressing because you’re trying to email or share the file, compress less — or don’t compress at all — and use a file-sharing service with a download link.”

    Lossless, Visually Lossless, or Visible? How Much Quality Loss Is Acceptable

    Three tiers cover nearly every situation.

    True lossless codecs such as FFV1, HuffYUV, and Lagarith are reversible, but their compression ratios are far lower than lossy codecs — converting an already-compressed H.265 file to a lossless format actually makes it much larger. They belong in source-footage archiving, not delivery.

    Visually lossless is the practical target: CRF 18–22 for H.264, CRF 22–28 for H.265. These settings reduce file size considerably while producing output that looks identical to most viewers.

    Visible loss begins around CRF 28+, where blocking appears in motion and banding shows up in gradients and dark scenes.

    The rule that resolves most confusion: you can drop a high-bitrate source by around 80% without visible loss, but you cannot drop an already-compressed file by another 80%. As Uploadex puts it, there is no quality left to throw away.

    VP9 and AV1 offer better efficiency than H.265, but with slower encodes and narrower device support. Treat them as an advanced option, not a default recommendation.

    To judge your own output, pause on motion, dark, and gradient frames side by side. If you can spot the difference, back the CRF off by two points and re-run.

    Zip vs. Re-encode: Why Your Archive Didn’t Shrink

    Zipping a MOV does not meaningfully reduce it, because video is already compressed data — ZIP typically saves only a percent or two. Zip remains useful for bundling a master with project files — see how to zip a file on Mac and Windows — not for shrinking video.

    Does Compressing a MOV Reduce Audio Quality?

    Only if you lower the audio bitrate; the video codec you choose does not touch audio. AAC 128 kbps is fine for speech, while 192–256 kbps suits music-heavy content. Since audio is a small share of total size, cutting it rarely solves a size problem — keep it at 128 kbps minimum. Poor audio makes viewers perceive the video as worse than it actually is.

    Compressed but Still Too Big? Diagnose It in This Order

    Check 1 — did you actually re-encode, or just re-wrap? Remuxing a MOV into an MP4 container keeps the same bitrate and the same size. Codec is the lever that moves size; the container is cosmetic.

    Check 2 — was the source already compressed? A 5 Mbps MOV has almost no headroom left. According to Uploadex, an already-compressed 5 Mbps source only reaches about 3 or 2 Mbps, with slight loss in busy scenes. Verify the input bitrate before assuming the tool failed.

    Check 3 — did you change codec and CRF, or only the container and filename?

    Check 4 — is your target a hard platform limit? Gmail’s 25 MB and Outlook’s 20 MB are hard constraints, not soft goals. If that is the destination, switch strategy to a share link instead of squeezing further — the same workaround that gets large files past Discord’s 20MB file limit.

    Check 5 — are resolution and frame rate still untouched? Downscaling 4K to 1080p or 60 fps to 30 fps is the remaining lever once CRF and bitrate are optimized.

    Check 6 — did the export silently fall back to a default preset? Confirm the output’s actual resolution, codec, and bitrate rather than trusting the filename.

    Keep the Original as a Master: Verifying Your Compressed MOV

    The compressed file is a delivery copy. Keep the untouched MOV master on separate storage so you never re-compress an already-compressed file. That is exactly how the 800 GB → 120 GB marketing team reduction worked: masters stayed on a backup drive while only delivery copies were re-encoded.

    Verification follows four steps. Compress a 15-second sample of the busiest section at full resolution and watch it before rendering the whole clip. Compare motion, dark, and gradient scenes side by side, and if artifacts appear, raise quality by two CRF points and re-run. Check orientation on portrait footage and confirm small on-screen text is still readable. Then name the output with resolution, codec, and bitrate — product-demo_1080p_h264_8Mbps.mp4 — so a future replacement is a lookup rather than a guess.

    Verify a 15-second sample before encoding the full clip

    Store masters and delivery copies in separate folders with different backup rules: masters get redundancy, copies get deleted after the campaign.

    Conclusion

    How to compress a MOV file comes down to knowing what is inside the container. Re-encode ProRes or high-bitrate footage to H.264 at CRF 22 — or H.265 when size matters more than compatibility — and keep the original as a master.

    Diagnose your file first, pick the row in the decision table that matches your source and destination, run a 15-second sample, verify it at full size, then encode the full clip. HandBrake’s Fast 1080p30 preset with RF 20–23 handles most jobs; FFmpeg handles exact targets. And if the goal is a 25 MB email attachment, skip the squeeze entirely and send a share link.

    FAQ

    What is the best codec for compressing MOV files?

    H.264 is best for maximum compatibility and playback everywhere. H.265 (HEVC) delivers the smallest file at the same quality, which matters most for 4K and long clips. The trade-off: H.265 encodes slower and older devices may not play it. ProRes is a source codec, not a delivery codec.

    Should I convert MOV to MP4 when compressing?

    Yes for sharing, uploading, and email-size targets — MP4 is the most portable container and adds no extra quality loss. Keep MOV if the file is going back into an edit timeline or needs ProRes-class intermediate handling. Container choice does not change file size by itself; the codec and bitrate do.

    Can a MOV file be compressed without losing quality?

    Truly lossless codecs such as FFV1, HuffYUV, and Lagarith barely shrink the file, so they are archive-only. Visually lossless is the practical answer: CRF 18–22 for H.264, 22–28 for H.265. High-bitrate sources can drop about 80% with no visible change; already-compressed files cannot.

    Why is my compressed MOV file still too large?

    The most common cause is that the source was already compressed, leaving little quality to remove. The second is remuxing rather than re-encoding, which leaves the bitrate unchanged. The third is a hard cap like Gmail’s 25 MB — that calls for a share link instead of more compression.

    Does compressing a MOV file reduce audio quality?

    Only if you lower the audio bitrate; the video codec you choose does not touch audio. AAC 128 kbps is usually enough for speech and screen recordings, while 192–256 kbps suits music. Audio is a tiny share of total size, so keep it at 128 kbps minimum rather than cutting it to solve a size problem.

    Can I compress a MOV file on my phone?

    Yes — phone-side editors and share-sheet compression options handle short clips, and cloud tools accept uploads up to their free-tier cap. Expect less control: no CRF setting, limited codec choice, and often forced downscaling. For a 1 GB+ MOV, a desktop tool like HandBrake gives far more control over size and quality.

    Is zipping a MOV file an effective way to reduce its size?

    No — video is already compressed data, so ZIP usually saves only a percent or two. Zip is useful for bundling a master with project files, not for shrinking video. If a MOV must get smaller, re-encode it to H.264 or H.265 instead.

  • How Many Days Between Two Dates: Calculator + Exact Rules

    How Many Days Between Two Dates: Calculator + Exact Rules

    Header: calendar dates and day count between them

    To figure out how many days between two dates, subtract the earlier date from the later one. For example, September 1 to September 15, 2026 is 14 days. If you want both endpoints counted, turn on “include end date”; if you need to skip weekends, switch to business days.

    How Many Days Between Two Dates? The Direct Answer

    The basic definition fits in one line: total days = end date − start date. Every date calculator, spreadsheet function, and programming library uses the same math on the two values you enter as start and end dates.
    Here’s a simple example you can check by hand: September 1 to September 15, 2026 returns 14 days, because the usual elapsed-day method counts the start date but stops before the end date (calculatorsconversion). Count the same range inclusively, and you get 15.

    One set of inputs often returns several numbers, and each number answers a different question. A date difference calculator usually shows total days, total weeks, a years-months-days breakdown, and a business-day count side by side. The Texas Instruments-style breakdown used by ROBERIN makes this clear: 2024-01-15 to 2024-07-16 returns 183 days, 6 months 1 day, and 26 weeks 1 day — three ways to describe the same span.

    Two settings decide which number you should trust. The include end date toggle controls whether the final calendar day counts. The business days toggle controls whether Saturdays, Sundays, and sometimes holidays are removed. Set both before you read the result, not after.

    All of this works on calendar dates in the Gregorian calendar. A day count measures whole calendar days, not clock time, so a 23-hour or 25-hour daylight-saving day does not change the answer (calculatorsconversion).

    The one-line formula: end date − start date

    Written out, the formula is elapsed days = end-date serial − start-date serial. The “include end date” option just adds one calendar day to the absolute duration. The business-day result counts Monday through Friday only.

    What each result field means (total days, weeks, months, business days)

    Total days is the raw count, and it’s the number most people need. Total weeks divides that by seven and keeps the remainder. The years-months-weeks-days breakdown is a calendar-style description, not a measurement — useful for ages and anniversaries, less useful for arithmetic. Business days removes weekends so the result matches a real work schedule.

    How to Count Days Between Two Dates in 3 Steps

    Any date difference calculator comes down to three inputs and one reading. Order matters here, because choosing the counting mode after you’ve already read a number is how most off-by-one confusion starts.

    1. Enter the start date. Type it into the first field, or use the calendar picker. Watch the format: most US tools expect MM/DD/YYYY, while much of the world reads DD/MM/YYYY. A value like 03/04 is genuinely ambiguous.
    2. Enter the end date. The end date can be years or decades after the start date. One calculation handles the full span whether it points into the past or the future.

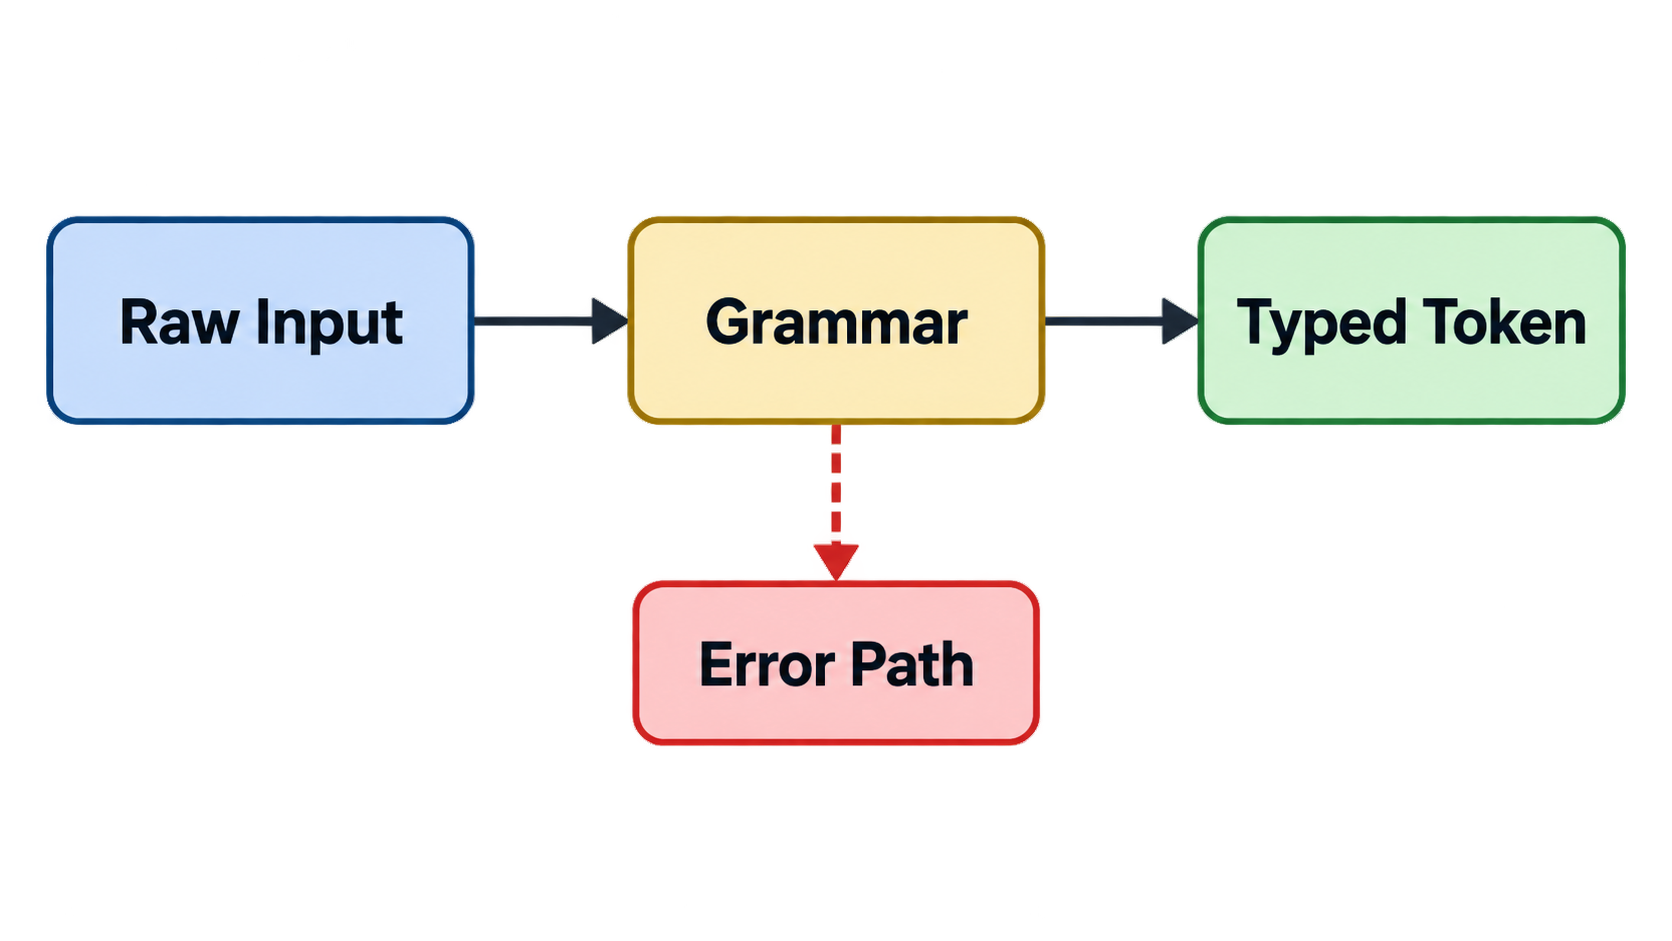
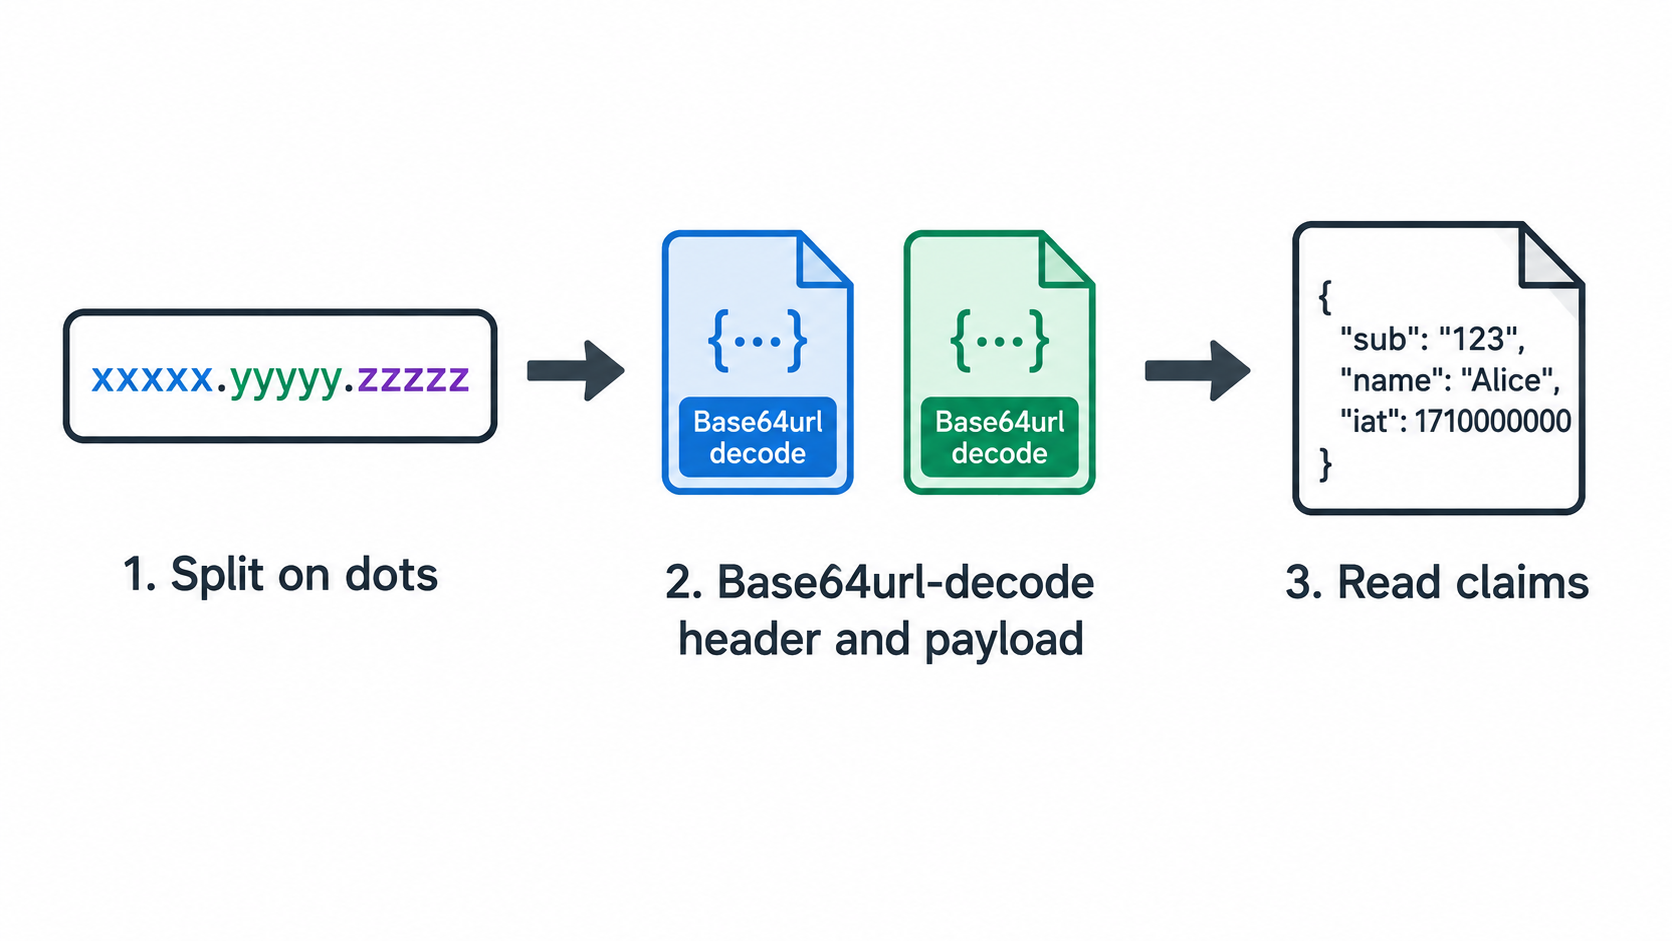
    3. Choose the counting mode, then read the result. Decide between calendar days and business days, and decide whether the end date counts. The number only means something after those two switches are set.
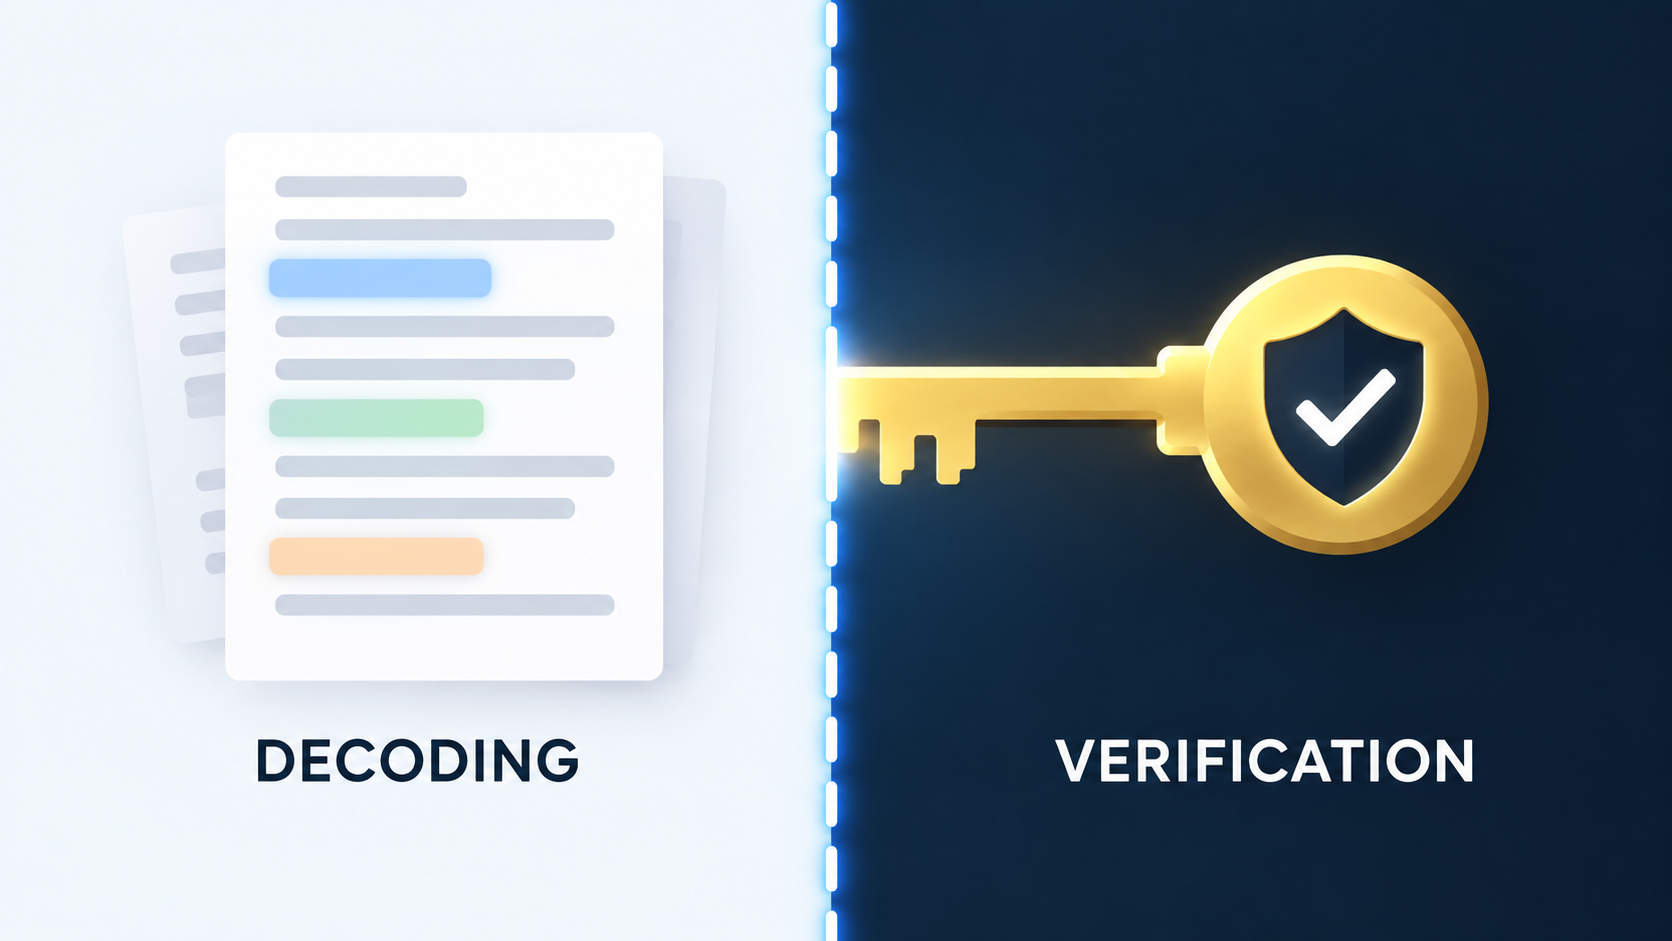
    4. Pick the output field that matches your question. Use total days for a duration, the years-months-days breakdown for a lifespan, and business days for a deadline.

    Simplified three-step date difference workflow

    The same dates produce different numbers under different modes, which is the whole point. Take 2024-01-15 to 2024-07-16: ROBERIN returns 183 total days alongside 6 months 1 day and 26 weeks 1 day. Turning on weekend skipping would lower the count further. The dates didn’t change — only the rule did.

    Step 1–2: Enter the start date and end date

    Both fields accept any calendar date, and the result updates as soon as both are valid. You don’t need to split a long interval into pieces: a span that runs from one year into another is calculated in one pass, with month lengths and leap days handled internally.

    Step 3: Choose calendar days, business days, or include end date

    Treat the mode selection as part of the question, not an afterthought. “How many days of leave did I use?” and “how many nights was I away?” describe the same trip but need different settings. Lock the mode first, and you avoid the common surprise of accepting a number and later finding out it excluded weekends.

    Why the Math Is Exact: Gregorian Calendar Rules and Date Serial Numbers

    Date subtraction is reliable because of an internal conversion almost no calculator shows you. Once you understand it, you can see why results are exact whole numbers rather than approximations.

    Every calendar date is a serial number (Julian Day Number)

    Each date is first converted into one continuous count of days — a date serial, often implemented as a Julian Day Number, which counts days from January 1, 4713 BC (ourcalculators). Subtraction then compares two integers instead of two human-readable strings.

    That conversion step absorbs the messy parts of the calendar: uneven month lengths, leap days, and historical calendar reforms. Once both dates exist as serial numbers, the difference is a subtraction any computer can perform exactly.

    Calendar dates mapped to a continuous number line

    The Gregorian leap-year rule in one line

    The rule is: a year divisible by 4 is a leap year, except century years, which are leap years only if they’re divisible by 400 (calculatorsconversion). So 2000 was a leap year, and 1900 was not.

    The practical effect is always exactly one day, never a fraction. January 1, 2024 to January 1, 2025 spans 366 days because 2024 contains February 29. January 1, 2025 to January 1, 2026 spans 365 days (datecalculatorbetweentwodates.com). A shorter, more local example comes from the checked-example table at calculatorsconversion: February 28 to March 1, 2024 returns 2 days, not 1, because February 29 sits between them.

    Should You Include the End Date? Inclusive vs Exclusive Counting

    This one setting causes more disagreement between calculators than any other factor. Most tools offer the toggle without explaining when to flip it.

    The default in most calculators is exclusive counting: the start date counts, but the end date does not. Read the same range inclusively, and you add one day. From the 1st to the 5th, that’s 4 days excluded and 5 days included (ROBERIN).

    Decision table: which scenarios count the end date

    Exclude the end date Include the end date
    Age calculation Hotel nights and rentals
    Project or work duration Leave and vacation days used
    Standard mathematical date subtraction Event and conference duration
    Intervals expressed as nights Assigned work or usage days

    The logic behind the split is whether the final day is experienced or merely marked. A hotel stay booked from Monday to Friday is four nights, because you sleep four times. The same trip described as vacation days used is five, because Friday is still a day away from work.

    Why June 1 to June 1 is not a full year

    Exclusive counting has a boundary that surprises people. According to DQYDJ’s month calculator documentation, June 1, 2000 to June 1, 2001 shows less than twelve months, because the calculator counts the first date but not the ending date. Extend the end to June 2, 2001, and you get exactly 12 months.

    The fix is simple: if a result looks one short, move the end date forward by one day instead of assuming the tool is broken.

    Calendar Days vs Business Days: Weekends and US Federal Holidays

    Calendar days count every date in the range, including Saturdays, Sundays, and holidays. Business days count only working days. Over a long span, the two numbers can diverge enough to move a deadline by nearly six weeks.

    What counts as a business day in the US (FRCP Rule 6)

    In US legal usage, the Federal Rules of Civil Procedure Rule 6 defines a business day as any day that is not a Saturday, a Sunday, or a federal legal holiday (ourcalculators). That definition, not the informal “Monday through Friday,” is what governs court filing deadlines.

    The size of the difference is easy to underestimate. Between July 6 and September 30, 2026 there are 86 calendar days but only 62 business days once weekends are excluded — roughly a 28% reduction (ourcalculators). A “90-day” contract term and a “90-business-day” term therefore land close to six weeks apart.

    86 calendar days vs 62 business days comparison

    11 federal holidays, observed dates, and why calculators don’t subtract them

    At the federal level, the United States observes 11 holidays, with Juneteenth added in 2021. A standard year contains 260–262 working days before holidays, and roughly 249 working days per year after federal holidays are removed (ourcalculators).

    Holiday handling is where tools are least reliable, and it’s worth being direct about that. Most business-day calculators exclude Saturdays and Sundays only, because holiday calendars vary by country, region, and organization (calculatorsconversion). Even tools that support holiday skipping may cover a limited range — ROBERIN’s holiday dataset covers US federal holidays for 2024 through 2027 with observed weekend shifts, and treats dates outside that window as ordinary weekdays.

    Two more caveats apply. The US Office of Personnel Management publishes the official federal holiday schedule including observed dates, which shift a Saturday holiday to the preceding Friday and a Sunday holiday to the following Monday. Bank or stock-market calendars can also differ from the federal list, so a business-day count that matters should be checked against the specific calendar that governs it.

    The honest summary: weekend exclusion is reliable, holiday exclusion is approximate, and any formal deadline should be verified against the applicable rule and holiday source rather than a calculator’s output alone (calculator disclaimer at calculatorsconversion).

    Result Off by One Day? A 60-Second Troubleshooting Checklist

    Two calculators returning results one day apart is almost always a settings mismatch, not an arithmetic error. Run these four checks in order.

    Four checks, in order

    1. Include end date. This is the cause in roughly nine out of ten cases. September 1 to September 15, 2026 is 14 days exclusive and 15 days inclusive. Flip the toggle, and the two tools should agree.
    2. Weekend exclusion. If the other tool was in business-day mode, its number will be lower by the number of Saturdays and Sundays in the range.
    3. A crossing of February 29. If your interval contains a leap day, the count is one higher than a non-leap equivalent (datecalculatorbetweentwodates.com).
    4. Date format misreading. An input of 03/04 can be read as March 4 or April 3 depending on locale, which silently shifts the result by weeks.

    A quick sanity check against the checked-example table at calculatorsconversion — each row short enough to verify by hand — settles most disputes in under a minute.

    ISO 8601 (YYYY-MM-DD) as an input habit

    The ambiguity in the fourth check disappears when dates are written in ISO 8601 format, which puts the year first: 2026-09-15. Software and official records use this standard precisely because it can’t be confused with a day-first or month-first reading (ISO 8601). When you enter a date whose month and day are both 12 or lower, typing it in this order removes the risk entirely.

    Leap Years and End-of-Month Clamping: The Two Rules That Change Your Count

    Two calendar behaviors account for nearly every “why is this number different from what I expected” question. Both are rules, not defects, and both behave consistently across Excel, Python, and web calculators.

    February 29: when your count gains a day

    A leap day adds exactly one day to any interval that spans it, and only those intervals. A leap year contains 366 days instead of 365, which is why the full-year comparison reads 366 versus 365 (datecalculatorbetweentwodates.com).

    For short ranges, the effect is easy to spot: February 28 to March 1 returns 1 day in an ordinary year and 2 days in 2024, because the leap day sits inside the range (calculatorsconversion).

    January 31 + 1 month = February 28 or 29?

    Adding months or years to a date triggers end-of-month clamping. When the target month has no matching day number, the result falls back to that month’s final valid day instead of spilling into the next month.

    The two classic cases: January 31, 2024 + 1 month = February 29, 2024, and February 29, 2024 + 1 year = February 28, 2025 (calculatorsconversion). The same operation on January 31, 2025 lands on February 28, because 2025 has no leap day.

    “Does not overflow” and “silently changes the day number” describe the same behavior. It matters for monthly billing dates and recurring schedules, where a clamp can shift a recurring date by a day or two across February (ourcalculators).

    End-of-month clamping: January 31 plus one month

    Add or Subtract Days, Weeks, and Months From a Date

    The inverse question — what date falls 90 days from now, or 6 months before a deadline — uses the same calendar math run in the opposite direction. It’s the second mode on nearly every date calculator.

    Adding days and weeks (straight arithmetic)

    Days and weeks are pure arithmetic. Adding a week moves the date forward by exactly seven days, and adding a day moves it by exactly one, with no clamping and no exceptions. The calendar absorbs the carries automatically.

    Common business intervals are worth noting: 30, 60, and 90 days are the usual contract and payment windows, and 2 weeks is the standard sprint or notice period. When the addition needs to land on a working day, tools that support it let you apply weekend and holiday skipping to the added duration rather than only to a difference calculation (ROBERIN).

    Adding months and years (clamping applies)

    Months and years behave differently because they aren’t fixed lengths. Adding one month to January 31 produces 2024-02-29 (a Thursday) — the leap-year clamp — rather than March 1 (ROBERIN). Tools generally apply years and months first, then weeks and days. Changing that order near a month-end can produce a different result (calculatorsconversion).

    How to Calculate Days Between Dates in Excel and Google Sheets

    Spreadsheets store dates as plain numbers. That’s exactly why simple subtraction works — and why the most common error is a formatting problem, not a formula problem.

    Simple subtraction: =B2-A2 and the formatting trap

    With a start date in A2 and an end date in B2, =B2-A2 returns the number of days. The trap is that Excel may carry the date format over to the result cell and display a date-looking value instead of a number. Format the result as a number to fix it (timeanddatecalculator.com). This works the same way in Google Sheets, which uses the same date serial system.

    DATEDIF for years, months, and days (plus its edge-case flaw)

    DATEDIF produces the years-months-days breakdown using three unit codes. The standard construction concatenates the parts:

    =DATEDIF(B5,C5,"y")&" years, "&DATEDIF(B5,C5,"ym")&" months, " &DATEDIF(B5,C5,"md")&" days"
    

    That formula, documented by Dave Bruns at Exceljet, returns a string such as “1 years, 6 months, 0 days.” A LET-based version that defines start, end, years, months, and days as named variables is easier to read and can be extended to handle singular and plural unit names.

    One caveat is worth carrying forward: according to Exceljet, DATEDIF can return incorrect results with date pairs that touch specific edge cases. The recommended workaround is to build an alternative with a custom LAMBDA function. For straightforward intervals, the function is fine. For production formulas serving a whole workbook, test your specific date boundaries.

    NETWORKDAYS / NETWORKDAYS.INTL for business days and holidays

    For business-day counts, NETWORKDAYS excludes Saturdays and Sundays automatically and can also exclude a supplied list of holidays. NETWORKDAYS.INTL accepts custom weekend patterns for schedules that don’t follow a standard Saturday-Sunday week (timeanddatecalculator.com). This is the only method described here that removes holidays natively — the equivalent web calculator exclusions usually stop at weekends.

    When a Day Count Isn’t Enough: Age, Time Zones, and Daylight Saving

    Day counts answer calendar questions, not clock questions. The two diverge in a few situations worth knowing before you rely on a number.

    Days are calendar days, not 24-hour blocks

    A calendar-day difference is not an hours-between-times calculation (calculatorsconversion). Calendar dates carry no time zone or daylight-saving component, which is exactly why date subtraction gives a stable whole number while adding and subtracting clock times does not.

    The reason is that daylight-saving transitions make a day 23 or 25 hours long instead of 24 (timeanddatecalculator.com). An hours-and-minutes total spanning the transition can be off by an hour; a plain day count is unaffected. Similarly, a period calculation across time zones, or one that crosses midnight, may need an extra day added outside the date difference itself — a job for a timezone converter rather than a date calculator.

    The distinction between calendar and clock measurement is a formal one in metrology, which is why the National Institute of Standards and Technology is the reference used for time and frequency standards.

    Turning a day count into an age

    An age calculator is the same date-difference logic with a different output format. Enter a birth date and a reference date, and the tool returns years, months, and days rather than a raw total (MiniToolsPro) — the full walkthrough for how to find your exact age applies the same exclusive-end convention.

    For age specifically, the end date is excluded. That matches standard convention and matters when eligibility hinges on a cutoff date — the age calculator approach is more precise than counting whole years when a single day can decide the outcome (ourcalculators).

    Conclusion

    The answer to how many days between two dates always depends on two variables: the dates themselves, and the counting rule you apply to them. The subtraction is never in doubt. What changes the number is whether the end date counts and whether weekends are excluded.

    Run the calculation, then check the two toggles against the troubleshooting list above before you use the result. If the number is going into a contract or a spreadsheet, restate it with DATEDIF or NETWORKDAYS and verify any holiday assumptions against the OPM federal holiday calendar. For any interval crossing February 29, add the extra day. When months or years are involved, confirm the end-of-month clamp landed where you intended.

    FAQ

    Why is my result off by one day compared with another calculator?

    In most cases, the include end date setting differs: September 1 to September 15, 2026 is 14 days exclusive and 15 days inclusive. The next most common cause is counting mode — the other tool may have excluded weekends. Also check whether the range crosses February 29 and whether a date like 03/04 was read month-first or day-first.

    Does the calculator count weekends and public holidays?

    In the default calendar-day mode, weekends and holidays are both included in the total. Only business-day mode removes Saturdays and Sundays. Federal holidays are usually not subtracted automatically, and a tool’s holiday data may cover only certain years. For anything formal, verify against the OPM holiday calendar.

    How does February 29 in a leap year change the count?

    It adds exactly one day to any interval that spans it, and no more. January 1, 2024 to January 1, 2025 is 366 days, while January 1, 2025 to January 1, 2026 is 365 days. The Gregorian rule is divisibility by 4, with century years requiring divisibility by 400 — so 2000 was a leap year and 1900 was not.

    What is January 31 plus one month?

    It is the last day of the target month, not the first day of the next one — a rule called end-of-month clamping. January 31, 2024 plus one month is February 29, 2024; the same date in 2025 yields February 28. The rule extends to years: February 29, 2024 plus one year is February 28, 2025.

    Can I use this number for a contract or court deadline?

    First establish whether the rule specifies calendar days or business days, since the two can diverge by nearly six weeks over a long span. In US legal usage, Federal Rules of Civil Procedure Rule 6 defines a business day as any day that is not a Saturday, Sunday, or federal holiday. Treat calculator output as an estimate and confirm the deadline against the governing rule, the court’s holiday calendar, and professional advice.

  • Tally Counter: What It Is, How to Use It & Which to Buy

    Tally Counter: What It Is, How to Use It & Which to Buy

    Header: Tally counter forms and one-press counting

    A tally counter is a handheld or digital clicker that keeps a running count — people, laps, reps, or inventory — with one press per item. Most mechanical models show four digits and reset to zero with a rotating knob; phone apps and watch widgets do the same job without hardware.

    What Is a Tally Counter?

    A tally counter is a small device that adds one to a running total each time you press its button. It records how many times something happened — pitches thrown, laps swum, people through a door — instead of storing a number you choose ahead of time.

    That difference matters: it separates a consumer tally counter from an industrial preset counter. A preset counter like the Omron H7CX-AWD1-N Multifunction Preset Counter, which sometimes appears next to tally counters in marketplace listings, is built to count down to a target and trigger an output. A tally counter just adds upward, one press at a time.

    These devices come in four physical forms:

    • Mechanical handheld tally counter — a spring-loaded clicker with a numbered wheel and a side reset knob
    • Digital tally counter — a battery-powered electronic unit with an LCD or LED readout
    • Tally counter app — a phone, tablet, or Apple Watch app that turns a screen tap into a count
    • Desktop or browser tools — a free online tally counter for tracking items while seated at a computer

    Four tally counter form factors at a glance

    The same device also goes by several names. Clicker counter, hand counter, handheld tally counter, pitch counter, and lap counter all describe the same core mechanism. The label usually reflects the job, not a structural difference.

    Tally Counter vs. Tally Marks vs. Clicker: Same Words, Different Things

    People often use these three terms interchangeably, but they are not the same. Tally marks are a notation system — marks made on paper or a chalkboard, traditionally grouped in fives. Clicker is casual shorthand for the hardware, borrowed from the sound the button makes. Tally counter is the device itself: a mechanical or digital unit that advances a displayed number automatically.

    The practical difference is who keeps track of the total. With tally marks, the person writes and groups the marks in their head. With a tally counter, the mechanism does the arithmetic and the user only presses. Tally marks are still useful when no device is available; a counter is faster when large volumes build up.

    The Four Parts of a Standard 4-Digit Hand Tally Counter

    Nearly every consumer mechanical tally counter is made from the same four parts.

    1. The press button — a top-mounted key that moves the counter forward exactly one position per full press.
    2. The digit display window — four numbered wheels under a small lens, showing a range from 0000 to 9999.
    3. The reset mechanism — a rotating knob on the side of the housing (some models use a top button) that returns all wheels to zero.
    4. The housing and internals — a metal or plastic shell around a ratchet-and-spring assembly that moves the wheels.

    Exploded view of a standard mechanical tally counter

    Metal tally counters usually use a metal shell around the same internals, which is why they tend to survive drops and sweaty hands better than plastic-bodied versions. The trade-off is weight.

    How to Use a Tally Counter and Reset It to Zero

    Using a tally counter is simple, but the problems people run into are almost always mechanical, not conceptual. Full presses, clean resets, and knowing the digit limit solve most of them.

    Step by Step: Operating a Handheld Clicker One-Handed

    1. Grip the body in your non-dominant hand (or dominant, if that hand is free), wrapping your fingers around the housing so the button sits under your thumb.
    2. Position the display so it faces you, but keep your eyes on the target — the pitcher, the swimmer, the doorway.
    3. Press the button fully until you feel or hear the click, then release completely. Every full press advances one digit.
    4. Repeat on each event, keeping a steady rhythm instead of a fast series of partial presses.
    5. Check the display periodically — every 25 or 50 counts is usually enough — to confirm the number is tracking what you observed.

    Simple one-handed tally counter press sequence

    The most common beginner mistake is the half-press. A partial press can fail to register a count, or it can slip past the ratchet and jump two positions. Pressing deliberately, with a clear release between counts, avoids both.

    What Happens After 9,999 — and How to Reset

    A 4-digit counter holds values from 0000 to 9999. Press the button once more and the display rolls back to 0000 and starts counting again. There is no error state and no lockout — the counter simply loses continuity.

    For long continuous counts, that rollover matters. Anyone counting more than 9,999 events in one session needs to either record a subtotal before rollover or use a device with more digits, such as a digital tally counter or an online number counter with no digit ceiling.

    Resetting differs by type:

    • Mechanical tally counter: rotate the knob on the side of the housing until every wheel reads zero.
    • Digital tally counter: press the reset button, or hold it for a second or two on models that require a long press to prevent accidental clearing.
    • App: tap the reset icon, swipe the counter, or use the reset control on a widget.

    Resetting does not damage the device, but the reset knob is a moving part, and repeated rotation adds wear.

    Troubleshooting: Skipped Counts, Stuck Digits, Weak Springs

    Most tally counter problems have mechanical causes. Matching the symptom to the cause narrows down the fix quickly.

    Symptom Likely cause What to do
    Counts skip or jump by two Partial press, or worn ratchet teeth Press fully and deliberately; retire the unit if skipping persists
    Digits stick or fail to advance Debris in the wheel mechanism Clear the window area; avoid lubricants that attract grit
    Button feels weak or does not return Fatigued return spring Replace the unit — springs are not typically user-serviceable
    Button is stiff or hard to depress Tight housing or grit around the plunger Work the button repeatedly; replace if it stays stiff

    App users face a different set of issues: a locked screen preventing a tap, battery drain during long sessions, or an accidental swipe resetting the count. Lock-screen and Dynamic Island widgets reduce — but do not eliminate — the first problem.

    Mechanical vs. Digital vs. App: Which Tally Counter Should You Use?

    There is no single best tally counter. The right pick depends on how long you count, where you count, and whether you need the data afterward.

    A mechanical handheld clicker never needs a battery, has no startup time, and works in rain, cold, or gloves. It stops at four digits and keeps no history. A digital tally counter may offer larger digit ranges, backlighting, and sometimes segmented timing, but it depends on a battery and costs more. A phone or watch app is always with you, supports multiple counters, and can export records — at the cost of battery dependence and screen-based distraction. An online tally counter suits desk work but is useless for one-handed outdoor counting.

    Comparison Table: Mechanical Clicker vs. Digital Counter vs. Phone and Watch App

    Feature Mechanical tally counter Digital tally counter Phone / watch app
    Power source None Battery Device battery
    Display 4-digit wheel window LCD/LED, often more digits Screen, unlimited counters
    Maximum count 9,999 per cycle Varies by model, often higher Effectively unlimited
    Reset Side rotating knob Reset button or long press Tap, swipe, or widget control
    Durability Metal-bodied versions handle drops and sweat well Depends on housing and sealing Depends on the phone’s own protection
    One-handed use Yes, thumb-operated Usually yes Yes, but requires looking at a screen
    Records and export None Rare, model-dependent Common
    Best for Sports, coaching, outdoor work, long sessions Settings needing larger ranges or backlighting Everyday counting, habit tracking, multi-counter use

    Tally Counter Apps for iPhone, iPad, and Apple Watch

    The App Store listing for Tally Counter: Tap & Count shows what a modern app-based counter can do. The app supports iPhone, iPad, Apple Watch (watchOS 10.0 or later), and Macs with an Apple M1 chip or later on macOS 14.0 or later. It requires iOS 17.0 or later, weighs 30.7 MB, and is rated 4+ in the Utilities category.

    Listed features include one-tap counting, unlimited counters, Home Screen and Lock Screen widgets, Dynamic Island and Live Activities, and StandBy widgets. The app is free to download with in-app purchases; the listing states United States pricing of $0.99 per week or $4.99 per year for unlimited access. The most recent version shown is 1.30, dated 7 September.

    Other apps in the same category that appear in the App Store’s “You Might Also Like” section include CountHub, Count Me, Countr, Counter Widget 26, and Counter Widget – Tally Counter. If you prefer a desktop tool, browser-based options exist too — though note that a Chrome extension named Tally is a Claude token counter with 100,000 users, not a counting device. Version 0.4.2 was updated August 31, 2026, and pricing runs from a free tier to Pro at $4 per month, $20 per year, or $30 for lifetime access.

    Which Tally Counter for Which Job: Pitch, Lap, Rep, Row, and People Counting

    The same mechanism shows up in very different settings, and the name usually follows the job. Matching the form factor to the task prevents most buying mistakes.

    Sports and Coaching: Pitch Counters and Lap Counters

    A pitch counter tracks pitches thrown, usually in baseball and softball, where coaches and parents need an accurate count without taking their eyes off the field. These are typically small, one-handed units that can be worked with the thumb while standing.

    A lap counter serves swimmers and runners tracking laps. Mechanical versions work fine for straight lap counts; digital models with segmented recording are more useful when splits matter. In both cases, a metal tally counter body resists sweat and repeated handling better than a plastic one.

    People Counting, Inventory, and Field Tallies

    Door staff and event teams counting attendees need a large, easy-to-press button, fast reset between shifts, and enough durability to survive being passed from person to person. A handheld tally counter clicker with a metal housing fits that profile.

    Retail and warehouse inventory work benefits from counters bought in multi-packs — one unit per aisle or per worker — that accumulate across a full counting session. Outdoor and forestry work has its own tradition: the dot-and-line tally, where dots represent counts from 1 to 4, lines 5 to 8, and diagonal lines 9 and 10. This method appears in forestry literature as far back as an 1898 United States government report on forest mensuration. Paper tallies remain common in the field, and a mechanical counter can complement them when volume grows.

    What to Look For in a Handheld Tally Counter: Metal Body, 4-Digit Display, Pack Size

    Only a few specs determine whether a tally counter works for you. Digit count, reset mechanism, housing material, and pack size cover most of the decision.

    Digit Count and Reset Mechanism: The Two Specs That Matter Most

    Four digits is the consumer standard, which caps one counting cycle at 9,999 before rollover. If your sessions routinely go past that, a digital tally counter with more digits or an app with unlimited counters removes the ceiling.

    The reset mechanism affects speed and error risk. A side rotating knob is the classic mechanical solution, but in practice it takes two hands — one to hold, one to twist. A top-mounted reset button is faster but easier to trigger by accident. Electronic reset buttons sometimes require a deliberate long press specifically to prevent accidental clearing mid-count. Decide which failure mode you can tolerate: slow resets or accidental ones.

    Single Pack vs. Multi-Pack: A Named 4-Digit Example

    Multi-pack listings are common for a reason. eBay results for handheld tally counters include listings such as “Handheld Tally Counter 4 Digit Mechanical Clicker Counters 4 Pcs,” which suits teams giving one counter to each person, and single-unit listings such as a “1x Metal Tally Counter Clicker Handheld Pitch Counter,” which suits individual buyers.

    A frequently listed model name is the White Deer 4D-2P Tally Counter, which appears in black in the marketplace results alongside generic “4-digit metal tally counter clicker” listings.

    One caution applies across all of these: six of the ten search results reviewed for this guide were eBay product pages, and those listings did not provide verifiable prices, quantities, or specifications. Before buying, confirm the actual housing material, the spring construction, the true digit count, and the per-unit price when buying in bulk. Listings that use words like “metal” and “heavy duty” in the title do not always say whether the internals match the shell.

    Tally Marks vs. Tally Counter: Where the Device Came From

    The tally counter is a recent form of an extremely old habit. According to Wikipedia’s overview of tally marks, the oldest tally sticks date to between 35,000 and 25,000 years ago, appearing as notched bones from the European Aurignacian and Gravettian periods and from Africa’s Late Stone Age. Counting by marks predates writing and has outlasted it in everyday use.

    From notched bones and tally marks to modern tally counters

    From Notched Bones to Unicode: A Brief Lineage

    The Wolf bone is one of the best-documented early examples. It was discovered in 1937 at Dolní Věstonice in Moravia, during excavations led by Karl Absolon, and is dated to the Aurignacian, roughly 30,000 years ago. The bone carries 55 marks that may be tally marks, and the head of an ivory Venus figurine was excavated nearby.

    The Ishango bone, found in the Ishango region of the present-day Democratic Republic of Congo, is dated to more than 20,000 years old. On discovery, it was thought to portray a series of prime numbers. As Peter Strom Rudman writes in How Mathematics Happened: The First 50,000 Years (2007, p. 64), “no attempt has been made to explain why a tally of something should exhibit multiples of two, prime numbers between 10 and 20, and some numbers that are almost multiples of 10.” Alexander Marshack examined the bone microscopically in 1971 and concluded it may represent a six-month lunar calendar.

    Calendar use also appears at Little Salt Spring, where artifacts suggest a tally system used for calendric purposes about 10,000 years ago. As Caleb Everett notes in Numbers and the Making of Us (2017, p. 33), “the antler ‘calendar’ at Little Salt Spring may represent one of the clearest cases of a Paleolithic tool used for tracking the lunar cycle.”

    Clustering into fives is the other long-running convention. Tally marks are typically grouped in fives for legibility — a pattern that also appears in Chinese-character tallying, where the character 正 is built from five strokes. The same source notes that the claimed advantage of five over ten for easy identification is marked as needing a citation, so the grouping convention is well attested while the explanation for it remains less firmly documented.

    The lineage reaches modern standards as well. Ken Lunde and Daisuke Miura submitted proposals to encode tally marks in the Unicode Standard in 2015 and again in 2016. Ultimately, the box tally and dot-and-dash tally characters were not accepted; only five ideographic tally marks and two Western tally digits were added to the Counting Rod Numerals block in Unicode version 11.0 in June 2018. Only the tally marks for 1 and 5 are encoded, with 2, 3, and 4 intended to be composed from sequences of the mark for 1.

    Name Collision: The ‘Tally’ Chrome Extension Is Not a Counter

    Searching for “tally” software turns up a tool that has nothing to do with counting objects. Tally — Claude token counter is a Chrome extension that tracks remaining Claude messages, splits chats, and moves conversations to other AI tools. It has 100,000 users and 2.4K ratings averaging 4.5 stars, with version 0.4.2 updated August 31, 2026. The developer states it is not affiliated with Anthropic.

    The shared word is the only connection. If you want a device or app that counts laps, reps, or people, this extension will not do it.

    Conclusion

    A tally counter is the same simple idea in four forms — a mechanical clicker, a digital counter, a phone or watch app, or a desktop tool — and the right choice depends on how long you count, where you count, and whether you need the data afterward. Start by confirming how long a single session will run and where you will count, then choose hardware or an app. If you buy a mechanical unit, verify the digit count (four is standard), the reset mechanism, and the housing material, and check the actual specs and per-unit price that marketplace listings often leave unstated.

    FAQ

    How do you use a tally counter?

    Hold the body in one hand with the button under your thumb, then press fully and release once per item. Full presses matter — half-pressing can skip or double a count. On mechanical models, the side knob resets to zero; digital units use a reset button, and apps use a tap or swipe. Keep your eyes on the target, not the display.

    How many digits does a standard hand tally counter have, and what happens when you reach 9,999?

    Most consumer handheld counters show four digits, covering 0 to 9,999 in a single cycle. Press once past 9,999 and the display rolls back to 0000 with no error and no warning, so the count simply restarts. For longer sessions, record a subtotal before rollover or use a digital counter or app with a higher ceiling.

    How do you reset a tally counter to zero?

    Mechanical counters reset by rotating the knob on the side of the housing until the wheels read zero. Digital models use a reset button, and some require a deliberate long press to prevent accidental clearing mid-count. Apps typically offer a tap-to-reset icon, a swipe gesture, or a reset control on a widget. Resetting is safe, though the knob is a part that wears down.

    What is the difference between a tally counter and tally marks?

    Tally marks are a notation system — written strokes, traditionally grouped in fives, used to record a running total by hand. A tally counter is a physical or software device that advances a displayed number automatically with each press. Both track cumulative counts, but one relies on writing and the other on a mechanism.

    Is there a tally counter app for iPhone and Apple Watch?

    Yes. Tally Counter: Tap & Count supports iPhone, iPad, Apple Watch (watchOS 10.0 or later), and Macs with an Apple M1 chip or later, requiring iOS 17.0 or later. The listing shows United States pricing of $0.99 per week or $4.99 per year, with version 1.30 dated 7 September. Alternatives listed in the App Store include CountHub, Count Me, Countr, and Counter Widget 26 — or skip the install entirely with a browser-based tally counter.

    Why do some tally counters say “pitch counter” or “lap counter” instead of “tally counter”?

    These are the same type of device, named for the job rather than the mechanism. A pitch counter tracks pitches in baseball or softball and is usually a small one-handed unit. A lap counter tracks swimming or running laps and sometimes records segments. When buying, match the form factor to your activity — the underlying function is still one press, one count.

  • Token Parser: What It Is and How to Build One

    Token Parser: What It Is and How to Build One

    Header: one name, four different parsers

    A token parser turns an input string into discrete tokens and interprets them: lexical tokens in source code, Base64url segments in a JWT, placeholders like {SEQ:X} in a document template, or design tokens in a build pipeline. Which parser you need depends on the format you’re decoding — and the term still spans four unrelated meanings that no single page explains.

    What Is a Token Parser?

    A token parser is the component that takes a raw string and produces a sequence of typed, interpreted tokens. It answers three questions, in order: where does one meaningful unit end and the next begin, what kind of unit is it, and what does it mean once you know its type? Everything downstream — an authorization header, an abstract syntax tree, a generated document number, a compiled design system — inherits whatever the parser decided.

    That definition also marks the parser’s boundary. A token parser is not a validator, a verifier, or a serializer. Parsing ends where trust decisions begin. Decoding a JWT’s payload and confirming the token was signed by a party holding the private key are different operations, run by different code, with different failure modes. Conflating the two is the most common defect in this space.

    The four variants in this guide share the same skeleton, even though they operate on completely unrelated formats:

    • A scanner or tokenizer that walks the input and segments it
    • A token grammar — a regex, a DFA, or a lookup registry — that decides which segment matches which token type
    • A token record carrying at minimum a type, the raw lexeme, an interpreted value, and a position for error reporting
    • An error path that defines what happens when the input does not match the grammar

    Shared skeleton of the four token parser variants

    That ambiguity is the real problem. Search for “token” today and you’ll find at least five meanings: a lexeme in source code, a Base64url segment inside a JWT, an OAuth access token presented in an Authorization header, a design token in a build pipeline, a template placeholder — and, in developer tooling, a counted unit of LLM consumption. The premise of the ezparser JWT parser, for example, is that “token” means a signed JSON credential. The premise of the plus-uno token-literal check is that “token” means a design-system value. Both are called token parsers. They don’t read the same thing.

    This matters because picking the wrong branch gives you a parser that compiles, runs, passes a smoke test, and reads the wrong object. Point a JWT-shaped parser at a design-token file and it won’t throw — it will simply extract nothing useful, or extract something plausible but wrong.

    Token parser vs. tokenizer vs. lexer: where the lines are

    These terms overlap, but they describe different stages. A tokenizer or lexer produces the token stream from a character string. A token parser consumes that stream and assigns structural meaning — grouping tokens into expressions, blocks, or records.

    In practice, plenty of codebases use the words interchangeably, and the distinction often collapses inside a single module. The useful rule: check what the library actually accepts and returns before assuming which term it means. If it takes a string and returns a list of typed units, the vocabulary is cosmetic. If it takes a string and returns a tree, it’s doing both jobs, and the naming isn’t worth arguing about.

    Quick glossary: token, lexeme, claim, Base64url, design token, placeholder

    • Token — a typed unit produced by parsing; its type, not its text, drives downstream behavior.
    • Lexeme — the raw substring a token was matched from, kept for error messages and round-tripping.
    • Claim — a name/value pair inside a JWT payload, such as iss, sub, or exp.
    • Base64url — a URL-safe Base64 variant that substitutes - for + and _ for /, and typically omits padding.
    • Design token — a named design value (color, dimension, typography, motion) held in a platform artifact and consumed by a build pipeline.
    • Placeholder — a bracketed token inside a template string, such as {BRANCH} or {SEQ:X}, replaced at generation time.

    Which Token Parser Do You Actually Need? A Decision Table

    The input in front of you determines which parser you should reach for. Find your input in the first column, then read across — the rest of this guide follows this table.

    Input you have Token meaning Output you want Parser type First thing to get right
    A three-part dotted string copied out of a browser or log JWT / OAuth security token Readable header and claims Base64url segment decoder + JSON deserializer Decode only — never verify, never trust for authorization
    Source code, a log line, or a configuration file Lexical token A token stream feeding a parser or AST Tokenizer / lexer Maximal munch and rule ordering
    A string containing {PREFIX} or {SEQ:X} Template placeholder token A substituted, unique output string Registry-driven substitution Fail loud on unknown tokens
    JSON, SCSS, or Kotlin artifacts holding colors, spacing, typography Design token Generated platform code Build-pipeline generator with a pinned source Pin the source commit and reproduce byte for byte

    Every row works on a different contract. The JWT row is inspection only — the output goes to a human debugging a login flow. The lexical row is a pipeline stage. The template row is a substitution engine where correctness means uniqueness, not readability. The design-token row is a code generator where correctness means diff size.

    None of the pages that currently rank for this term defines it or separates those four meanings. They’re either tool landing pages describing one branch in isolation, or GitHub issues that assume you already know which branch you’re on. The table above fills that gap.

    One-line rule: the format you are decoding picks the parser

    If you remember nothing else, remember this: the format you’re decoding picks the parser, not the other way around. You don’t choose a token parser and then go looking for something to feed it. Name the token format first, and the format dictates the grammar, the failure behavior, and where the parser has to stop.

    Token Parser for Security Tokens: How to Decode and Inspect a JWT

    The JWT parser is the most-searched branch of this topic, and the one where misuse causes the most damage. The procedure below is for inspection only. It’s meant for a debugger, a local script, or a CLI — never for a server-side authorization decision.

    Step 1 — split on the dots. RFC 7519 defines a compact JWT as three Base64url segments joined by periods: Header, Payload, and Signature. Splitting gives you three strings. Anything other than three is a malformed token.

    Step 2 — Base64url-decode the first two segments. Base64url substitutes - for + and _ for /, and the padding is usually stripped. A standard Base64 decoder will fail on a stripped segment unless you re-pad it to a multiple of four characters. This is the most common reason a naive decoder throws on a valid token.

    Step 3 — read the fields that matter. In the header, alg tells you which signing algorithm was declared, and typ usually reads JWT. In the payload, iss is the issuer, sub is the subject, aud is the intended audience, iat is issued-at, and exp is expiry — all timestamps in Unix seconds. Convert exp to a UTC time and compare it against the current clock; that answers “is this token stale?” without a round-trip to the issuer.

    Step 4 — treat the signature segment as opaque bytes. Without the HMAC secret or the RSA public key, the third segment tells you nothing. It’s a byte string whose only purpose is to be checked by code that holds the key.

    Step 5 — write the decoder. The following examples are explicitly decode-only.

    import base64, json, datetime
    
    def decode_segment(segment: str) -> dict:
        # Base64url: restore padding before decoding
        padded = segment + "=" * (-len(segment) % 4)
        raw = base64.urlsafe_b64decode(padded.encode("ascii"))
        return json.loads(raw.decode("utf-8"))
    
    def inspect(jwt: str) -> None:
        parts = jwt.split(".")
        if len(parts) != 3:
            raise ValueError("compact JWT must have exactly three segments")
        header, payload, _signature = parts  # signature is opaque here
        header = decode_segment(header)
        payload = decode_segment(payload)
    
        print("alg:", header.get("alg"), "typ:", header.get("typ"))
        for claim in ("iss", "sub", "aud", "iat", "exp"):
            print(f"{claim}: {payload.get(claim)}")
    
        if "exp" in payload:
            expiry = datetime.datetime.fromtimestamp(payload["exp"], datetime.timezone.utc)
            print("expires at (UTC):", expiry.isoformat())
            print("expired:", expiry < datetime.datetime.now(datetime.timezone.utc))
    

    The Node equivalent is shorter because the runtime already understands the encoding:

    // decode-only — this does not verify the signature
    function inspect(jwt) {
      const parts = jwt.split('.');
      if (parts.length !== 3) throw new Error('compact JWT must have exactly three segments');
    
      const [header, payload] = parts.map((segment) =>
        JSON.parse(Buffer.from(segment, 'base64url').toString('utf8'))
      );
    
      console.log('alg:', header.alg, 'typ:', header.typ);
      for (const claim of ['iss', 'sub', 'aud', 'iat', 'exp']) {
        console.log(claim, payload[claim]);
      }
      if (payload.exp) {
        const expiry = new Date(payload.exp * 1000);
        console.log('expires at (UTC):', expiry.toISOString());
        console.log('expired:', expiry < new Date());
      }
    }
    

    Step 6 — place the token in its OAuth context. In OAuth 2.0, an access token arrives in an Authorization: Bearer <access_token> header. The token_type value issued alongside the token is what tells a client how to present it — not an assumption baked into the calling code.

    Three-step JWT decode-and-inspect flow

    Splitting and Base64url-decoding the three segments

    The padding problem deserves its own note, because it produces confusing failures. Base64url encoding of a JSON object rarely lands on a multiple of four characters, and most producers strip the = padding rather than emit it. A decoder that expects padded input either throws or silently truncates. Re-padding with (-len(segment) % 4) characters — as in the Python example above — restores the input to a form the standard decoder will accept.

    The second trap is the alphabet. - and _ aren’t valid characters in standard Base64. A decoder that doesn’t switch alphabets will reject a perfectly valid segment. Python’s base64.urlsafe_b64decode and Node’s 'base64url' encoding handle this automatically; a hand-rolled decoder usually won’t.

    Reading exp, iss, aud and sub without a server round-trip

    Four claims carry most of the debugging value. exp tells you whether the token is still current. iss tells you which system minted it — the usual cause of a rejected token is that it came from a staging issuer when production was expected. aud tells you which API it was meant for, and a token minted for one audience will be correctly rejected by another. sub tells you who the token is about.

    All four can be read offline, with no key required. That’s the point: claims are informative, not authoritative. Anything a decoder can read, an attacker can write.

    Where a Token Parser Must Stop: Decoding Is Not Verification

    Decoding reverses Base64url and deserializes JSON. That’s the whole operation. Anyone can craft a token with any claims they like, sign nothing, and produce a string that decodes perfectly. Only signature verification with the HMAC secret or RSA public key establishes that the claims actually came from the issuer. A token parser that returns claims to a caller who then treats them as trusted isn’t misconfigured — it’s been asked to do something it can’t do.

    The boundary generalizes across credential formats. A SAML response decoder shows every field of an assertion without proving it came from the identity provider, and a cookie header parser shows what the browser sent without vouching for the session behind it. In each case, parsing makes claims readable; only verification makes them trustworthy.

    The boundary line between parsing and trust

    OAuth 2.0 makes that boundary explicit. RFC 6749 §5.1 requires both access_token and token_type in a successful token response, and states that token_type is case-insensitive — so Bearer, bearer, and BEARER are all valid. RFC 6749 §7.1 is the rule that gets skipped in practice: a client must not use an access token whose type it doesn’t understand.

    Reject a missing token_type instead of defaulting to Bearer

    The cortexfs issue #282 documents exactly this failure. In parse_oauth_token_response, validation used Option::is_some_and, which only rejects a present non-Bearer value. A response with no token_type field at all passed validation silently. Downstream, model_headers serialized every Credential::OAuth as Authorization: Bearer <access_token> — so an undeclared type got reinterpreted as Bearer by default.

    The shape of the fix generalizes well beyond one repository. Require the field to be present. Accept Bearer case-insensitively. Keep rejecting unsupported types such as mac. Update the success fixtures in the same change to include token_type: "Bearer". As the issue records, the expected production change was one existing predicate tightened in place, netting zero production lines of code — the fix removed an implicit assumption instead of adding an abstraction.

    Here’s the pattern to internalize: a validator that checks “if present, must be valid” is a weaker thing than one that checks “must be present and valid.” The first admits a missing field; the second doesn’t. When the consuming code has a fallback default, the first becomes a silent policy decision made by omission.

    Keep parser errors bounded and generic

    A token parser must never return its internals to a client. Offsets, grammar rule names, expected token types, partial parse states — that’s a map of the input format, and handing that map to an untrusted caller is a gift.

    The synchro issue #53 records this as audit finding C12, independently verified with a verdict of CONFIRMED at severity Low. The server returned token parser details in responses, and no existing test covered the behavior. The proposed fix is to return a bounded generic error instead of parser internals, with an acceptance criterion that a permanent test fails without the fix and passes with it. Detailed diagnostics belong in server-side logs behind a stable correlation ID — the client gets an opaque error and a handle, not a description of the grammar.

    Building a Lexical Token Parser (Tokenizer or Lexer)

    For source code and structured text, the pipeline runs: raw string → scanner → token stream → parser → AST. The token parser is the stage that decides where one unit ends and the next begins, and every stage after it inherits those decisions.

    Lexical pipeline from raw string to AST

    Define the token record first. A workable minimum has four fields: an enum type, the raw lexeme, an optional interpreted value (a parsed number, an unescaped string), and a line/column position for diagnostics. Skipping the position field is the most common shortcut and the one that hurts most later — error messages without positions are close to useless.

    Three implementation rules prevent most tokenizer bugs:

    1. Maximal munch. Always take the longest valid match at the current position, so == is one token rather than two =.
    2. Order rules so keywords precede identifiers. If identifiers are matched first, while becomes an identifier and the keyword rule never fires.
    3. Decide explicitly about whitespace and comments. Either emit them as token kinds or skip them deliberately — but make it a documented decision, not an accident of the first regex that happens to match.

    A working hand-written lexer fits in roughly forty lines and covers the token kinds most languages need:

    import re
    from dataclasses import dataclass
    
    @dataclass
    class Token:
        type: str
        lexeme: str
        value: object = None
        line: int = 1
        col: int = 1
    
    # Order matters: keywords before identifiers, longest operators first.
    RULES = [
        ("NUMBER", r"\d+(\.\d+)?"),
        ("IDENT",  r"[A-Za-z_]\w*"),
        ("STRING", r'"(?:[^"\\]|\\.)*"'),
        ("OP",     r"==|!=|<=|>=|&&|\|\||[-+*/=<>(){},;]"),
    ]
    KEYWORDS = {"if", "else", "while", "return"}
    SKIP = re.compile(r"[ \t\r]+")
    
    def tokenize(src: str) -> list[Token]:
        tokens, i, line, line_start = [], 0, 1, 0
        while i < len(src):
            if src[i] == "\n":
                line, i, line_start = line + 1, i + 1, i
                continue
            m = SKIP.match(src, i)
            if m:
                i = m.end()
                continue
            for kind, pattern in RULES:
                m = re.compile(pattern).match(src, i)
                if not m:
                    continue
                lexeme = m.group(0)
                if kind == "IDENT" and lexeme in KEYWORDS:
                    kind = "KEYWORD"
                value = None
                if kind == "NUMBER":
                    value = float(lexeme) if "." in lexeme else int(lexeme)
                elif kind == "STRING":
                    value = lexeme[1:-1]
                tokens.append(Token(kind, lexeme, value, line, i - line_start + 1))
                i = m.end()
                break
            else:
                raise SyntaxError(f"unexpected character {src[i]!r} "
                                  f"at line {line}, column {i - line_start + 1}")
        tokens.append(Token("EOF", "", None, line, i - line_start + 1))
        return tokens
    
    if __name__ == "__main__":
        for t in tokenize('total = price * 2; if total > 100 { return "big"; }'):
            print(f"{t.type:<8} {t.lexeme!r:<12} {t.value!r:<8} {t.line}:{t.col}")
    

    Printing the token dump isn’t decoration. The dump is what you compare against when a grammar change produces unexpected behavior, and it separates “the lexer is wrong” from “the parser is wrong” in seconds instead of hours.

    Maximal munch, rule order and keyword ambiguity

    Maximal munch and rule order are the same problem looked at from two angles. A rule set that matches = before == produces two EQ tokens where one EQEQ was intended, and the parser downstream reports a confusing error two stages away from the cause. Sorting operator alternatives longest-first, and keywords before identifiers, eliminates both classes of bug without any lookahead machinery.

    Keyword ambiguity needs an explicit decision. Most languages treat keywords as reserved: the lexer recognizes if as a keyword in every position, so a variable named if is a syntax error rather than an identifier. Languages that allow contextual keywords push the decision into the parser instead. Either choice works; leaving it undecided gives you a lexer whose behavior depends on which rule happened to be listed first.

    Does tokenization change parser accuracy? Evidence from a 2026 study

    Tokenization quality isn’t cosmetic, and there’s now published evidence for that. Shamaeva and Loukachevitch (2026), in Pattern Recognition and Image Analysis, Vol. 36, pp. 486–497 (DOI 10.1134/S105466182670029X), compared two ways of evaluating a syntactic parser: with its built-in tokenizer, and with a tokenizer that returns gold markup. For a significant number of sentences, the built-in tokenization differed from the gold one, and average UAS and LAS scores were higher when the parser was evaluated with gold markup — some metrics by 0.05 or more.

    The study covers Russian-language corpora (SynTagRus, GSD, PUD, Taiga, and Poetry) and the parsers UDPipe, Stanza, Natasha, DeepPavlov, and spaCy, as they existed for this 2026 research. Those are the versions studied — not a claim about current releases of any of those tools.

    The practical takeaway for anyone building a parser: if your accuracy numbers look wrong, test the tokenizer before you rewrite the grammar. A meaningful share of apparent parsing errors originate one stage earlier, in segmentation decisions the parser never sees.

    Parsing Template Tokens and Placeholders Safely

    A document-numbering engine is a good concrete case. The tan-erp issue #6, opened 18 September 2026, asks how IDocumentNumberGenerator should parse template strings containing nine token forms — {PREFIX}, {BRANCH}, {YYYY}, {YY}, {BBBB}, {BB}, {MM}, {DD}, and {SEQ:X} — derive a period key from them, and generate unique document numbers atomically with full unit-test coverage.

    Four design decisions follow from that framing.

    Design around a registry, not a loose regex. A table of known token names with a resolution function per token makes unknown placeholders detectable. A single permissive pattern like \{[A-Z]+\} matches anything and tells you nothing about whether the result is meaningful.

    Anchor the pattern. Match whole placeholders with anchored boundaries, and handle escaping explicitly. If a substituted value can itself contain {, an unanchored second pass will re-parse it — that’s how injection-shaped bugs get into template engines.

    Fail loudly on unknown tokens. Raising is the correct behavior. Leaving the literal {BRANCH} in the output, or dropping it, silently produces malformed or colliding identifiers, and the failure surfaces much later in a way that’s hard to trace back to the template.

    Keep atomicity outside the parser. Parse first, then generate the counter inside a single transaction. The parser can be perfectly correct and two concurrent requests can still get the same number if the sequence increment isn’t atomic.

    There’s a harder adjacent case worth flagging: languages without whitespace word boundaries. The same issue pairs the template work with Thai tokenization, because a naive split on spaces produces no segmentation at all for Thai text. That branch needs a dictionary- or rule-based tokenizer — a different algorithm from placeholder substitution, and the two shouldn’t be combined into one pass.

    Unknown placeholders should raise, not fall through

    The difference between “raise” and “fall through” is the difference between a caught error and a data-integrity incident. A fall-through leaves the literal token in a generated document number, and every request that hits the same template produces the same literal — so the collision is systematic, not random. Raising converts invisible corruption into a stack trace at the first occurrence.

    Token Parsing in a Design-Token Build Pipeline

    A design-token parser reads generated platform artifacts — SCSS declarations, var() references, Kotlin token files — rather than a hand-maintained source file. That changes the risk profile: the input is machine-written, verbose, and changes shape whenever the upstream generator changes.

    The slint issue #3, opened 27 September 2026, documents the parsing contract for a Material 3 Expressive token pipeline. The source is Compose material3’s generated token files in androidx/androidx, pinned to commit 23327507f7fc7d5b19d65fec4b090f60c970079b (androidx-main, 2026-09-27), whose files carry the header // VERSION: 14_1_0. Since 2026-08-05 those files use inline value classes, so token values sit on get() = lines — a parser written for the older file shape silently reads nothing and reports no error.

    Three rules from that contract transfer to any design-token pipeline:

    1. Fail loudly on any token that cannot be parsed or mapped. Never silently drop or default a value. A dropped token becomes a component that renders with the wrong color, discovered by a designer rather than by CI.
    2. Reproduce committed output byte for byte in CI from the pinned commit. The generator runs on a clean checkout with one documented command, and the check passes only when the output is identical.
    3. Treat a version-pin bump as a deliberate, reviewed change. The pin is recorded in one place and printed into generated file headers, so bumping it is an explicit diff rather than an incidental drift.

    The referenced pipeline also resolves references between token files — a button token pointing at ShapeKeyTokens.CornerMedium, which points at ShapeTokens.CornerMedium — so the parser needs a typed intermediate model, not a flat name/value map.

    Why the pinned commit and the date are the parsing contract

    A design-token parser is only correct relative to a specific input. The same file path yields different values at different commits, and the file format itself changed on 2026-08-05. Recording 23327507f7fc7d5b19d65fec4b090f60c970079b and // VERSION: 14_1_0 in one place turns “the parser is broken” into “the pin moved and the diff is these lines.” Without the pin, a format change and a parser bug look identical from the outside.

    Build the Token Sets Once: Parsing Performance and Duplication Risk

    Token sets, DFAs, and grammar patterns should be constructed once and held on the parser instance. Rebuilding them at every call site is a performance problem, and duplicated parsers are a correctness problem that costs more than the performance one.

    The measured cost of getting the performance case wrong comes from the hefermotor issue #22, opened 19 September 2026. The _TokenSets primitive built an array literal on every method call, and the grammar called those methods at roughly 35 test sites. For the three largest sets — expr_start with 40 tokens, called at every call expression, plus case_pattern_start and type_start — building per call added 10–15% to the sum of Parse.tree over the standard library’s files in a debug build. Moving those three to fields on _Parser removed the overhead. The remaining, smaller sets were not measured.

    The correctness case comes from the plus-uno issue #622, from the 2026-09-18 architecture review. The docs token-literal check carried a parallel implementation of most of the tokens module: its own token reader, declaration regex, alias resolver with its own cycle guard, colour key, dimension key, family map, and SCSS brace parser. Removing the duplicate — tracked in PR #667 — affected 315 live token pairs that were equal before the change and unequal after. Unchanged output had been resting on no fallback literal pairing an opaque hex against a translucent token, not on any guarantee the code provided.

    That number is the argument. A duplicate parser isn’t just redundant; it’s a second set of semantics that diverges the moment either copy is edited, and the divergence stays invisible until someone enumerates it.

    Enumerate output changes instead of assuming they are absent

    The plus-uno acceptance criteria state the discipline directly: any output change is enumerated and reviewed, not assumed absent. That’s a higher bar than “tests pass,” because passing tests only prove the cases they cover. The 315-pair review is the model — the reviewer had to name the mechanism that preserved the output, not just observe that nothing appeared to break.

    The rule of thumb: one grammar module, one token registry, built once, version-pinned.

    How to Test a Token Parser: Acceptance Criteria from GitHub Tickets

    This section exists because of what the search results show about how the work is actually gated. Eight of the top ten results are GitHub issues and repositories, and five of them gate completion on tests passing or on enumerated acceptance criteria — but none presents those criteria as reusable guidance. The six criteria below are pulled from those tickets and generalized.

    1. A permanent regression test that fails without the fix and passes with it. The synchro issue #53 attaches this explicitly to the error-leak fix for audit finding C12, noting that no existing test covered the behavior. A test written after the fix that passes on the fixed code proves nothing on its own; it must be shown to fail on the unfixed code.

    2. Enumerate every output difference. The plus-uno criteria require that output changes be enumerated and reviewed rather than assumed absent. Claiming “no behavior change” without naming the mechanism is not evidence.

    3. Byte-for-byte reproduction in CI from a pinned upstream commit. The design-token pipeline’s reproducibility check is the strongest of the six because it admits no interpretation: either the generated bytes match or they do not.

    4. Fixture hygiene in the same change. When you tighten a predicate, update the success fixtures alongside it. The cortexfs fix added token_type: "Bearer" to the Codex OAuth success fixtures in the same change that required the field — otherwise the newly correct parser would have failed its own pre-existing happy-path test.

    5. Negative cases as first-class tests. Cover absent token_type, an unknown template placeholder, an unsupported token type such as mac, and a truncated Base64url segment. The cortexfs test plan adds a missing-token_type failure case to the existing hermetic OAuth regression; the synchro fix requires the defect to stop reproducing.

    6. A test for the error path itself. Assert that the client-facing error is bounded and contains no parser internals. This is the criterion that would have caught C12 before an audit did.

    Negative tests: absent fields, unknown tokens, truncated segments

    Negative cases deserve their own emphasis, because they’re where the parser’s boundaries actually live. Positive tests describe what a parser accepts; negative tests describe what it refuses, and refusal is the behavior that protects everything downstream.

    Four cases cover most of the risk surface. An absent required field — the token_type case. An unrecognized token in a registry-driven parser — the template placeholder case. A recognized-but-unsupported token — the mac case, where the field is present and well-formed but the implementation doesn’t support the semantics. And a truncated input — a Base64url segment whose padding has been stripped or whose length is wrong. Each should have a named test, and each test should assert on the specific error the caller receives, not just that an exception was raised.

    Conclusion

    A token parser isn’t one thing. It’s four different parsers sharing a name, and the format you’re decoding decides which one you need, what its output may claim, and where it has to stop.

    Name your token format first, then use the decision table to pick the branch. If it’s a JWT or OAuth token, decode it for inspection but verify the signature before you trust it, and reject a missing or unrecognized token_type instead of defaulting to Bearer. If it’s a lexical, template, or design token, define the token registry, build it once, fail loudly on anything unrecognized, and back the result with a regression test that fails without your fix.

    FAQ

    Is a token parser the same thing as a tokenizer or a lexer?

    They overlap, but they aren’t identical. A tokenizer or lexer produces the token stream; a token parser consumes tokens and gives them structural meaning. In practice, plenty of codebases use the terms interchangeably, so read the token format before assuming which one a given library means.

    Does a JWT parser verify the token’s signature?

    By default, no. Decoding reverses Base64url and deserializes JSON — nothing more. Verification requires the HMAC secret or RSA public key, and a decoded token can carry any claims its sender invented. For anything security-relevant, use libraries with signature verification explicitly enabled — the same decode-only boundary applies to any online JWT parser you use for inspection.

    Why does RFC 6749 require token_type, and is it case-sensitive?

    RFC 6749 §5.1 requires both access_token and token_type in a successful response so the client knows how to present the token. token_type is case-insensitive: Bearer, bearer, and BEARER are all valid. RFC 6749 §7.1 adds that a client must not use an access token whose type it does not understand — so reject rather than default.

    Why shouldn’t a token parser’s error message include its internal token details?

    Parser internals leak grammar rules, offsets, and token names, which hands an attacker a map of the input format. The synchro issue #53 records an audit-confirmed finding — C12, verdict CONFIRMED, severity Low — of exactly this kind of leak going out to clients. Return a bounded generic error and keep detailed diagnostics in server-side logs behind a stable correlation ID.

    Can I parse template placeholders like {BRANCH} or {SEQ:X} safely, and what about ones I don’t recognise?

    Parse against a registry of known tokens rather than a loose regex, and anchor the pattern. Raise on any unrecognized placeholder instead of leaving it in the output — silent passthrough produces duplicate or malformed identifiers. Handle escaping explicitly so injected values containing braces aren’t re-parsed on a later pass.

    Should I write my own token parser or use a library?

    Use a library when a standard defines the format — JWT and OAuth have mature, audited implementations, and hand-rolling the security path is where bugs live. Write your own when the token set is small, the grammar is yours (template placeholders, a domain-specific syntax), or you need it to fail loudly on unknown tokens in a way no general library does. Either way, build token sets once and cover the negative cases with tests.

  • What Is an IBAN Number? A US Guide to IBANs and SWIFT

    What Is an IBAN Number? A US Guide to IBANs and SWIFT

    Header: IBAN and US cross-border payment essentials

    An IBAN (International Bank Account Number) is a standardized code of up to 34 characters that identifies a specific bank account for cross-border payments. It combines a two-letter country code, two check digits, and a country-specific BBAN. US banks do not issue IBANs, so US senders and recipients use a routing number plus the bank’s SWIFT/BIC code instead.

    What Is an IBAN Number? Definition, Scope, and Limits

    An IBAN is an internationally agreed way to identify bank accounts across national borders. The goal is to reduce transcription errors and let banks in different countries process cross-border transactions using one consistent format, instead of a patchwork of national account-numbering schemes. An IBAN points to one customer’s account at a financial institution; it is not a generic bank address or a payment network.

    The standard behind it is ISO 13616. According to Wikipedia’s overview of the International Bank Account Number, the format was originally adopted by the European Committee for Banking Standards (ECBS) and has been published as the international standard ISO 13616 since 1997. The current version is ISO 13616:2020, which names SWIFT (the Society for Worldwide Interbank Financial Telecommunication) as the formal registrar.

    The 30-Second Definition

    An IBAN is a string of up to 34 alphanumeric characters made of three parts: a two-letter country code, two check digits, and a country-specific Basic Bank Account Number (BBAN) that holds the domestic bank code, branch identifier, and account number. Banks validate the check digits before releasing a payment, which catches most single-character typos at the point of data entry. In practice, an IBAN answers one question: which exact account, at which bank, in which country.

    What an IBAN Is Not

    An IBAN is not a bank identifier. A bank identifier — the SWIFT/BIC code — points to an institution or branch, while an IBAN points to a specific account inside that institution. International wires commonly require both.

    An IBAN is also not a payment network. SWIFT, SEPA, ACH, Fedwire, and card networks move or message money; an IBAN is only an addressing standard that those systems read.

    Finally, an IBAN is not a US routing number. A routing number is a nine-digit domestic code, and it is not accepted as an IBAN substitute in any IBAN country. As Ramp’s guide to IBAN numbers puts it, if a form asks you for a US IBAN, there simply isn’t one to provide.

    The practical boundary for US readers is simple: US banks do not issue IBANs, which is why the rest of this guide focuses on what US senders and recipients actually put on a payment form.

    Do US Banks Issue IBANs? What to Use Instead

    No. US banks do not issue IBANs, and US accounts are not assigned one when opened. The United States relies on ABA routing transit numbers for domestic account identification, and on SWIFT codes for international routing. Any adoption of the IBAN standard by US banks would likely be initiated by ANSI ASC X9, the US financial services standards development organization — a working group (X9B20) was established as an X9 subcommittee to generate an IBAN construction for US bank accounts, but nothing has replaced routing numbers in practice.

    The US substitute is a three-part package: a nine-digit ABA routing number, the account number, and the bank’s SWIFT/BIC code whenever the payment crosses a border.

    Domestic rails explain why the US never needed IBANs. ACH, Fedwire, FedNow, and RTP all operate inside a single national numbering system, so nine-digit routing numbers plus account numbers are sufficient for the vast majority of US payments. SEPA Instant plays an equivalent same-country role in the euro area, but it sits on top of IBAN-based accounts.

    What to Put on an International Payment Form as a US Sender

    When a US bank’s wire form asks for beneficiary details, use the recipient’s local fields, not US ones. The typical field-by-field entries look like this:

    • Beneficiary IBAN or account number: enter the full IBAN for the recipient’s country, exactly as provided, with no spaces and no edits to the check digits.
    • Beneficiary bank SWIFT/BIC: the 8- or 11-character code identifying the recipient’s bank.
    • Beneficiary name and address: exactly as the account is registered.
    • Your routing number and account number: these identify your own US account as the source of funds, not the recipient.
    • Intermediary bank details: requested when your bank has no direct relationship with the recipient’s bank.

    If a form asks for a “US IBAN” on your side, there is nothing to enter; your routing number and account number serve that role.

    What to Give a Foreign Payer as a US Recipient

    A foreign payer sending money into a US account needs four details: your bank’s nine-digit ABA routing number, your account number, your bank’s SWIFT/BIC code, and the account holder name as registered.

    Multi-currency providers such as Wise and Revolut can assign IBANs to eligible accounts precisely so international payers have a single validated identifier to use. If you hold an account with one of those providers and it has been issued an IBAN, share that IBAN instead of domestic details. If you bank with a traditional US institution, share the routing number, account number, and SWIFT/BIC combination.

    One timing detail matters on the receiving end: funds arriving in a foreign currency are converted at the prevailing exchange rate before they reach your account, so the number on the invoice is not necessarily the number that lands.

    How an IBAN Is Structured: Country Code, Check Digits, and BBAN

    Every IBAN follows the same three-part sequence, and every part has a fixed job.

    The country code occupies the first two characters and uses ISO 3166-1 alpha-2 — DE for Germany, FR for France, GB for the United Kingdom. The country code determines which BBAN format applies, so it is the first thing a validating system checks.

    The check digits occupy positions three and four. They are calculated from the rest of the string and validated with the MOD-97 checksum described in ISO 7064, letting a bank confirm the number contains no simple transcription error before submitting a transaction.

    The BBAN fills every remaining character, up to a maximum of 30 alphanumeric characters. It carries the domestic bank code, branch identifier, and account number in whatever national format the country uses. The national central bank or designated payment authority decides that format, which is why BBAN structures are not consistent between countries.

    IBAN three-part structure: country code, check digits, BBAN

    Real IBAN Examples by Country

    The following examples come from Ramp’s IBAN guide and are illustrative formats rather than live accounts:

    Country Country Code Total Length Sample Format
    Norway NO 15 NO93 8601 1117 947
    Belgium BE 16 BE68 5390 0754 7034
    Netherlands NL 18 NL91 ABNA 0417 1643 00
    Germany DE 22 DE89 3704 0044 0532 0130 00
    United Kingdom GB 22 GB29 NWBK 6016 1331 9268 19
    France FR 27 FR14 2004 1010 0505 0001 3M02 606
    Malta MT 31 MT84 MALT 0110 0012 3456 MTLC AST0 01S

    Reading the German example: DE is the country, 89 is the checksum, 37040044 is the bank identifier, and 0532013000 is the individual account number.

    Why IBAN Length Varies by Country

    Total IBAN length is fixed nationally, which is why it ranges from 15 characters in Norway to the 34-character ceiling. Norway uses 15, Belgium 16, the Netherlands 18, Germany and the UK 22, Spain 24, France and Italy 27, and Malta 31.

    Because each country’s BBAN encodes different elements — some include branch codes, some include national check digits, some include account-type indicators — the length cannot be standardized across borders. The IBAN registry is the official source for each country’s length and format, and validating systems check the total length against the country code before running the checksum.

    How IBAN Check Digits Work — and What They Don’t Verify

    The IBAN check digits use a MOD-97 operation, formally described in ISO 7064, to confirm that a string contains no simple errors. The validation is designed to catch single-character substitutions, nearly all single transpositions, and shifts of the whole string to the left or right.

    This matters because it moves error detection to the moment of data entry. A bank’s system can reject a mistyped IBAN immediately rather than discovering the problem days later when the payment bounces back through intermediary banks. That design goal — validating as much as possible at the point of entry — is the core reason IBANs reduced cross-border failure rates compared with the pre-1997 arrangement.

    A Worked MOD-97 Example

    The validation algorithm has four steps: confirm the total length matches the country, move the first four characters to the end, replace each letter with two digits (A = 10 through Z = 35), then divide the resulting integer by 97. If the remainder is 1, the check digit test passes.

    Simplified MOD-97 validation steps

    Using the fictitious United Kingdom example published on Wikipedia, IBAN GB82 WEST 1234 5698 7654 32:

    1. Rearrange: move GB82 to the end → WEST12345698765432GB82
    2. Convert letters to digits: W=32, E=14, S=28, T=29, then G=16, B=11 → 3214282912345698765432161182
    3. Compute the remainder: 3214282912345698765432161182 mod 97 = 1

    Because the remainder is 1, the string passes the check digit test.

    What the Checksum Does Not Check

    This is the limitation that costs people money. A checksum-valid IBAN confirms the string is correctly formatted; it says nothing about who owns the account. A wrong IBAN that happens to be mathematically valid will send funds to the wrong recipient.

    As Bertrand Théaud, Founder of Statrys, notes: “A correctly formatted IBAN is not proof the payment will land in the right account. For transfers outside the SEPA zone, the check digits catch typos, not wrong account numbers, so validate the account holder’s name yourself, not just the string of characters.”

    Inside SEPA, banks are now required to flag a clear name mismatch before sending, though a close-enough match can still pass. Outside SEPA, banks generally do not verify that the recipient’s name matches the account holder before crediting funds, so recovery is slow and not guaranteed. The practical rule is to verify the account holder’s identity independently — by confirming the beneficiary name through a channel you trust — in addition to checking the IBAN string.

    IBAN vs SWIFT/BIC vs Routing Number: Which Code Does What?

    Each code answers a different question, and mixing them up is one of the most common causes of delayed international payments.

    Criteria IBAN SWIFT/BIC Routing Number
    Purpose Identifies an individual account Identifies a bank or branch Identifies a US financial institution
    Length Up to 34 characters 8–11 characters 9 digits
    Geographic use Primarily Europe, Middle East, Caribbean Worldwide United States, domestic only
    Format Country code + check digits + BBAN Bank code + country code + location code + optional branch code Numeric

    An IBAN identifies the account. A SWIFT/BIC code identifies the institution. A routing number identifies a US bank inside the domestic network and never travels beyond it. An IBAN and a SWIFT/BIC code are frequently used together on international wires: the SWIFT code routes the payment to the right bank, and the IBAN directs it to the right account inside that bank.

    Three codes, three roles: account vs bank vs US domestic

    The scale of the SWIFT network explains why SWIFT/BIC codes remain essential even when an IBAN is present. Ramp notes that SWIFT is used by more than 11,000 financial institutions worldwide, and that the network extends beyond traditional banks to brokerage firms, payment processors, and other participants.

    When You Need Both an IBAN and a SWIFT Code

    You need both when the destination account sits in an IBAN country. A transfer from France to Germany requires the recipient’s IBAN and the recipient bank’s SWIFT/BIC. Within SEPA, an IBAN alone is often sufficient to identify an account, and banks are no longer permitted to require customers to supply the beneficiary bank’s BIC for SEPA payments — but many payment forms still ask for both by default, and non-SEPA transfers generally do require both.

    When the destination account sits in a non-IBAN country, such as the US, you provide the SWIFT/BIC code plus the local account and routing details instead of an IBAN.

    Why the US Uses Routing Numbers Instead of IBANs

    The US financial system was built on domestic rails — ACH, Fedwire, FedNow, and RTP — that all identify institutions with nine-digit ABA routing numbers. Adding IBANs would mean adopting a second, parallel account-identification standard for accounts that already work inside a functioning national system.

    That arrangement creates friction in one direction only. US banks recognize the IBAN format and process incoming IBAN payments without issue, but they do not issue IBANs to their own customers. A US routing number, in turn, is not accepted as an IBAN substitute in Europe or anywhere else that uses the standard.

    Where IBANs Are Used — and Where They Aren’t

    IBAN adoption is usually described in two ways: how many countries use it, and which registry defines the format. Both numbers drift over time, which is why dated figures matter.

    According to Wikipedia, 89 countries were using the IBAN numbering system by December 2024. Per the IBAN Register maintained with data licensed from S.W.I.F.T. SCRL and updated 8 May 2026, around 90 countries and territories now use the IBAN format, spanning most of Europe, parts of the Middle East and North Africa, and a growing number of Sub-Saharan African and Central Asian states. Country counts move because new jurisdictions join the standard and register their BBAN formats over time.

    Adoption is heaviest in Europe, where the IBAN began inside the European Union. It is also established across the Middle East and the Caribbean, and present in parts of Africa.

    SEPA and the Eurozone

    SEPA — the Single Euro Payments Area — is the payment network and rulebook that made the IBAN the default account identifier for euro-denominated transfers. SEPA is not a code; it is a scheme in which the IBAN identifies the account and the payment is processed under SEPA rules and timelines.

    The transition was staged. The IBAN scheme fully replaced domestic numbering schemes from 31 December 2012, national systems for credit transfer and direct debit were abolished on 1 February 2014, and the requirement extended to all cross-border SEPA transactions on 1 February 2016. After those dates, the IBAN alone is sufficient to identify an account for home and foreign transactions in SEPA countries.

    Canada, Australia, and Other Non-IBAN Countries

    Canada and Australia do not use IBANs. Canadian financial institutions use routing numbers issued by Payments Canada for domestic transfers and SWIFT for international transfers, with no formal regulatory requirement to adopt IBAN. Australia uses Bank State Branch (BSB) codes for domestic transfers and SWIFT for international transfers — a BSB plus an account number combined is not an IBAN, even if a provider’s form labels it that way. New Zealand follows the same pattern. Most Asian countries, including Hong Kong and Singapore, rely on SWIFT/BIC codes and local account numbers rather than IBANs.

    Ukraine illustrates how a country can move onto the standard later. Ukrainian banks had used IBAN-format aliases on an ad hoc basis as a precursor to formal SWIFT registration, and that practice ended on 1 November 2019 when all Ukrainian banks fully switched to the IBAN standard.

    One compliance issue worth knowing about inside the euro area is IBAN discrimination: refusing or charging extra for a valid IBAN issued in another SEPA country. It is a rulebook violation rather than a technical limitation.

    How to Find Your IBAN (If You Have One)

    If you bank in an IBAN country, you do not apply for an IBAN separately — your bank assigns one automatically when you open the account, and it appears in a handful of predictable places.

    Five Places to Look

    1. Online banking: log in and open your account details or account summary page; most banks display the full IBAN alongside your account number and sort code.
    2. Paper or electronic statements: the IBAN typically appears near your account number and branch information.
    3. Mobile banking app: check sections labeled account details, international details, or payment details.
    4. Debit or credit card: some banks, particularly in Europe, print the IBAN on the card itself.
    5. Bank customer service: call or visit a branch; after verifying your identity, staff can provide the IBAN directly.

    US account holders will not find an IBAN in any of these places, because US banks do not issue them. If a form asks for your US IBAN, use your routing number, account number, and the bank’s SWIFT/BIC code instead.

    Using an IBAN Calculator Safely

    An IBAN calculator can reconstruct a full IBAN from your country code, bank code, and account number if your bank’s document doesn’t display the complete string. Treat third-party calculators cautiously: they are not your bank’s verified site, and entering sensitive account credentials into an unverified tool creates security risk. Prefer your bank’s own website or app, and never supply online banking login details to a calculator.

    What Happens If an IBAN Is Wrong or Missing

    The consequences depend on which kind of error you made. There are two distinct failure modes, and they are not equally serious.

    If the IBAN is incorrectly formatted — wrong length, wrong country code, or check digits that fail MOD-97 — the payment is rejected outright or stopped for manual correction. The system catches the error, but the money is still delayed.

    If the IBAN is correctly formatted but belongs to someone else, the checksum passes and the funds move. Outside SEPA, banks generally do not verify that the recipient’s name matches the account holder before crediting, so the payment reaches the wrong account and recovery depends on the cooperation of institutions that have no obligation to reverse it quickly.

    Two IBAN error paths: format rejection vs wrong-account transfer

    What a Mistake Costs

    Per Statrys, sending a payment with the wrong format, or omitting the IBAN where it is required, routinely adds 3-5 business days and USD 15-40 in correction fees. That figure covers the administrative cost of retrieval and resubmission — it does not include what the payment’s delay costs your business relationship.

    International transfer costs also stack up independently of errors. Ramp walks through an illustrative USD 10,000 wire from the US to a German supplier: a USD 35 outgoing wire fee, a USD 20 intermediary bank fee, and an exchange rate 2% less favorable than the reference rate would add roughly USD 255 to the payment cost. The FX spread is typically the largest and least visible line item, which is why comparing the quoted exchange rate matters more than comparing flat wire fees.

    Cost Component What Drives It
    Outgoing wire fee Bank, account type, and transfer method
    Incoming wire fee Receiving bank and account type
    Intermediary bank fee Payment route and fee instructions
    FX spread Provider and currency pair
    Return or correction fee Applied when details are wrong or missing

    How to Recover a Misdirected Payment

    Contact your bank immediately. Speed is the single largest factor in whether funds can be recalled, because recovery depends on reaching the receiving bank before the money is withdrawn or moved onward.

    Ask your bank to issue a recall or return request to the beneficiary bank and to confirm in writing what was sent, when, and to which IBAN. Expect the process to be slow and not guaranteed outside SEPA. As Bertrand Théaud cautions, validate the account holder’s name yourself rather than relying on the string alone — that check is the only reliable protection, because by the time a misdirected payment is discovered, the funds have already landed.

    ISO 13616 and the IBAN Registry: Who Governs IBANs

    The IBAN standard is not maintained by any single bank or country. It is governed through ISO, with SWIFT acting as the registration authority that administers the country formats.

    From ECBS to ISO 13616

    The format was originally adopted by the European Committee for Banking Standards (ECBS), which produced a “slimmed down” version of the standard that permitted only upper-case letters and required a fixed IBAN length for each country. ISO published ISO 13616:1997, which was subsequently withdrawn and replaced by ISO 13616:2003. The standard was revised again in 2007 when it was split into two parts: ISO 13616-1, which specifies the IBAN elements, and ISO 13616-2, which describes the registration authority and the procedures for registering compliant country formats. The current version is ISO 13616:2020, which names SWIFT as the formal registrar.

    A useful historical marker of how involved country-level migration became: in Germany, the Deutsche Bundesbank and the German Banking Industry Committee required all holders of German bank codes to publish the specifics of their IBAN generation format, including legacy bank code handling, so third parties could generate IBANs independently. The first such catalogue was published in June 2013 as a variant of the old bank code file.

    How the Registry Keeps Country Formats Consistent

    The IBAN registry is the official catalogue of countries that follow the standard. It records each country’s IBAN structure, character types, and length requirements, along with an update history and definitions of the terms used in IBAN transactions — and it is the reference banks and payment processors check when validating IBANs or updating their systems. Because BBAN formats are set nationally, the registry is what keeps those national decisions legible to every other participating country.

    Ukraine’s full switchover to IBAN on 1 November 2019 is a more recent example of how countries move from informal IBAN-format aliases to formal participation in the standard.

    Conclusion

    An IBAN is an international bank account identifier used in around 90 countries and territories, but the United States does not issue them. US senders and recipients work with routing numbers, account numbers, and SWIFT/BIC codes instead — and any form asking for a US IBAN has no answer to give.

    Before sending an international payment, confirm the recipient’s name independently rather than trusting a valid-looking string, verify the IBAN format against the country’s registry or a trusted calculator, and keep the SWIFT/BIC code on file for the recipient’s bank. If you suspect an IBAN error, contact your bank immediately, because recovery gets harder with every hour the funds remain in the wrong account.

    FAQ

    Does the United States have IBAN numbers?

    No. US banks do not issue IBANs, and US accounts are not assigned one. Domestic payments use a nine-digit ABA routing number plus an account number, while international payments use the bank’s SWIFT/BIC code. If a payment form asks you for a US IBAN, there is none to provide.

    Is an IBAN the same as a SWIFT code?

    No. An IBAN identifies a specific bank account, while a SWIFT/BIC code identifies the bank or financial institution that holds it. International wires often require both: the SWIFT code routes the payment to the correct bank, and the IBAN directs it to the correct account inside that bank.

    Is an IBAN the same as a routing number?

    No. An IBAN is an international account identifier used in IBAN countries. A routing number is a nine-digit US code used mainly for domestic payments. A US routing number is not accepted as an IBAN substitute in Europe or other IBAN regions, so foreign payers will need your bank’s SWIFT/BIC code instead.

    What happens if I use the wrong IBAN?

    An incorrectly formatted IBAN is rejected or held for correction. A valid IBAN belonging to someone else is worse: the funds move. Wrong or missing IBAN details can add 3-5 business days and USD 15-40 in correction fees. Contact your bank immediately if funds are misdirected; recovery is slow and not guaranteed outside SEPA.

    How do I find my IBAN number?

    Check your online banking account details, paper or electronic statements, or your debit or credit card, or contact your bank. An IBAN calculator can reconstruct the string from your country code, bank code, and account number. US account holders will not find an IBAN, because US banks do not issue them.

    How many characters is an IBAN, and why does the length vary by country?

    An IBAN can be up to 34 characters: a two-letter country code, two check digits, and a BBAN of up to 30 characters. Length varies because each country’s central bank or payment authority sets its own BBAN format. Norway uses 15 characters, while many countries use 22 to 34.

    Do Canada and Australia use IBANs?

    No. Canada uses routing numbers issued by Payments Canada for domestic transfers, and Australia uses Bank State Branch (BSB) codes plus account numbers. Both rely on SWIFT for international transfers. A BSB and account number combined is not an IBAN, even when a payment form labels it that way.